Friday, December 21, 2018

Donohue MLW S2 - Part 3


Another motive power project completed before Christmas. After the SW1200RS fiasco and overcomplicated GP15-1s wiring, it's a nice touch to end the year on a positive note.


The biggest challenge with this locomotive was to make the details pop under the black coat of paint. Pure black is notorious to be one of the worst color for scale models. Smaller details and shapes are buried because shadows and highlights can't contrast enough with the surrounding color. This effect is even worst when trying to photograph the model.


For this reason, the black paint was faded in various ways, using oil washes, diluted acrylics and some powders. But even that wasn't enough to bring details back. A subtle oil pain drybrushing helped to highlight the louvers, rivets, fan and grilles. Then, not yet satisfied, I used my trusty color pencils to make specific details even more visible. At this point, I new I had stepped into the artistic side of the hobby. It was no longer about recreating a specific effect by following a recipe, but to build up effects until they toll the story I wanted.


In the case of the trucks, they were painted significantly a lighter shade than on the prototype, dusted and dry brushed to replicate the dirt streaking effect that happens in real life. It wasn't enough. Once again, using a color pencil, I lightly colored the truck sideframe edges to had some highlight and better define them.


Taking this extra step is generally what makes a model full of life. Surprisingly enough, we rarely venture to that point when creating scenery. Several layers of scenic materials are laid one upon another. Rarely we will use paint, washes, powders and various other tricks in our tool box to add depth and variety in the mix. If I had a single goal for 2019, it would be to approach layout scenery with the same dedication I have for motive power and freight car weathering.


Sunday, December 16, 2018

Atlas GP40-2W CN 9423 - Part 2


Fall 2018 has been an extremely frustrating time to build our locomotive fleet. DCC issues and wiring plagued most of our projects. Fortunately, some projects went soother and I glad to announce CN 9423 is now officially completed.


A generous coat of weathering has been added to the Atlas model, making it closer to the real prototype which was a poor mess back in the early 2000s when it ran over Murray Bay Subdivision rails.


I used my habitual weathering techniques such as oil paints and washes, acrylic paints, PanPastel, weathering powder and several other tricks such as fading, shading and dry brushing. While I'm quite satisfied, I'll note that my peeling/rusting paint effects are a little bit too coarse. I'll have to improve on that, using different methods if I ever want to replicate this interesting effect that was a common occurence on Canadian National locomotives.


And while I'm not 100% happy with this effect, I'm still quite happy with the result. What was a generic RTR model is now a real locomotive full of character. It earned it souls and this absolutely counts to my eyes.


Monday, December 10, 2018

Donohue MLW S2 - Part 2

I wasn't active as much as I wish I could be during the last month. We are still struggling to implement DCC, sound and lighting in a few locomotive projects and it took a toll on our motivation to a certain point.

However, the S2 project is going forward. I did had my doubts about some aspects of this project, but fortunately, a kind soul provided a few hints that were sufficient enough to move the road block in front of me.


I was inspired to take a few extra steps, including a reconstruction of the pilots and replacing the truck sideframes with correct ones. I also put my sanity to the test by trying to replicate the Abitibi Consolidated sticker on the cab. The words had to be pieced together from generic locomotive text lifted from a Microscale Set. By example, Abitibi was made by using groups of letters from a word such as "Prohibited". The red logo had to be handpainted. It is less than 2mm in diameter, barely noticeable. But I felt I had to add this little detail to do justice to the model.


The truck sideframes were from an old tooling Atlas S2. They aren't compatible with new Atlas S2 locomotive and I had to drill holes so wheel axles could fit, then added a pin made from a styrene sprue to secure the sideframe into the truck assembly. I've yet to decide how I'll secure the sideframes semi-permanently. Probably some kind of glue.

Now, it's time to weather this little locomotive and do the final reassembly. The rotating beacon will also be functional. A small pico LED should do the job.

Sunday, November 25, 2018

Donohue MLW S2 - Part 1

Some work has been done on future Donohue MLW S2 switcher locomotive. Already equipped by Atlas with a factory Loksound decoder, this kitbash it relatively straightforward.

The cab roof was modified in the same fashion Merrillees of Toronto did before selling this ex-CP unit to Donohue in the 80s.


The big issues are the truck sideframes and pilots. Donohue locomotive rides on AAR types. Unfortunately, the older Atlas sideframes aren't incompatible with their new tooling. I the past, I always had bad experience trying to fit sideframes on other locomotives. I'd be curious to know how people install them on trucks in a sturdy fashion.

The other problem is the pilot. Footbars were removed and new steel sheets were fitted on each side of the steps. The locomotive frame is cast metal, making it hard to rework without making a big mess and I'm not very fond of the idea to extend the pilot with styrene bits glued on metal. Not very reliable in the long term if you ask me. But I have plenty of time to figure these issues and decide how to handle them.

Thursday, November 22, 2018

FRED - Protecting Your Trains

As our recent blog posts have shown, our efforts have shifted from building a layout to building a railway company. Several small details, not directly related to modelling but supporting it have to be implemented to improve the way we run the layout and FREDs are another small detail taht can make a difference.

Before committing to paint, ballast and scenery, we feel it's better to troubleshoot the layout as much as possible and fine tune operation. If changes have to be done, it will be less destructive.

In 1994, cabooses altogether disappeared from the old CN Murray Bay Subdivision. The new owner - Chemin de fer Charlevoix - was a shortline and had probably no use keeping up with such an old and costly technology. This may have been a contributing factor to my lack of fascination with CFC in its early days.

Replacing the caboose was a FRED (Flashing Rear End Device) which is nothing more than a yellow stick with a flashing red light mounted on the last car knuckle. Quite spartan, but it certainly made history.

A FRED inserted in a standard Kadee  #148 coupler

Replicating a scale FRED is quite easy. Any yellow stick with a red spot should do the job. In our case, we used a Peco yellow insulated plastic rail joiner and added a red square tape on it. The FRED bottom half was painted black to make it less conscupious. The plastic peg normally creating a gap between rails works wonder to keep the FRED firmly anchored into the knuckle.

I'm well aware much more sophisticated options are available. A few manufacturers offer working FRED which are cost prohibitive, out of scale and of no use for operation. Most of these gadgets require to be wired directly to a truck. It means the FRED must be permanently mounted on a specific car, which makes very little sense for an operator. One could argue you can make a much more realistic FRED using pico LED and I would agree, but it wouldn't hide the fact you must provide a power source.

A spare FRED is kept in Clermont yard and D'Estimauville just in case...

I my mind, working scale FRED is a sophistry. What may looks more prototypical ends up being less prototypical. In real life, flashing FREDs are barely visible in daylight, now imagine them in scale and the light becomes irrelevant. In fact, the most important characteristic to reproduce is versatility. FREDs imposed themselves because they were a simple and efficent way to protect a train rear end. The moment your scale FRED can't be moved around, it kind of lose its purpose.

On the other hand, a flashing FRED will probably appeal to people running trains at exhibition or who run some trains which doesn't require switching the last car. In these case, why not! But for simple operators, keeping things simple is bound to be more than enough.

*** Some will remark my few latest posts are all about implementing very crude solutions to improve operation. Does it means we lowered our standards? Not really.  While trying to step up our operations, several ideas must be put in action in a relatively fast way. The goal isn't to make great models at this point, but rather mockup and test them. Improvement will come as seen fit. In the case of FRED or scale brakemans, I'm happy with what we actually use. They aren't great under close scrutinity, but play their role and replicate in a decent way the real things. Being under constant use, it would be foolish to be too fancy since sturdiness is the key feature. And yes, if I find better figures, I'll gladly use them!

Tuesday, November 20, 2018

Putting a Face on Your Layout

Well, for some changes, let's take a look at something more lightheated than the last post.
A typical CFC employee in the mid-2000s with a blue hard hat.

I often wrote here that operating a layout was, at the end of the day, some kind of game. You lay some rules and then you play your game. However,  a crucial aspect of playing this game is tracking down your moves. Sounds and mechanical devices can only replicate some very specific actions but barely take into account the human factor. A big deal of real life railroading is about car and human movements. The closer they can overlap, the more efficient operations are.

For most of us, this overlap never occur because the human factor isn't truly taken into account. It means that without the limiting human factor, we end up being far too much efficient, flipping our turnouts at the touch of a finger the moment our brain process the information.

While I concede replicating a walking human on a layout can never be more than an approximation, as imperfect as it can be, it is better than nothing at all.

No surprise that for years, well-known modellers have used brakeman figures to better get a grasp at what they are doing. At this point, we aren’t not very far from action figures and, I feel, it’s for the best. This is even more interesting when operating in team. Both people start to better understand what they are doing. Little details like protecting a grade crossing, bending a turnout iron, cutting cars at a specific location or setting handbrake start to make much more sense because they now have a visual cue.

I certainly agree most figures on the market are far too costly for their less than impressive quality. Over the last few years, better figures are now available from smaller manufacturers, including ones based on scanned real human bodies.
A crude yet helpful figure
In our case, we’ve come to the conclusion old Bachmann figures depicting 1950s people are still doing a decent job for what they are. One of them – a conductor raising a lantern – has been a favourite of us. His slim nature makes him easy to place on locomotive running board while his raised arm and lantern are perfect to hang him on car handrail. While not realistic, his base is also quite useful when he’s supposed to be standing at a turnout or protecting a grade crossing.

However, it must be noted this guy can hardly look like a railroad worker from the 2000s. For this reason, Jérôme asked me to modernize the little guy a little bit and maybe try my hand on other figures. I worked using pictures of real life CFC employees.  Their most striking and common features were blue hard hat, safety jacket and dark clothing.


Fortunately enough, the old 1950s hats are easy to shape into a hard hat using a file. As for the safety jacket, they are quite easy to replicate because people back then often wore jackets and coats. In our case, Bachmann figures have this feature and it’s only a matter of painting the jacket orange and the sleeves another color and you get it right. Finally, the lantern can be removed all together and replace with a very small brass hook.

Brass rod makes a fairly unnoticeable hook.
Once painted, these figures play their role and set the era convincingly, which was our original goal even if they don't look terrific. That can be address later on with better figures and paint job. At this point, sky is the limit and pushing the concept limits is a matter of personal choice. Many modellers drastically reshaped figures, adding posable limbs and even adding magnets.

Ready to get a coat of Dullcote and one brakement needs a brass hook.

A Few Tricks to Improve Figure Realism


  1. Observe real workers, how they are dress and the color used.
  2. Use muted colors. Don't fear adding white, tan, dark gray and buff to bright colors. In fact, except yellow safety stripes, no out of the bottle colors were used.
  3. Keep your color palette limited: working clothes are generally plain. Take in account the season and climate your layout is set. In our case, early spring means workers are still wearing coats to protect them from the weather.
  4. Figures are really small, uses lighter colors on them so they better photograph. Stay away from pure black.
  5. Carefully replicate small details that makes a difference: black rubber ends on boots, leather lining on gloves, identification stickers on hard hat, etc.
  6. The last one is obvious, pick up the best figure you can! ;-)


Sunday, November 18, 2018

Frustration, Change of Pace and Improved Operations

Improving operation immersion...

You probably all found out my writing output on this blog took a plunge in the few last week. With no surprise, this was due to recurrent health issues and not lack of content. Unforunately, writing in an other language when you're not feeling well can quickly become extremely challenging and it was the case.

In terms of layout construction, nothing really happened since. Trying to wire DCC, sound and lighting in locomotives proved to be a nightmare. The SW1200RS project is also hellish even if it was supposed to be more straight forward (beware of undecorated Rapido locomotives would be my advice).

To be honest, model railroading can be very frustrating when the results aren't matching the amount of effort put into something. Over the last few months, I've been trying to replicate as close as possible locomotives that ran on Murray Bay Subdivision during the early 2000s. I my mind, if you have the right locomotives for a layout it means you're half way toward completing your vision... but maybe I'm somewhat wrong in my claim. It's not my goal to rant here and thus, I won't share these angry feelings clouding my mind, but I think you can easily understand them.

However, I prefer to share the positive outcome with layout operation.

A switchlist, a pen, some keys and a cell phone (to run TrainCrew app)
Two weeks ago, after wasting an entire afternoon on locomotives, we decided to finally inaugurate the "new" layout using JMRI Switch Lists for the first time. Donohue Switcher and trains #522 and #523 were scheduled and everything worked fine.

Using FRED... made from a Peco insulating joiner and some red tape.

It's great to not have to create switch lists by yourself and I'm not saying it for lazy reasons (programming JMRI is everything except easy). After years of operation, my pattern were extremely predictable and I didn't take advantage of several opportunities. I would put together a train and Jérôme could almost blindlessly spot each cars effortlessly. Also, having to work a list made by the computer helps a lot in the immersion process because you don't know in advance what to do with the trains. That's a big plus for me.

Jérôme and Louis-Marie switching Donohue

We worked in tandem and it was great to stop at moments and start planning the next moves instead of being on autopilot due to our biases. To slow down things, we used the TrainCrew application to make sure we took our time to respect the railroad rules. Among many tasks, correct number of handbrakes were applied, air brake tests performed. Wieland, with it's two small sidings was now a really busy spot on the railroad. Not so long ago, running this part of the layout was a matter of a few seconds. Now it takes at least ten minutes. Just setting out cars at Villeneuve is now a significant task. All that made the layout feel really big and in such a manner we really did have the feeling to have worked a full day. Once again, it proves us very little is required to keep some guys entertained for a while. It certainly confirmed me that such a diminutive layout like my Temicouata project will provide a lot of fun. As for Harlem Station, I can already predict operating sessions on that layout will be extremely challenging.

An old trick in the book: using scale figure to better visualize what is happening.
Then, it was decided to finally implement a real office for Wieland. A desk, an old laptop, a banker lamp and an old wooden rolling chair did the trick. We are also eyeing an old desk to complete the area. A printer will also be added soon to print switch lists on the spot. Meanwhile, Jérôme dug out original CFC timetables and employee instructions. These have been valuable to improve our understanding of how things were done back in the days.

Wieland office... up and running

JMRI Operations was also altered to add CN Limoilou yard as the effective staging area. This new location represents the rolling stock storage cabinet under the layout. Far to be a gimmick, this enable us to replicate in a more prototypical fashion how cars were swapped at D'Estimauville between train 522 and train 523.

Miniature padlock used to lock turnouts and derails

Fast forward to yesterday. Following a Facebook advice, I acquired several miniature padlocks on Ebay to secure turnouts, derails and fence gates. They have been temporarily mounted on the benchwork at this point, but will be better implemented later when working on scenery. It looks silly right now, but it had a tremendous impact on how the operating session went on. It drastically slowed down operations, but also forced us to better plan our moves. As a matter of fact, it was impressive how the layout stopped to be a toy and became a real game. Once again, implementing all these little details on a layout can make a real difference...

So, at the end of the day, wiring locomotive is extremely frustrating, but on the other hand, the layout as modified and now operated is far better than what we did in the past. In all honesty, it seems to support the idea that a fun and rewarding layout isn't that much grounded in the prototype or scope of the project, but rather how you approach you concept and put it in action.

Silly? Maybe, but quite useful.

Friday, October 26, 2018

Rolling Stock Standards

With track laying and wiring completed, the layout is now ready for regular operation under JMRI Operations management, or so we could think. Jumping to the next step (paint and ballast) is  enticing, but the real challenge now is to improve the rolling stock performance. Last year many cars were tested (wheel gauge and coupler height) but many new cars found their way in the collection and certainly don’t meet our standards. Meanwhile, we have settled on a weight standard that better suits our needs.

Why the fleet now standing at 115 cars, my new Excel spreadsheet roster is quite useful in tracking them and monitor which ones must be improved.

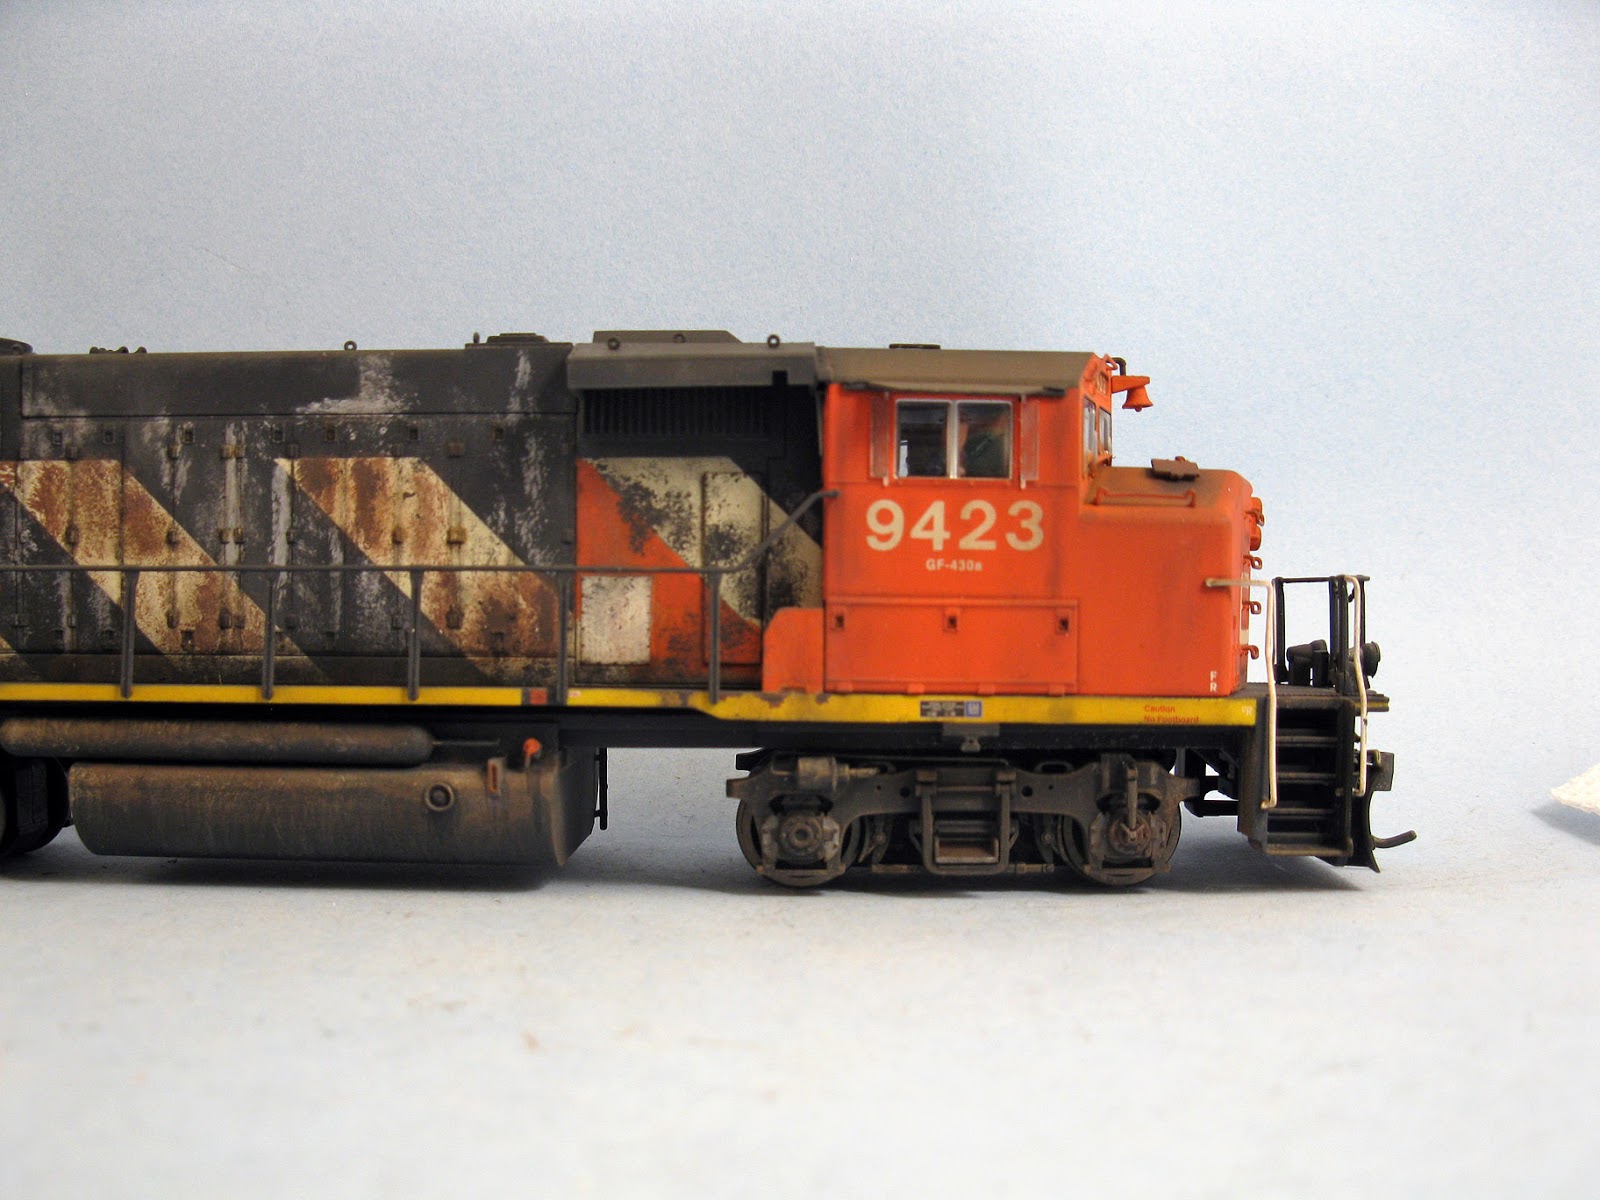
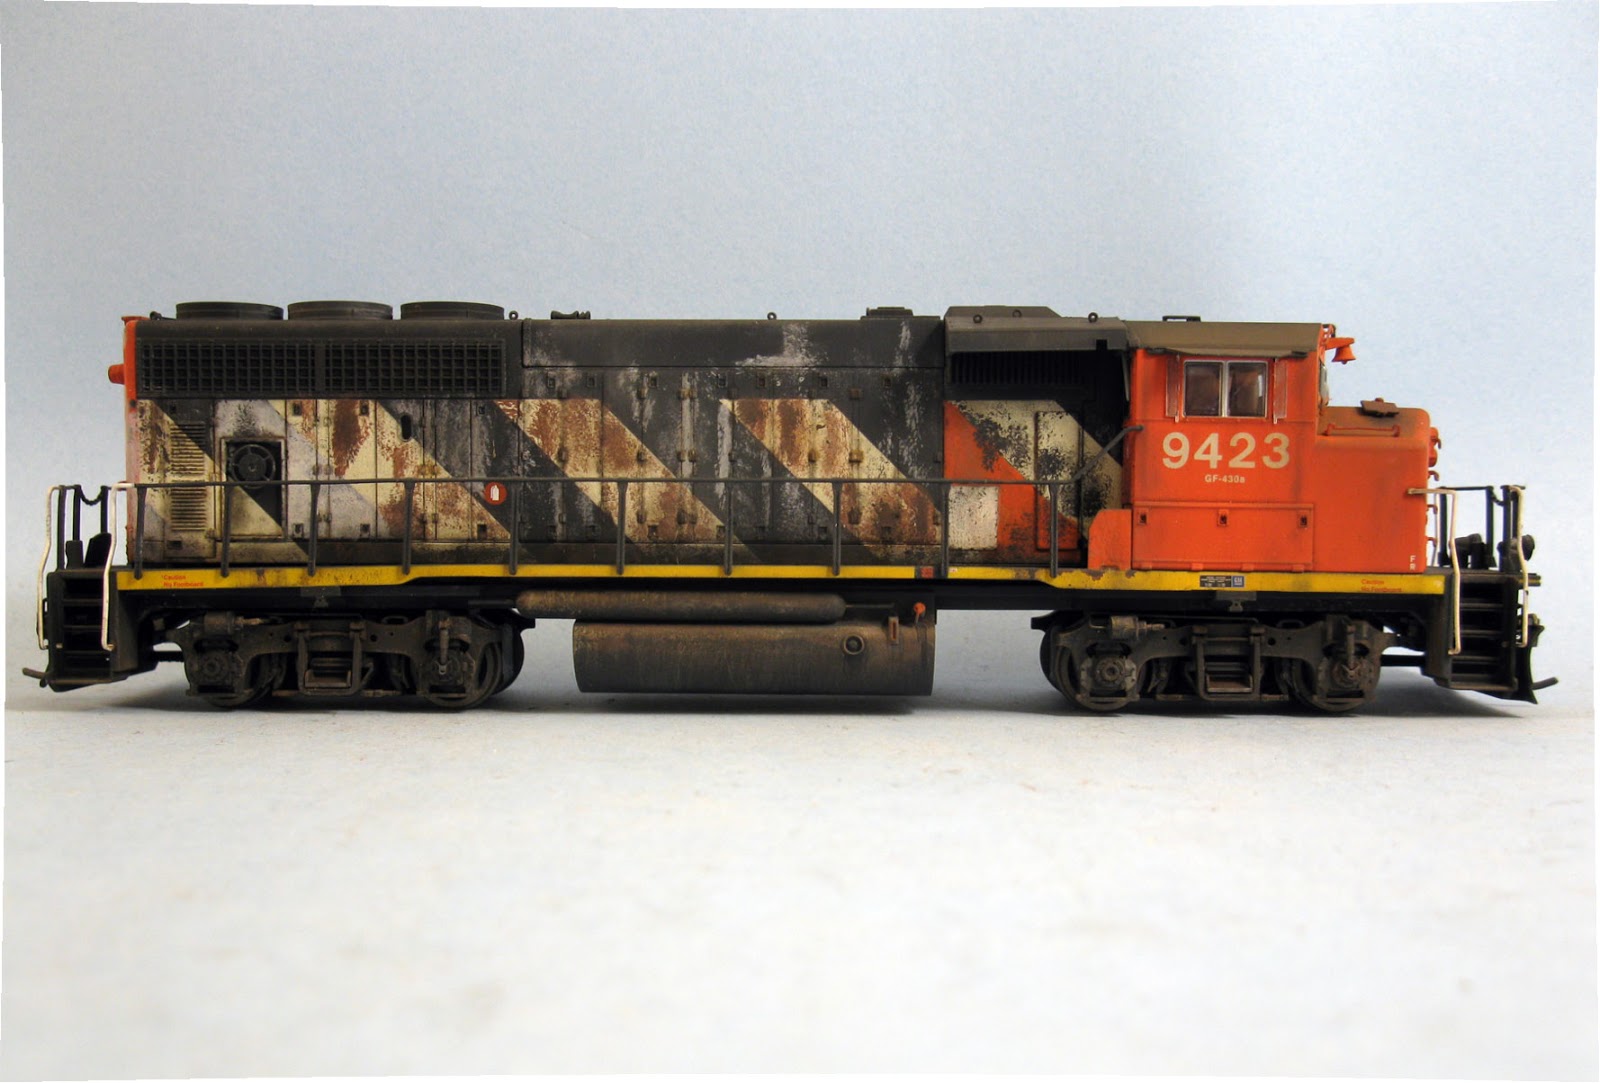
I consider three types of mechanical improvements: car weight, coupler type/height and metal wheel/gauge.  Weathering, correct paint scheme and customization/kitbashing can also be added to this list though they don't directly relate with operation. They improve the realism and immersion, which at the end of the day is our goal since we are replicating a real railway. Many cars only require renumbering or relettering, some must be repainted and a very few ones must be kitbashed. Weathering on all rolling stock is definitely a goal but far to be a priority at this time.

That brings me to the heated topic of car weight. I’ve read a lot about it and came to the conclusion I didn’t care about what most people advocate for because my interaction with trains isn’t similar to most of them. We aren't a club, we don't run excessively long train with large motive power consist, we don't have grades nor tunnels nor helixes. The last three elements are among things I consider vastly overrated in this hobby, but this is my own personal opinion based on my goals in this hobby. Your mileage may vary and I certainly would say "go for it" if these things do matters to you.

That said, once again it’s a matter of finding the right solution to the right problem. Someone running very long train on a multi-deck layout with certainly push for lighter cars while another person with a smaller layout (or no helix) could go with heavier cars. Mike Confalone proved that many years ago and I don't see the need for a debate. You must also take in account that steam locomotives are generally poor pullers, particularly smaller ones while diesel are relatively good pullers. Era and locale will have an impact too since older trains were far shorter than modern ones by several factor. Finally, depending on electronics on board (decoder, sound, keep alive), a locomotive can lose a lot of pulling power too. It's surprising how these gadgets can eat up space and remove weight from a locomotive!

In our case, we tried Mike Confalone recipe a few years ago. It means most cars weighed about 8 oz to 11 oz. This is quite a lot. I liked it a lot and it was perfectly fine, but I must admit it was a little bit hard on our locomotives when pulling trains on the peninsula. The 24 inches radius there was a killer and I expect the new 28 inches radius won't make that much of a difference. Since this area is now a yard, this limitation can quickly become a liability.

But in fact, the real problem is that heavy cars are a little bit harder to handle and store with our drawer system. Many cars must rest on their side with their fragile ladders supporting quite a lot of weight. Not ideal in the long run for fragile cars such as tanks. Also, most people are so accustomed to light cars they have a tendency to not grasp them firmly enough. While not accident happened so far, I'm pretty sure it was bound to happen.


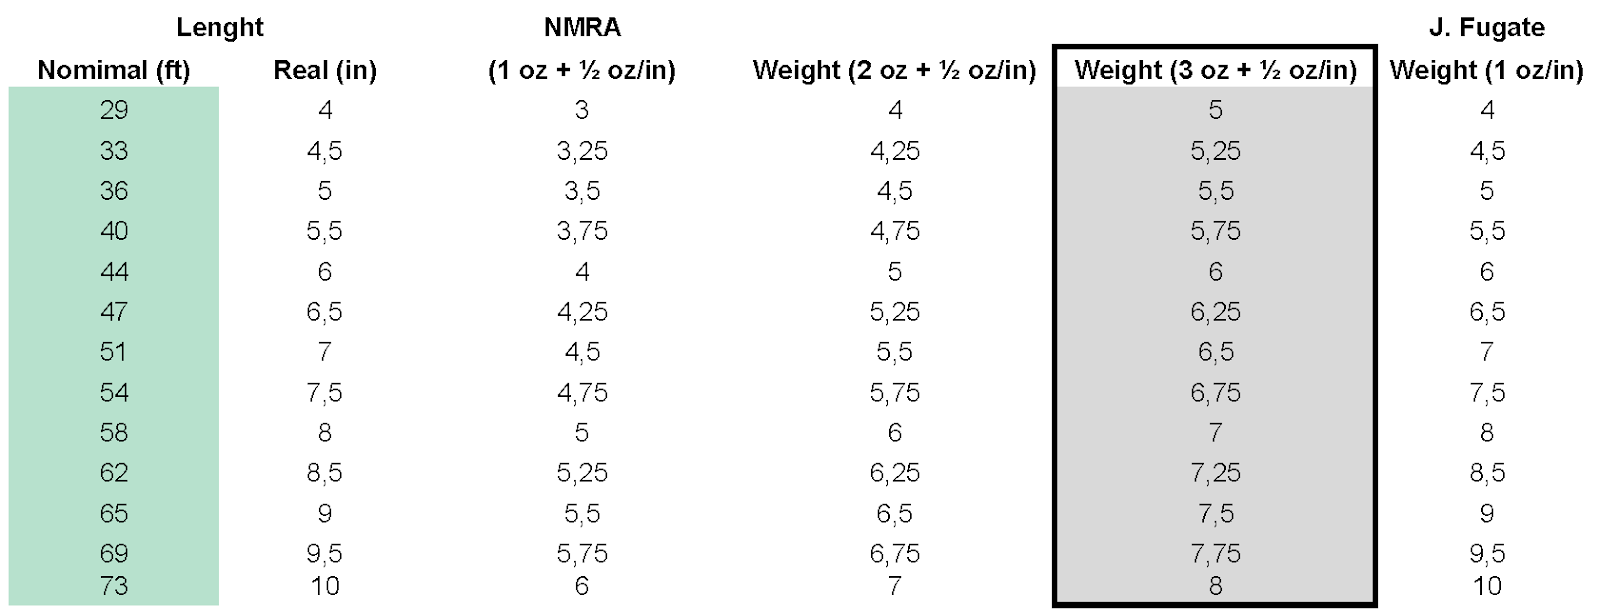
Thus we decided to find a middle ground between NMRA standards and Mike Confalone’s one. Using Excel, I created various options including an altered NMRA formula. The classic NMRA formula is 1 oz. per car plus ½ oz./inch of car length. I tried using 2 oz., then 3 oz. I also replaced the ½ oz. with ¾ oz. or 1 oz. By coincidence, I came close to Joe Fugate’s simple formula of 1 oz./inch.

At the end of the day, I felt Joe’s formula was interesting by its simplicity; however, you quickly end up with high numbers with longer cars. Given most longer cars on our layout are flat cars and gondolas, this is physically impossible to implement with normal means. A 10 oz. centerbeam flat car isn't realistic at all if your loads are removeable.

Knowing that, I decided to determine what would be the optimal weight for a standard 50ft car. I wanted a car that was sufficiently heavy to not roll easily during coupling while being light enough to not crush details when stored. The 6.5 oz. to 7 oz. range seems to be right. It fitted Joe Fugate’s formula but also the altered NMRA formula if using 3 oz. instead of 1 oz.

At the end of the day, I settled on the altered 3 oz. NMRA formula. It makes shorter cars a little bit heavier, which is a good thing, while keeping longer cars within a more realistic range. On the positive side, it means less lead is required to weight a car. Given the price of lead wheel weights at auto parts stores, this is much more economical. Also, when handling the car, they feel heavy, but not to the point you feel it's a brick (which was the case before).

So far, the entire 50ft boxcar fleet have an average weight of 6.5 oz. Now is time to standardize other car types, including very tricky closed cars such as kaolin tank cars and covered hoppers. I may not reach my goal with centerbeam flat cars, but I'll try to go as close as I can.

Sunday, October 21, 2018

Working Manual Switch Stand – Improving a Winning Recipe


When good friend Trevor Marshall, with the help of Chris Abbott, got the idea to use Sunset Valley switch stands to active turnouts on his Port Rowan 1:64 layout, he was on something that had the potential to change the way we interact with model trackwork.

Canadian prototype-based targets

Using his excellent design as a starting point, I’ve decided to push it a little bit further by using the stand switches as a mean to tell my train conductors where they are. As we know, most stand switches are equipped with a colored target that gives us an indication about which direction the point is facing and the siding identification number. It is my belief this feature can be easily implemented on a Sunset Valley switch stand to improve safety and awareness about turnouts.


Original SV switch stand with new parts

Indeed, the large colored target would be an efficient visual device to tell at a glance how tracks are aligned. Furthermore, by adding the track name on the target – per prototype procedure – it helps the operator to know where he is without resorting overly blatant contraptions such as miniature track plans or various labels on the fascia. Given the JMRI switchlists are built using the track numbers, it will be easy to know where a task must be performed.


Modified SV switch stand ready for paint

Jérôme also suggested bringing things much closer to the prototype by replacing the target with something much more in line with Canadian National practices. Modifications to the Sunset Valley stand switch are minimal and only require removing the old round target and replacing it with an appropriate CNR one. I cut mine in a 0.81 thick brass sheet (the same thickness used by Sunset Valley). Also, a small disk and square were also crafted in brass and soldered on top of the shaft to better indicate the selected turnout route. The disk and square are assembled together using half length slots. Small slots are also provided on the switch stand shaft to provide a sturdy joint.


Targets are painted in an appropriate color with spray can enamel paint and self-adhesive or dry transfer 3/16” letters applied to complete the stand switch identification. A good coat of varnish protect the finish.

Completed switch stand with siding identification number

Interestingly enough, when browsing again my photo archives, I found out that main line switch stand handles are painted in yellow to enhance their visibility in Clermont yard. While paint wouldn’t make a lot of sense or stand out a lot, Trevor Marshall pointed out in his article he added a rubber sleeve on the handle so that an operator using this particular switch would instantly recognize it as a specific function due to the change of texture. I suspect a chunk of shrink tubing could do the job nicely.


Turnout diverging route selected

This is basically a test and I’ll be honest here, my fellow club members felt I was wasting my time (and theirs) on a gimmick. I was glad to find out Jérôme did like the concept once implemented. While this is a neat idea, we feel it would be better to only equip turnouts in Clermont. However, we are not sure about implementing this system at Donohue or Villeneuve right now due to the prohibitive cost of Sunset Valley stand switches and the extensive work required to modify and install them. It also takes up some space and Villeneuve benchwork has several desks and tables under it... Having about 4 or 5 switch stands cluttered together near a yard throat could be a serious space issues. We will have to think about it for a while.

Without taxes and shipping cost, each turnout control system cost about CDN$45 or US$34 (including Bullfrog turnout control, SV switch stand and brass plate). Certainly great for smaller layouts or simple designs, but definitely prohibitive. With 26 turnouts on our layout, that would be a sizeable investment and I feel it is better to add these turnout controls where they can make a significant difference: the main yard. I feel having at least this specific location prototypically operated would be a big step forward and the addition of working derails on the sidings will also add another layer of realism.

Friday, October 12, 2018

MLW RS18 Madness - Part 19

Rebuilding Clermont, my daily job, university classes and urgent renovation work on my house have kept me quite busy and drained my strenghts over the last few weeks, so I'll take things easy over the few next weeks. Fortunately, remaining modelling work is less demanding and can be done in a more relaxed manner.


During the last week end, I started to weather NBEC 1816. After giving some thoughts about this task, it was convinced to approach this complex matter in several steps instead of rushing it in one day.


Among the first step was to add paint peeling and rust effect. Indeed, according to prototype pictures, paint was flaking off badly on 1816, particularly on the ends and battery box panels. It was also evident the exposed layer of rusted steel was covered in dust and grime. This is why I elected to do it as a first step prior to any fading or wash.


Using an extremely fine paint brush and thinned down dark brown acrylic paint, each rust spot was replicated. I went a few extra steps to ensure each rust spots was as close as possible as real. It took about 2 hours, but it paid off because what you get is a true 1816 and not some stand in.


When done, I used some very thinned down CP Action Red paint and added red spots on the black sill. On 1816, the black paint was eroding, showing the red color underneath. I felt it was a really nice effect seldom modelled that was well worth my efforts. The trick was to build up the color with several thin layers instead of coating heavily the model. You probably recall that when I painted the locomotive, I already airbrushed some red in these areas to feather the future eroding paint effects.


Also, I discovered some decals were missing on my model. Several warning labels and white dots were applied to the 1816's pilots. Fortunately, these labels are included with Microscale CP Rail diesel locomotive decals. Now, only the NBEC initials need to be added... I'm still waiting to get some decal in the mail.

Finally, classification light lenses were made with blobs of paint. Green and Red lights are old Testor metallic enamel paint. The trick was to not shake the bottle so metallic flakes would stay in the bottom and the translucent paint would sit on top of it. Enamels are great for this purpose because they won't dry flat like acrylics but will make semi-circular lenses.

The white class lights are made differently. A bright aluminium acrylic paint was brushed where the lenses would sit. When dry, I took some gloss medium (in this case Micro Gloss) and tinted it with a hint of black. No need to put too much black, just enough to look slightly dirty. When applied and dry, it creates a characteristic glass translucent effect typical of uncleaned class lights.


Tuesday, October 9, 2018

Rebuilding Clermont – Succesful Mission

It took about 7 sessions of work over a little bit more than 10 days to completely rebuild Clermont and Wieland. It was indeed exhausting, with several 10-hour long days including frustrating steps backward. But it is done and better than ever.

I certainly had my doubts when I proposed this major redesign, but the improvement in terms of train movement can't be denied. From a scenic perspective, it is certainly less glamour than a mainline nested between a cliff and a mighty rive, but it can have it's merit. Maybe the most unusual feature of the yard is being on a curve. Generally, people will try to build them as linear as possible. This is, indeed what common sense would tell us. More than once, you end up with curved yard ladders that are hard to operate due to couplers misalignment. My guess was that it was far better to put our turnouts on almost straight tracks and curve the yard itself where no coupling generally occur. This gave us the opportunity to use #8 and #7 turnouts without compromise or resorting to S-curves.

The new yard completed

However, rebuilding the layout in such an extensive way required some sacrifice. But at the end of the day, it was a good decision to cram as much work as we could during the last week because we estimated this would have taken at least 2 months under our habitual schedule. It would have been unacceptable.


Our last rebuilding session yesterday went smoothly. Due to the new roadbed, installing the track only took 5 hours and we got no particular issue during the process. Also, it seems our yard throats are better laid than the first time we did it a week ago. The smooth transitions ensure reliable operation with longer cars.


As for next week, we will put priority rewiring the layout. It shouldn't be too hard because bus wires are still in place and only new feeders need to be installed. Once done, it will be time to operate once again but this time with MRI switchlists and fine tune everything before even thinking about scenery.


But scenery will soon have to be taken in account and I can already say the peninsula will see quite a few drastic changes more in line with the prototype. For the moment, it has been agreed to work scenery from Wieland toward Donohue. I’d really like if we could start fleshing out Wieland by Christmas, but we will see in due time because some other tasks are more urgent.

Roadbed height variation per prototype

Among these tasks, we are planning to clean the room and get rid of unwanted material. We own several items that are no longer of any use for us and they clutter the space. Some will have to be simply thrown in the dumpster, others will probably be sold or simply given to whom can have a use for them.


Meanwhile, I’m a little bit overwhelmed by the sheer amount of projects accumulating on my workbench at home. Several locomotives, completing woodchip car 3D design, working switch stand for turnout control and several others.