Saturday, February 18, 2023

Weathering in the Steam Era

We generally have that idea that color reference pictures before the 1950s are inexistent when dealing with car weathering but as countless Morning Sun books and internet photo archives show us, it's far from being right.


Lots of Autochrome (the commercial name for color photographic plates used in the early 20th century) pictures survives and trains were of major interest to photographers. Jack Delano's pictures are for the right reasons extremely famous and should remind us the the world in black & white never existed.


Over the last year, I've been looking at Jack's and others' railroad yard pictures. They are often shot from a raised embankment, a roof or an overpass which means you have an excellent look at the roofs. This morning, by sheer luck, I stumbled upon an October 18th, 1932 photo of the West Bottoms and Kansas City Stock Yard by Frank Lauder. Compared to Delano's, it's a plain and boring picture which doesn't share the highly artistry associated with Jack's work. Even the colors are that well preserved, but it does show an important thing: the car roofs.

West Bottoms and Kansas City Stock Yard, October 18th, 1932 (credit: Frank Lauder, Kansas City Public Library)

Two things strike me the most. First, how washed out the freight car paint looks to be, covered in dust, soot and rain. They are no longer vibrant, but seen through a filter of dirt and UV fading. We often see modellers weathering their cars and as they move forward with the steps, it just makes it look darker and darker. In my mind, this is a mistake for two reasons.: First, color doesn't scale and small object should always be painted lighter than their real prototype to compensate for that. Second, weathering add layers of darker washes. They alter drastically the car color, meaning we should fade them much more than anticipated to take into account that filtering effect. This is a point Martin Kovac, the armour modeller, often stresses out. You need to make things much more drastic because weathering darken colors and tone down the contrast. This is a reason why I nowadays add a lot of white and buff to my initial color. I've also restarted using drybrushing to highly details that will be, eventually, covered in darker stuff. People who paint stonework knows how you can start with the most garish colors and bring them together later on with washes, filters and dirt. Ryan Mendell, at Binbrook RPM two weeks ago, called it the "rainbow effect" because it looks so silly when you start, yet makes sense at the end of the process.

This Accurail reefer has been drastically faded with white and buff filters

My second observation is about horizontal surfaces such as car roofs and tank tops. Look at them in the picture. They are covered in coal soot, yet they are the so light colored they almost look off white. You can barely discern the original red oxyde or brown paint, yet they are not black or dark gray. Like the previous effect, light plays a role in that perception. Horizontal surfaces receive much more sunlight than vertical ones, making them look brighter. Just like the albedo on the Moon surface is in fact very dark since it's mostly made of basalt, but direct sunlight over the powdery surface makes her look white at night. The same happens with our cars. And the powdery observation too! Indeed, soot is a powder than collects on horizontal surfaces and dirt and dust get mixed with it. It's no longer dark grey, but rather a light grey color. For this reason, I've recently started to paint my car roofs much lighter than the car sides to help me capture that effect. Not only it looks better and more realistic, but it also gives more depth to the car itself, it looks more 3D even if it sounds absolutely silly to word it like that. At the end of the day, it enhances that impression of looking at wood or steel instead of plastic.

The wooden roof on that car is noticeably lighter than the sides


Friday, February 17, 2023

Stanstead - Fields of Gold

The title of this post is indeed recalling the old Sting's song Fields of Gold which my music teacher in first year of high school (which is first of middle school elsewhere in the Anglosphere) had chosen  for us to practice recorder. It didn't go well and I can recall we didn't share a natural bond is I can say so. I switched to the art class mid-year and stayed there until graduation... which was probably a better fit for me as I'm atrocious at playing any instruments.

However, the subject today isn't about music but rather planting grass on a layout. The common assertion is that you need a static grass applicator to get good results. There is this deep rooted belief that you lay a lot of glue and cover an area with static grass. Be it the same color or a blend, you do it carpet style. On the other hand, talented people, such as Luke Towan have popularized the idea you should create random patches of glue, use one mix on them, them redo the process again and again with other mixes and length. This is also basically how Gordon Gravett describes things too in his excellent scenery books published by White Swan in Great Britain. However, like with the recorder, it seems I'm not good at playing Fields of Gold with a static grass applicator. I never get that lush aspect seen in publications. But, since I'm not fighting against a stubborn music teacher, I know I have both time and other ways to reach the goal.


Years ago, I started applying grass with my fingers, pinching a bunch of fibers between my thumb and my index and dabbing them into random patches of glue. I would do that to create color accents around some features before carpeting the entire area later with the static grass applicator.


After many conversations with Chris Mears, I've soon ditched the static grass applicator and simply continued with the manual method. At first, it seemed counterproductive, but truth to be told, I was able to cover an entire field (let's say 4 feet by 4-6 inches) in about one hour. Since then, I've completely abandoned the static grass applicator for Stanstead and I'm glad I did.


Using my fingers, I can control every patches of colors just like an artist painting a landscape. There is more variation in density, length and colors. After a while, I go back and dump more material to build up texture. It may be small branches, rocks, ground foam or dead leaves. Anything goes on. So far, it's the only way I have found to recreate that beautiful mix of greens and straw colors you can find on late summer and autumn fields. It can also be used when gluing patches of basket liner mixed with static grass and any other scenery material to be honest.


Also, the method is much more relaxing, less messy and extremely enjoyable. You can work small patches as you see fit and come back later. You only have 15 minutes, then do some clumps. One hour and you have already two layers! It's is an additive process than leaves time and space to build up the scene gradually. Sure, it's not the 3-n-1 solution most would like to see in action, but I think it's scalable whatever the size of a layout you want to build.

Tuesday, February 14, 2023

2023 Binbrook RPM Post-Mortem

What we call the Binbrook RPM is an unofficial event hoster by fellow modeller Hunter Hughson in early February and surrounding his anniversary. Nothing fancy, but simply a wholesome gathering of like-minded souls. This year was particularly specially because it was the first meet after a 3 year hiatus due to the pandemic. Fortunately, almost everybody was able to find some time in there schedule and people gathered from all corners of the country with some special guest from far away in the United States.

I would have loved to travel by rail, but this year, the unforgiving VIA Rail schedules made it almost impossible. On Saturday morning, with Will Lawrence and Chris Mears, we visited a few hobby shops around Hamilton, including Otter Valley Railroad, Paris Junction Hobbies and Dundas Valley Hobby. The amount of time spent on the road was a testament to the fact hobby shops are now a few and afar. I dubbed that journey the Great Southern Ontario tour has it was as much as I can tell a disguised visit of hundreds of acres of farmland. While visiting these shops, one thing struck me quite a bit: I had nothing to purchase. Some could say I could have purchased supplies, but I didn't know what I really needed. With my approach to the hobby shifting more and more toward customization over acquired brand new locomotives, I've come to the point I'm no longer a good customer for a traditional shop. The same happened at the Springfield show too.

Later in the afternoon, we gathered at Hunter's place for the RPM. In the previous event, it was much more formal, but this time, people just chatted over models and dinner before we really committed to discussing modelling. I suspect the need for social interaction was probably was most of us needed. I won't name everybody that partake in the event since I will certainly forget a few names and I apologize in advance.

Hunter started by presenting us the two Athearn Ford trucks he modified for Penn Central and Conrail (?). These were the subject of a recent article in RMC and it was great to see them in real. What makes these models interesting is the simplicity of what was done to improve them greatly. By simplicity, I don't mean it's easy, but that the process is elegant and not convoluted. It's something that is achievable for most and which deliver great results.

Chris van der Heide presented a few Algoma Central drop bottom ore gondolas he has designed and 3D printed. Many dozens are currently printing. He explained to us how he was able to design a single part body that could be altered to represent various modifications done to them over the years, including different extensions. His models were both accurate, well printed and easy to assemble. Lots of thoughts have been poured in their design and it shows. Can't wait to see them painted!

Hunter's neighbor, a modeller who specialize in freight car weathering presented a few examples. While he use many different techniques, he wanted to explore more using only acrylics to streamline the process. He also shown us how silver color Sharpie pens can be extremely useful to replicate peeling paint on galvanized steel. Light weathering and dullcote gives the ink a realistic look that blends together well with the car.

Will Lawrence presented several models, but his work on a RSC-14 and a Cap Breton RS-18 were the most fascinating ones. Will still continue to convert Atlas RS11 in various MLW products. As he stated, the drive is excellent and they are easy to rework. He also does the same with Proto 1000 RS-10 and RS-18. According to him, the notorious height discrepancies are barely noticeable and if you don't mix them with Atlas locomotives, you will never notice it. He loves the drive and the detail quality, thus can overlook the inaccuracies. I do agree with that statement. 

Robin shown us is current effort at replicating a SW1200RS both in S scale and in O scale using an Athearn drive. He also use 3D printing to build these models and experiment a lot with part design. We only saw his work in progress, but it's quite promising... I also tried to convince him to model Chemin de fer Lanaudière in S or O scale. He's after all another fan of Quebec small branchlines.

Chris Mears, once again, decided to surprise us with something most people wouldn't do. He shown us two scenery and track mockups he made recently. As always, his obsession with colors, textures and space makes it a fascinating exploration. Basically, he's trying to figure out how to model a small layout that can be displayed in a book shelf. Using 1/2" thick foam, napkins and various ballast, tile grout, static grass and jute rope, he's developing a technique to create scenery without having to wait for material to dry. No clay, no plaster, no fillers, just the good stuff. It may sounds cheap, but the results speak for themselves and it's probably the most amazing grassy track I've ever seen. He also presented us his friend James Hilton's book, which he helped to edit and contributed some material. Having discussed with James in the past, I can confidently say it's one of the sharpest minds I've encountered in this hobby.

Finally, I think it's Ryan Mendell that summed up the meet with the most accurate remark. He mentioned that since 3 years, most people had changed their approach to weathering. We no longer care about "accurate" freshly painted colors and start weathering before applying decals. Are we witnessing the influence of armour modellers? Most probably.

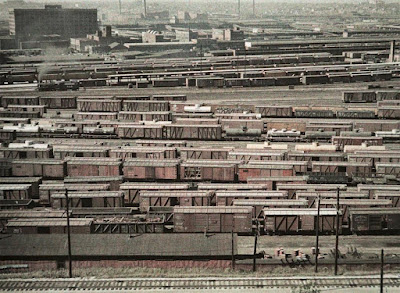
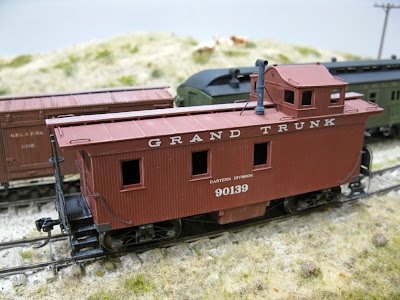
Pierre Oliver's layout shows that a lot can be achieve with simple means

On day 2, the gang moved to Pierre Oliver's house in St. Thomas to have an operating session on his excellent Southern Pacific Clovis Branch between Fresno and Bryant circa 1951. This is a huge basement layout, yet depicting a very mundane and small prototype. Design is by Trevor Marshall and it has, to some extent, a similar modus operandi than Port Rowan did. Pierre is a car builder and likes operation, thus the layout has a very simple level of scenery. However, since southern California is quite arid, it fits well and what is there is good enough to immerse visitors into the site.

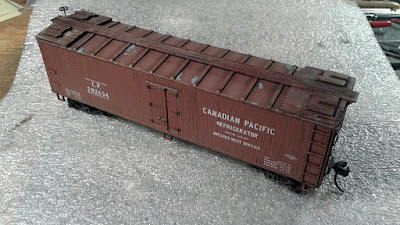
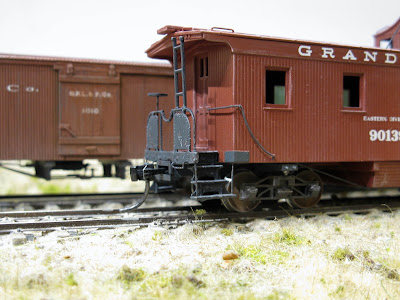
Pierre's layout is an exercise in simplicity

The layout is also commendable for having almost every single piece of track that existed on the prototype. No compromise, except the staging yard. Thus, when you operate, you get the full experience. It's also a fantastic prototype because it served the citrus and wine industries. So all these cool PFE reefers and wine tank cars are at home!

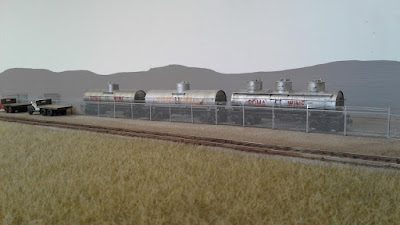
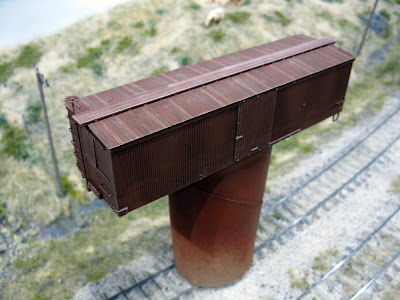
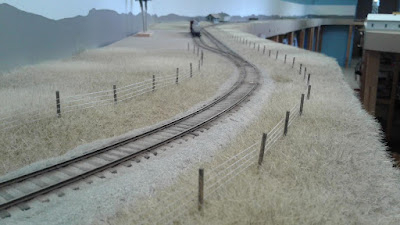
Wine tank cars in their prototypical context are a delight

While the track plan is simple, operations can be tricky due to a few moves that are required to perform the tasks. It's an interesting balance, because it's not a switching puzzle, though you have to think wisely before moving. I ran the local freight with Will Lawrence and it took us almost 3 hours to finish the job. At the end of the day, I felt like I worked on the real railroad. I think it convinced me to keep thing much simpler on my own home layout. That said, I think the Clovis branch is a good example of a layout designed for many operators, but that can work most of the time for a solo operator. Also, it's sheer simplicity makes it possible to build a very, very large layout and yet be able to scenic everything in a short time span. Pierre mentioned it took him about 1 years and a half to get everything up and running with a first pass of scenery. I don't know a lot of layouts that can boast that.

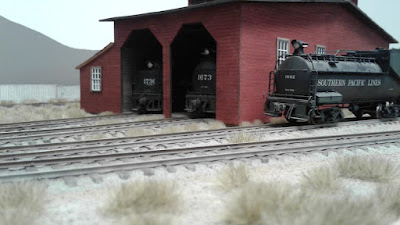
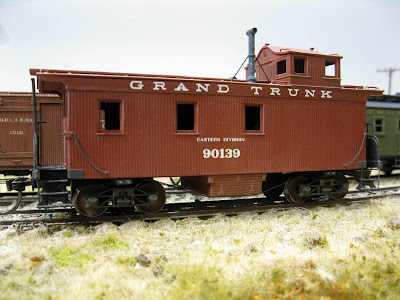
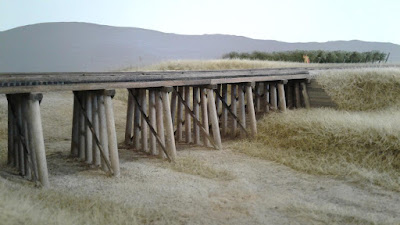
After a long day of work, it's time to go back to the roundhouse

Finally, we had a nice dinner at Pierre's which concluded a nice and relaxing weekend. On the morning, I rode Go Transit from Hamilton to Toronto as an enjoyable way to take my flight at Billy Bishop Airport. Once again, I'm reminded by the generosity and hospitality of my hosts which can hardly be described in words. In current years, that genuine display of warmth is worth much more than anything.

Wednesday, February 1, 2023

Grand Trunk Railway Caboose

Sometimes it takes times to come around and completed (or almost) a project. The GTR caboose was a novelty project of mine to try something old time, barely modelled and cool looking. Data was gathered from old car building encyclopedias, scale drawings in magazines and examining countless historical pictures. Several attempt were made, including many that failed. I try to over engineer the model as if it was plastic only to discover 3D printed resin isn't forgiving to structural stress during the printing process. 


Then, I discussed the project with Pierre Oliver of Yarmouth Model Works, who prompted me to model different cupolas to replicate several other cabooses that were based on the GTR original drawings. After a while, I let the project sit on my shelf, forgot about until two months ago when it became quite obvious I should get some sense of closure.


I fired up the printer and produced the missing parts. I also printed the trucks in one part, which worked quite well. Some brass rods, phosphore bronze grabiron, a coat of paint and weathering and voilà. I even used my custom decals to letter it.


At the end of the day, it was a fun project. It's both original yet down to earth. A lot of thoughts were poured in it, but it was well worth the effort. It was a pleasure to see it take shape under my eyes and bring to life something that nobody still alive has probably ever seen. It's probably what I like the most about old time model railroading, it brings to the real world artefact of an other era that have long been gone.