Sunday, July 20, 2014

The Bridge on the River Malbaie - Part 9

Yesterday, we integrated the future photo backdrop into the scene. It was just a mosaic printing from home printer, so colors are a little bit faded.

I must admit the photo is particularly well integrated with the actual scene. I was afraid there would be perspective issues, but in fact, it works far better than I thought.


We also made a quick mockup of the mill loading area reusing already built structure. The joint with the photo backdrop will have to be addressed, but that shouldn't be too hard to do with some vegetation.


Another area of concern was the parking lot. Louis-Marie visited the place last week and found out the parking lot isn't that much below the track level, about the height of a pickup truck cab. Thus, we decided to replace the fascia and raise the parking of 1-1/4 inch. Looks better and it gives more space for parking cars.


Wednesday, July 16, 2014

The Bridge on the River Malbaie - Part 8

I'm actually in the process of photoshopping several pictures and merging them into a credible photo backdrop. Not an easy task, but still very interesting.

Tonight, I worked on Malbaie River backdrop. I had a few pictures which made a nice panoramic view of the river seen from the street bridge. However, I had to mirror the scene, Donohue and the railway brige were visible in the background too and were erased. Instead, I tried, using several pictures, to make the river disappear in the background with distant mountains suggesting a wide valley.

Original scene
Also, the river was extremely agitated. I needed to make it looks more like a calm stream. Finally, the shore didn't fit with the layout. The right shore was lowered and the trees modified. It took about 6 hours to complete the backdrop.

Photoshopped panorama

I'm quite happy with the results since many iconic buildings that setup the places are there. Placing real structures on the layout there would be ridiculous hard as there's at best 6 inches from the track to the wall.

Backdrop digitally inserted on the layout


To scale the picture correctly, I inserted it in a photo I took of the bridge. This will help me to find the right scale for the backdrop and print it correctly.

Tuesday, July 15, 2014

CN Woodchip Gondola - No Easy Way Out

Today, I received my order from Shapeways. Many mixed feelings, but I knew perfectly in what I was venturing and decided to experiment.


First of all, the material. Since is it a car that will see a lot of operation, I wanted it to be strong enough. The White Strong & Flexible (WSF) material was a good choice in that respect. However, and I knew it, it would be rough to the touch and need a lot of sanding.


Replication of detail is inconsistent. Many small details are well rendered, but for no reason, big holes are where there should be material to attach the trucks.


In fact, it needs a lot of sanding. The material is indeed strong and hard to get smooth. I suspect only surface primer will do a decent job. I'll take a try at take next time I can.


All in all, I'm happy to have tried this. But let's face the fact, just preping the surface is gonna take a lot of work, maybe more than just building in from scratch in styrene. Also, the cost is still high. Printing this large car in better material (yet more brittle) would cost over 150$, which makes no sense.


For these reasons, I think it is not advisable, with the current technology, cost and market to print large cars. Since the model is "easy" to build from styrene sheets, I think it is the way to go at this moment. Sanding require too much work and details aren't crisp enough.

However, if I build a large fleet of these gondola, I'll probably print the underframe with truck bolsters, brake apparatus and coupler boxes. It is one place were printing would save lots of works and where I don't car if the model is a little bit rough.


That said, the model looks great on the layout! Definitely a nice prototype to replicate.

Monday, July 14, 2014

Freight Car Roster

To keep things easier to follow, I decided to move these informations in a dedicated post.

*** Be aware information will be updated irregularly to reflect the car fleet.

**** Last Edit: July 20th, 2014

To be part of the active roster, a freight must be built or reshopped prior to June 1983.

Donohue Clermont:

Owned:


-7 P1K 50' NSC Newsprint Boxcar in CN, CV and DW&P scheme
-2 Walthers FGE 50' boxcars in CN scheme
-2 Atlas 50' NSC plug door boxcars in GTW scheme
-2 Intermountain 10,000 gallons tank cars in CGTX scheme
-2 Tichy 10,000 gallons tank car (CGTX and CIL)
-4 Atlas Kaolin Tank Cars (Freeport x2, Thiele and J.M. Huber)
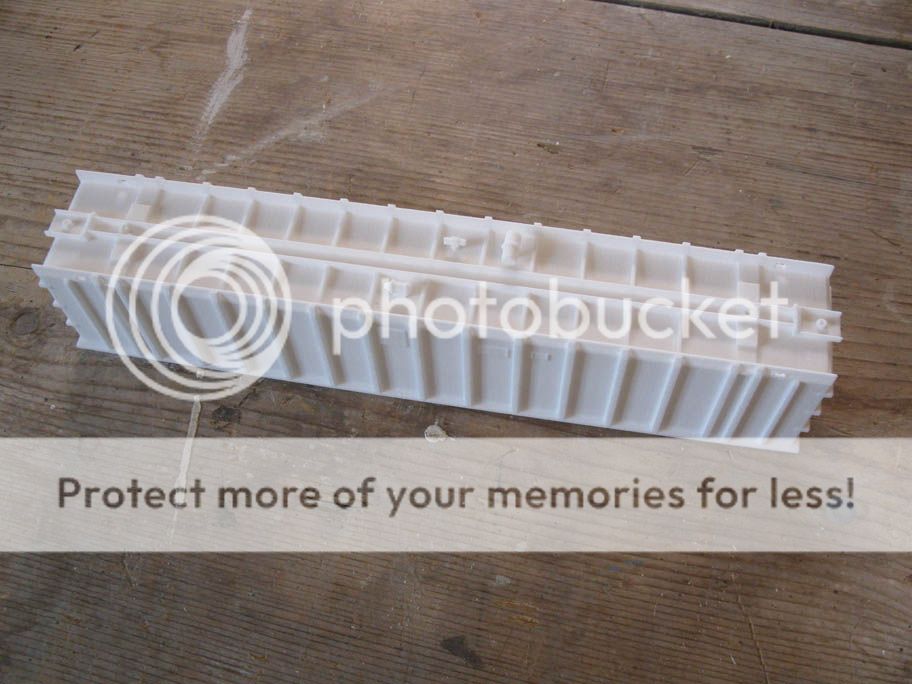
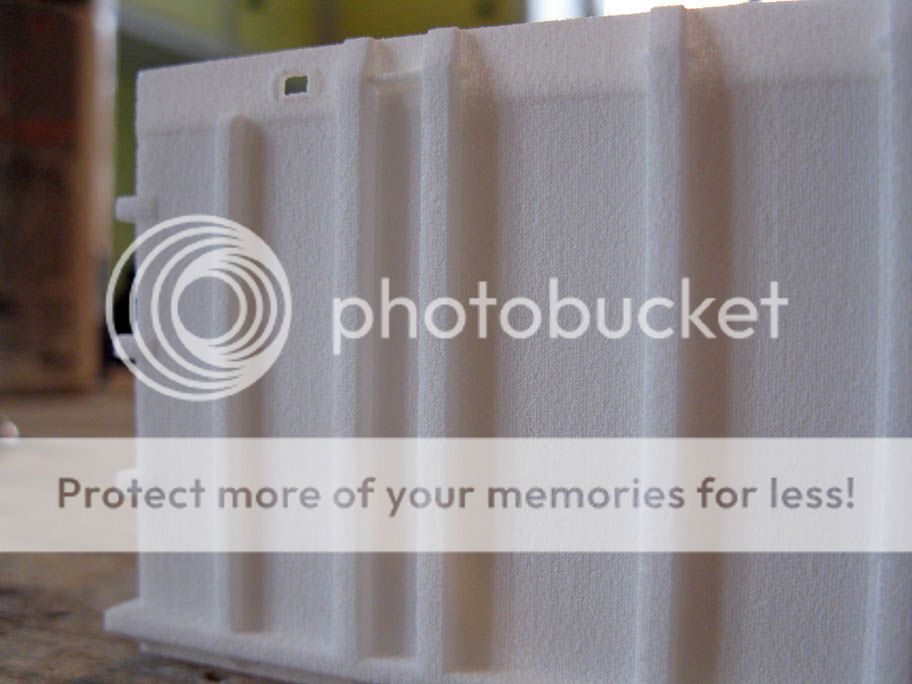
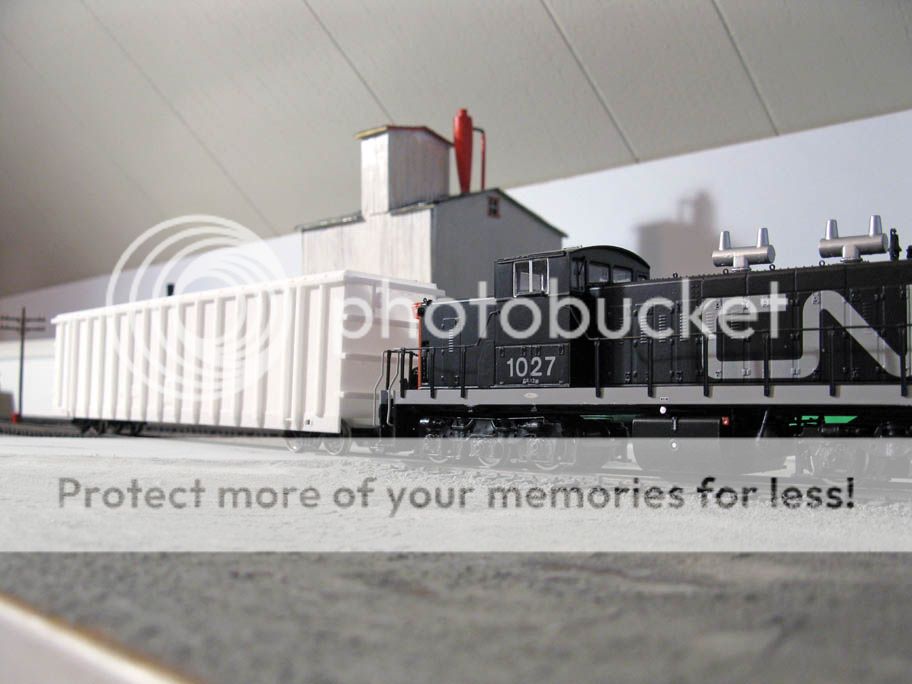
-1  60' woodchip cars in CN Rail scheme (unpainted 3D prototype from Shapeways)

Needed:


-5 60' woodchip cars in CN scheme (scratchbuilt or Shapeways)

Dominion Textile:

Owned:


-4 exterior posts 50' boxcars from Atlas, Athearn & Roundhouse in CN scheme
-3 exterior posts 50' boxcars from Atlas & Roundhouse in Railbox scheme
-1 50' boxcar from P1K in Mo-Pac scheme (to be repainted)

Needed:


-1 Roundhouse 50' exterior post boxcar Southern Railway scheme (cotton)
-1 Intermountain FMC Double Door 50' boxcar in Cotton Belt scheme (cotton)

Ciment Saint-Laurent:


Owned:


-8 True Line slabside hoppers in CN block lettering scheme. (I'd like to acquire a few of them in CN wet noodle too)
-3 Procor Pressure hopper car in CN scheme (in post 1994 white scheme, to be repainted)
-4 Procor Pressure hopper car in CN scheme (grey scheme cars)
-3 Accurail 3-bay hopper ins CN small block lettering scheme for gypsum service
-12 Accurail 3-bay hoppers in CN wet noodle scheme for gypsum service
-2 Bowser 70-ton coal hoppers in Pittsburg & Shawmut scheme for coal service
-4 Stewart 70-ton 12-panel coal hoppers Pennsylvania scheme for coal service

Léo Cauchon sawmill: 

I have everything I need, however, this industry will be simply staged.

-2 Walthers 50' NSC pulpwood flatcars with bulkhead (CN & DW&P)
-1 Walthers 72' centerbeam flatcar (CN)


Miscelleanous freight cars: 

Clients include various team tracks, General Cable in Clermont, Federal Pier in Pointe-au-Pic federal pier and less common commodities to already listed industries.

Owned:


-1 Bowser 70-ton coal hopper in CN scheme
-1 P1K 52' gondola in CN scheme
-2 Intermountain 8,000 gallons tank cars in ex-British-American scheme (to be assembled)

Wanted:


-1 Rapido 52' gondola in CN scheme (facultative)

Non revenue cars:

Owned:


-1 CN wood caboose in CN wet noodle scheme (True Line)
-1 Walthers Difco Dump Car in CN scheme
-4 kitbashed Bachmann Drop Bottom Gondolas in CN block lettering scheme
-1 Atlas Hart ballast hopper in CN scheme

Needed:

-1 Pointe-Saint-Charles caboose (True Line - Pre-order) replacing my worn off Sylvan resin model
-1 snow plow (True Line - Pre-order) replacing my butchered Walthers Russell snow plow
-3 Walthers Ballast Hoppers in CN scheme (Orange & Black)

Sunday, July 13, 2014

Railfanning Sartigan and New Finds in Archives

Yesterday, fellow railfan Jean-Pierre Veilleux was kind enough to open Groupe TRAQ archives in Charny for us.  We had a phone discussion about tank cars serving paper mills in Quebec City area and he was pretty sure their archives had some interesting shots of them in the early 80s.

Sartigan Railway 1828, Scott Junction (July 12th, 2014)


For this trip, Jérôme accompanied me and proposed we visit the new Sartigan Railway transloading yard in Scott Junction. We had the chance to see their RS18 now fully painted and lettered and the new S13 they recently acquired.

Goupe TRAQ archives aren't that well classified. A lot of stuff, but you are lucky if you find what you need on the first try. And we did!

Three photo albums from Marc Carette collection were full of pictures taken in Quebec City Area between 1981 and 1983. Some at Dominion Textile, some in Villeneuve and others in Limoilou.

We new Domtex was served by Southern 50' boxcars, but we now know Mo-Pac, Cotton Belt and Railbox were steady visitors.

Also, a few pictures showed sulphuric acid white UTLX tank cars (similar in design to Atlas kaolin car) lettered to Reed Company (the owner of Quebec City paper mill at that time, nowadays called Stadacona or White Birch Paper). That means these interesting cars have their place on the layout.

Also, a picture show a cut of 40' roofless CN boxcars seemingly in woodchip service at Stadacona. I've never seen this before. Seems like CN had exactly the same idea as CP. The cars were NSC because of their ends pattern and reinforced with beams on top of the walls.

Friday, July 11, 2014

Think Tank

Oh! Wanting to be prototypical isn't always easy when information is confuse, scarce, limited or unapplicable.

Once again, I hit the wall... to bounce again. All week, I've been reading about chemicals tank car used in industry paper during the 70s and early 80s. Almost no picture of freight trains on Murray Bay Sub are available for this era.

I went thought many websites, scrolling endless list of tank cars per reporting marks, checking built date, finding HO models, etc... Well tiring.

Most people talking about paper making on forum were generic as can be though some had factual data for the era.

Finally, when I was giving up, I thought about getting in touch with Jean-Pierre Veilleux from Groupe TRAQ in Charny. Once again, he was a valuable player in this game. He phoned me tonight and we discussed the good old days and other things. The good thing is he was well informed, better, it confirmed most things I found out.

First of all, he remember seeing a lot of old 10,000 gallons tank cars at every paper mills he railfanned during that era. Most of them were UTLX, some CGTX and other leasing companies he doesn't remember. Good thing, I've plenty of Tichy and Intermountain cars I can used for that purpose, 4 of each to be precise.

Second, he remembers very well white tank cars, small, with platform, ladders, and american roadnames. Well, a typical description for a kaolin tank car. I went back to Atlas website and quickly found out many roadnames and built date could fit my era including: Anglo-American Clays (1978), Cyprus (1976), Freeport (1971) and Thiele Kaolin (1978). This gives me a lot of opportunity and diversity.

Once again, talking with an ocular witness is always the best way to confirm data gathered from secondary sources.

Thursday, July 10, 2014

It's Spring Time... in the early 80s!


We finally agreed on a season for the layout. It was a crucial decision to take before printing the backdrop and starting doing scenery.

Our choice is late spring, in May, when leaves appear in their soft shade of greens. It is mainly motivated by the fact our backdrop was shot in May but also for scenic interest. Winter trees offer little foliage to hide transition between a scene or a building and the backdrop. In contrary, summer trees can really hide a lot of interesting visual spots with their dense foliage. However, early spring trees can play both roles with problem.

And personally, I must admit it is one of my favourite seasons.

Thus, the only remaining question is selecting a specific year which isn’t easy to answer. But this is primordial to focus when building the freight car roster. Here are some thoughts collected over the last years, proof that selecting an era wasn't a trivial process.

At least, we can identify 2 extreme dates by to events. First, we know we won’t run regular passenger trains. This means our era is after the regular service ended in 1976-1977 (thought special excursion trains occurred, in particular the ill-fated Tortillard in the early 80s). Second, we want to operate Dominion Textile plant at Montmorency which closed its door circa 1985-1986 (testimonies and written sources are diverging). This means the target area is somewhere between 1977-1984.

Another important fact is the rolling stock we have on hand. The most “recent” stuff to hit the rail will be the new Atlas 50’ NSC Plug Door Boxcar. The Grand Trunk ones (often seen on Murray Bay Sub during the 80s-90s and 00s) were built in 1979, CN ones were built a year later in 1980.

That means we can push forward our operating era somewhere between 1980 and 1985. I’m not that excited to choose a specific “year” or “day”. But I can confidently say the layout try to depict Class I railroading on a Eastern Canada branchline during the early 80. It also means we can run almost simultaneously - without warping history – GP9, RS18 and M420. And the most interesting fact, is that we all witnessed this era when CN was the king in Quebec City area and CP was fading away.

As you can see, the header has been changed accordingly.

The Right Cars

Modelling a paper mill in the late 1970s-early 1980s may sound easy, but in fact, very little information is readily available. For Dominion Textile and Ciment Saint-Laurent, I was lucky enough to discuss with people how worked there for years and had a good knowledge of rail operation at these plants. Unfortunately, it isn't the same with Donohue.

Trying to figure out the right freight car roster for such an industry is more complex than I thought. There's virtually no good pictures of a paper mill of my modelling era showing rail cars. Most information on the web is quite marginal, simply stating the kind of products used (clay, chlorine in the 60s, hydrogen peroxide and such). Nothing new under the sun, nothing very useful for the modeller. Also, very time consuming though enjoyable!

Then, I decided to check up freight rosters on the web and railroad pictures websites. I found many information, but most is relevant for the 90s, 00s and 10s. Which is out of question.

In last resort, I browsed many layout depicting a mill. I quickly found out that most modellers are satisfied with a string a tank cars carrying a generic substance conveniently called "chemicals" and unloaded into some intricate piping supplying it into the "paper making processing"... Well, let's say they don't have a clue what they are doing, at least, no more than me.

I only know the fancy kaolin slurry tank car aka JM Huber and Omya are too modern for my era. I've been told clay was typical bagged and carried in boxcars in my era, clay slurry was a rare sight.

The real questions are:

  1. What were typical tank cars used to carry chemicals used in paper making in the late 70s-early 80s?
  2. What were the typical owners/leasers for these cars? UTLX? CGTX? Dow? Hooker? Occidental? etc?
  3. Do relevant pictures of a canadian (or New England) paper mill rail yard exist?
  4. Does some railfans remember what types of car composed a typical consist back then?
  5. Is there a book detailing typical paper mill rail operation? (No, I'm not talking about generic books for modellers how only state evidences...)
If you have any clue, partial answer, link, key people, whatever bits of information, feel free to leave a comment! I'm sure this question is shared by many model railroaders!

Sunday, July 6, 2014

Here Comes the GMD1

I did it... 

Well, I've been wondering recently if I should buy or not a GMD1. I never saw one in real life and didn't suspect they even visited Eastern Quebec before I learned Rapido was releasing the model in plastic. I could get the locomotive for the sake of uniqueness, but I felt it was a stupid reason. Anyway, this prompted me to do some researches and I found out they did venture on Murray Bay Subdivision back in the 60s, pulling the passenger trains before Budd cars replaced them. Denis Fortier wrote an interesting article (French only) about it in Januray 2011 and this isn't foreign with my decision to buy one.

A few months ago, I contacted Jason Shron of Rapido Trains about my interest in making a prototypical Murray Bay passenger train of the 1960s (train #171-178-179). Coaches were still available, but he kindly asked me to wait a little bit since Rapido would soon announce a new edition of their steam generator.

A typical train over Murray Bay Subdivision was made of a GMD1 (units 1025, 1026 and 1027), a steam generator and two coaches.

What really convinced me about getting a Rapido GMD1 - albeit the high price tag - was several facts.

First, locomotives on Murray Bay were always limited by weight per axle. The part in Charlevoix is particularly risky with its light rail and unstable roadbed continually undermined by St. Lawrence River. For this reason, many trains in the 1960s were pulled by RSC-24 and GMD1 which had in common 3-axle trucks in 1-A-1 arrangement. This kind of truck makes locomotives particularly interesting from a visual point of view.

Secondly, Rapido makes unit number 1027 which was assigned to Murray Bay for a few years, making it very interesting. This locomotive is also "famous" to have been featured in a Walt Disney movie titled "Bid Red".

Finally, I've always been impressed by Rapido's quality and it would be another step toward completing an iconic train on the line. I missed my chance to get a 3-axle unit during the pre-order, but finally managed to find 1027 today at a decent price. Now, I only need to pre-order the steam generator. It's great to see it is now possible to make prototypical canadian passenger train nowadays without bashing entry-level models. Hats off  to Rapido for bringing us fine quality items. The next step would be to recreate the first Tortillard du Saint-Laurent, made of a chop nosed GP9, a special paint-scheme baggage car and 5 Bombardier bilevel GO Transit coaches. But that can wait...  Acquiring a static grass applicator is my main concern.

Le Tortillard crossing Baie-Saint-Paul Bridge (postcard, early 80s - Ebay)

*****

That said, I'm actually rebuilding the freight roster for the reengineered layout. I quickly came to the conclusion I already had most cars needed, except a very few I'll be able to acquire without ruining myself (mainly a few hoppers from Bowset and Accurail and JM Huber kaolin tank cars). In fact, I found out most models were already acquired many years ago, at a time I thought transition era was for me.

I'm just a little bit disappointed to find it took me so much time to go back to my era of interest: CN Wet Noodle on Murray Bay Sub (60s-80s). I'm always impressed how we can collect quickly and blindy useless models in the blink of an eye but will ponder a lot about allocating few bucks to scenery material. Rolling stock and motive power is self-gratification: already done, looks sharp... scenery isn't glamour and needs a lot of effort to look as nice.

First of all, I was always reluctant to get american cars. Not that I hate them, not at all, but they virtually never ventured in my area, except a few notable examples. Also, I'm a little bit impressed by the number of locomotives I acquired over the years. Too much for my own good. Many of them are out of era and upgrading them would cost much more than they are worth. At this, point, I'll keep them since I never sold anything from my collection and prefer to keep everything "just in case". But I think I'll probably get rid of some stuff at the next area train show.

But honestly, I wish I would have set my mind on a specific era sooner. My collection would be more coherent... and smaller! I think I'll have to redo my inventory as soon as possible to figure out what I have on hands. It will be a good exercice to decide what will go to storage and what will be part of the layout on a regular basis. I think the layout could be run with only 5 locomotives: 2 industrial switchers, a pair of freight locomotives (RS18 or GP9 or M420, depending the era) and a passenger locomotive. The entire fleet could be assembled by the end of the summer, thought I'll need to get a GE 45 Ton switcher and repaint it in Ciment Saint-Laurent scheme.

Playing With Mud

Donohue's GE 44-ton switcher over River Malbaie Bridge

Yesterday was probably one of the most efficient day working on the layout since a very long time. It's been 2 years - at least - since we last worked on scenery at a large scale. I think results talk by themselves.

The switcher pulling a string of newsprint boxcars

First of all, the new GE 44-tonner made sensation among club members. Definitely agreat looking engine fitting perfectly its industrial environment.

An overview of landscaping before mudding process

Secondly, we completed the terraforming behind the track at River Malbaie bridge. Base layers are invisible and made of polyisocyanurate foam scraps. These are covered with more expensive florist foam where trees and others scenic elements will be planted.

The bridge is dwarfed by the scenery

I gave a particular attention to land surrounding the  abutments to be the more prototypical as I could be. The real bridge's abutments are heavily embedded into the embankment.

A dramatic shot from the riverbed

Land beyond the track left to the bridge is relatively flat and will be planted with younger trees.

Left bank: Abutments and the employes' parking lot

The hill behind the  rigth part is low rising. I didn't venture farther left because, at this point, I have no idea how the scenery will blend itself with the rest of the layout. Anyway, I ran out of florist foam at this point.

Right bank: Abutment and rising grounds

To speed up gluing process, I abandoned No More Nail glue for hot glue. It really made a difference and assemblies were stronger. It's been years since I used a hot glue. I had bad memories of it from my architecture school days! Too many nasty burns during mindless all nighters. I'm quite happy I didn't had to put to many of them to complete my projects!

General view of River Malbaie from unmodelled Clermont road bridge

When the scenery base was completed, Louis-Marie prepared a few batches of Universal Mud - a custom mix of flat latex paint and papier-mâché - following Mike Confalone's recipe. The mix is really easy to use and to prepare. A real pleasure to work with this material because it is forgiving and can build up places where you messed us. It is a more sculptural approach to land forming than hardshell or cardboard strips. I'm not a fan of these methods personally.

Right bank after mudding process

The right bank needed a lot of mud to repair the numerous mistakes we did while building the with foam. The background hill and the left bank were done with more care and thus required less material to get a good-looking and realistic shape. Netherless, the final rugged aspect of the right embankment makes a particularly convincing landfill.
Left bank after mudding process.

I had quite a laugh while reading "Ideal for sidings" on the can of paint! Who thought latex paint for home improvement was "officially" suited for model railroading purpose!

"Ideal for sidings"

The mudding process was quite straightforward and it took about 1 hour to complete the scene. Concrete abutments and backdrop where protected with masking tape and fascia was cleaned as I messed it up a few times while working on the layout edge.

A general view after mudding process was completed

So far, so good. Universal mud is excellent to give a realistic generic ground. Nothing looks more similar that a layer of dark soil or humus.
 
Good friend Mathieu Gosselin - a real life railroader from a dynasty of railroaders - visited us during the evening and kindly prepared an excellent supper. The season's berries shortcake was particularly tasty! I should have taken a picture of it!

After eating and chatting for a while, I came back to the layout and painted all the visible foam areas to blend everything together before the next work session.

The scene completely painted

I'm particularly impressed how the abutments really sinked into the scnery just like the real ones.

Right abument embedded for good in scenery

Right abutment almost buried, just like the prototype.

It was also the occasion to remove the masking tape and reinstall the bridge in place, running a short train over the bridge. No need to tell this part of the layout is probably the most picturesque of all.

Masking tape removed and bridge installed

Even Donald Thompson - founder of Orford Express and an avid model railroad collector - was present for the inauguration! This little figure was modified and painted years ago to represent Donald, his long gray hair and conductor attire.

Donald Thompson approving the new bridge

Next step is to start modelling the riverbed. It will be a first for us and I hope it will turn at least OK. I think I'm gonna take a look again at Mike Cawdrey excellent modelling efforts.

The bridge seen from afar
The bridge from seen from the right
The bridge seen from the left
A close up shot with Donald waiting on the left side
It was also an excellent occasion to retake the 1978 shot.

Time to model the river
The big problem now is that we didn't set the season. Spring, Early Summer and late Autumn are possibilities.
Doesn't it look good with melting snow?
It's hard to tell, but this picture shows us an Early Spring setup with patches of melting snow would look great! This season is also coherent with Massey F. Jones' pictures from the late 70s. Stay tuned!


Saturday, July 5, 2014

A New Player

After finding picture of Donohue's old switcher, I decided to repaint my Bachmann GE 44-ton locomotive into the same paint scheme.


The switcher shell was cast in yellow plastic, so it was a good start. First of all, I dipped the model overnight in a bath of purple cleaning product to strip the paint. I thought everything would go, including the factory paint and my own previous custom paint job, however, only the custom paint lifted up. Scrubbing with an old toothbrush was straigforward and the model was ready to be modified to suit my prototype.

Keeping the factory paint saved me a lot of trouble. I only had to sand the green roof paint which was easier to do. Some repairs were also done to the cab. Many years ago, a negligent visitors dropped the model on the concrete floor and two mullions broke of. The cleaning agent made the parts loose and thus I needed to glue them back in place.


Painting process was straightforward. The underframe, skirts and running board were painted with Krylon flat black spray paint. Truck sideframes were handpainted with a mix of brown and black. Finally, windows received an aluminiun coat over the trims, just like the prototype.

When everything was dry, I used pastel chalk to rust up the trucks and add some dust to the lower body and running boards. Yellowish chalk was used to discolor the horizontal hoods and cab roof. These parts are often discolored by the sun over time. I didn't apply an oil wash over the model because I once did that many years go and it survived the stripping. Also, the pictures from 1978 show the unit in a very well maintained shape. No need to turn the model into a rust bucket. All in all, it took me about 3 hours to redo this engine and I'm quite pleased with the results when I take in account the very minimal efforts needed to reproduce the prototype. The nice thing about this model is that Donohue never lettered or numbered it, which saved me a lot of time.


This is officially the first locomotive I complete that is prototypically accurate for the era and the layout. The funny thing is I didn't thought about it when I built the locomotive roster.

That Pipe Must Go...


Two days ago, I talked to Louis-Marie how the vent pipe would be a real challenge to hide with the photobackdrop. Also, it was taking a lot of prime space in a spot where the layout is already shallow - about 14 inches including fascia.


Rerouting the pipe was a challenge because it was impossible to conceal it in the partition wall without seriously broking some part of our benchwork.


Finally, yesterday, it was decided to solve using mechanical vents. One for the sink, one for the washer. Not an optimal situation, but far better and less costly than rerouting the pipe.


I also continued working on the employes parking lot. Unfortunately, I got a nasty cut on my finger while cutting a foam block. A few minutes before, I was telling others how important you should never use a knife with the blade toward yourself... I should have applied my own warning to myself!


Also, while looking for actual Donohue's switcher locomotive, we found two great pictures of the previous GE 44-tonner that was used during the 70s and the early 80s before it was replaced by a modified MLW S2. I'm taking the liberty to post the beautiful pictures here because they are prime source material for our layout.
www.yourrailwaypictures.com credit: Massey F. Jones (1978)
 
Also, you can see clearly the bridge, type of cars and vicinity of the yard. Those pictures were taken in 1978 by Mr. Massey F. Jones and are hosted on a website dedicated to Older Industrial and on Site Diesel Locomotives of Canada.

www.yourrailwaypictures.com credit: Massey F. Jones (1978)

I particularly like this cute yellow GE 44-tonner and Jérôme took the initiative to set a similar setup on our layout. It didn't take a lot of time before we thought it would be nice to repaint it in the correct paint scheme.


Thursday, July 3, 2014

Sayonara Plywood Central! - Terraforming Malbaie River Valley

Yesterday, I got a call from Louis-Marie asking if I had some free time for the layout. I'm wasn't especially in shape, but I thought that would be a nice to vent some fatigue from the work day.

Finally, we ended up doing some terraforming using regular and florist foam. I was curious to use this material. Very easy to cut, to glue, to sand and to shape. Definitely a nice material.


I can't say I did a great job for the shore. The first shape I did was wrong and I had to add some slices of foam over it to get the right shape. Not perfect, but I'm relatively pleased with the result. Anyway, it is just a substructure for the real scenery shell that will smooth down everything.


I'm still pondering how I'll make the river, but I guess I'll take an intuitive stance toward it.


The nice thing is that now, we can start to see that the railway line is a small thing nest on the shore of a capricious river. I'm particularly satisfied by the right embankment. The left one will need some work, but still, I'm confident it will make a nice employees parking lot.


It's great to sce the scene comes together. Seriously, I'm happy we followed Jérôme's advice to model hilly Clermont instead of flat Beaupré. Sayonara Playwood Central!