Before painting track in Villeneuve, we decided yesterday to slightly modify the track arrangement to improve operation.
The right yard ladder was a complex assembly of curved turnouts branching off the main line. Worst, it meant the track radius was getting quite sharp there. Also, there was no hierachy in turnout location, so it was always confusing.
We decided to get rid of every curved turnout on the mainline and only use a large one on a straight stretch of track. We also made room to have enough place for a switcher and 3 cars to make move in the ladder without having t ofoul the main. The prototype did have something similar.
While operation later during the evening, it was evident we did the right thing.
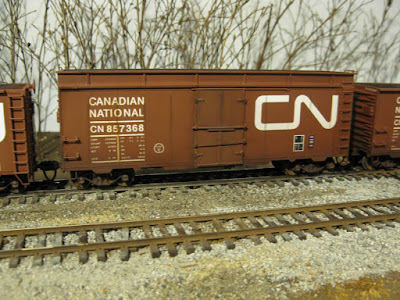
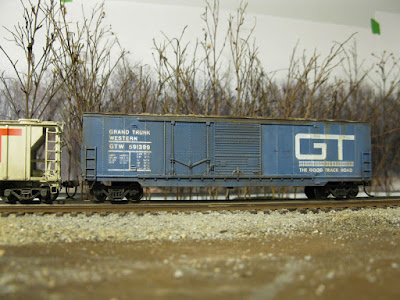
I also took some pictures of my newly weathered cars on the layout. To be noted, the backdrop looks good on my pictures, but in fact, it looks quite ugly in real life. We are seriously thinking about bumping our season from April to May to be able to better handle the scenery with trees with leaves.
Sunday, June 28, 2015
Saturday, June 27, 2015
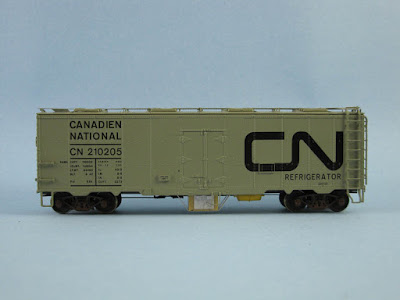
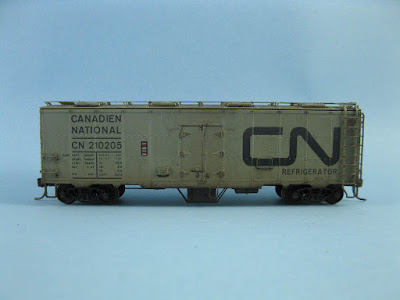
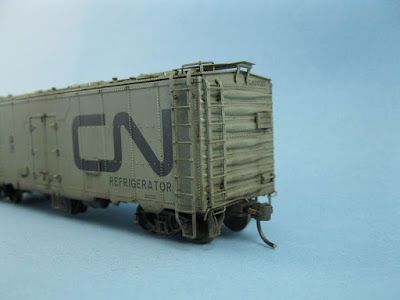
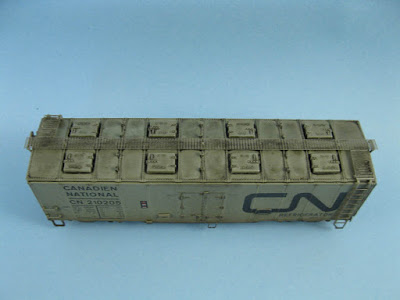
Another One Bites The Dust... True Line CN 8-hatch Reefer
I'm in a detailing and weathering spree though I feel I'm running out of steam, parts and decals. I've plenty of conversion projects in mind including a tentative to turn Bachmann 50ft boxcars into NSC newsprint ones. I was even thinking about rebuilding an Accurail Central Vermont wet noodle reefer but that would be a stretch for my locale and era! Nevertheless, I feel one could merge Accurail car sides with Roundhouse milk car round roof and ends.
But now, I decided, just like George Dutka and Peter Mumby did a few months ago, to finally build an underframe for my wrong color-True Line spare shell. Many of you probably know the first True Line Cn wet noodle cars were wrongly painted gray instead of aluminium. TLT did replace the shell for a correct one but let the old shell with the car. It was a nice idea to get rid of useless shells that way cause now we've got a project.
I've got several Roundhouse kit parts at home. I was quite happy to find out their 40ft underframe would fit tightly under the reefer shell without too much work. I trimmed down the underframe tab to make it less thick then spliced the car end with bits of styrene to make sure the underframe wasw long enough to fit the shell which was 2 mm longer.
Brake details are Accurail gondola brake gear, an Athearn air reservoir from a spine car set and a resin wood box from a military detailing kit. Bits of styrene were added to bring life to the heater box. Undeframe was ready to get a coat of flat black.
Trucks are Accurail with Proto 2000 metal wheels and couplers are Kadee.
Peter Mumby weathered the car on the assumption the aluminium paint weathered badly under certain circumstances. He was quite right. The aluminium badly fade, often looking grey, even tan grey. This color is also unforgiving and makes dirt very visible. Seriously, CN reefer looked like trash to me. They have a filthy look you wish you never ate anything transported in them!
I looked at many picture and at some point, I felt whatever the paint was altered, there was still some remnant of aluminium sparkling here and there, particularly on the upper parts of the body and roof. To get this effect, I decided to airbrush a very light wash of heavily thinned aluminium paint. I generously coated the roof. Then, working to build a gradient effect, I sprayed my mix on the car ends and sides. My goal was to keep the grey paint intact near the sill and make it fade into aluminium paint near the roof. I tried to kept aluminium paint on lettering as minimal as I could be. When it was done, I sprayed a wash of tan paint near the sill to represent dirt.
At that point, the model started to look like it was originally aluminium. The next step was easier. I made a grimy black oil paint wash and generously coated the model, letting it pool naturally under gravity. Prototype pictures show dirt pooled in specific spots and I wanted that look. Here and there, particularly hinges and rivets, I dabbed a second coat of oil paint to enhance the details. The last step was to add dirt traces on car ends and enhance some effect with weathering powders. The same powder were used to add texture to the wheels, trucks and couplers.
Friday, June 26, 2015
A Heavily Weathered Piece of History
| A heavily weathered CN boxcar (credits: cnrphotos.com) |
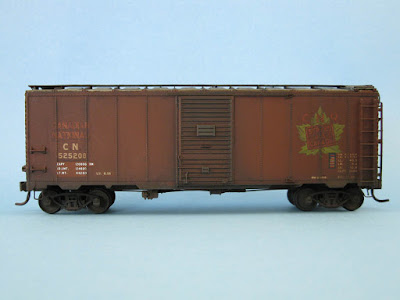
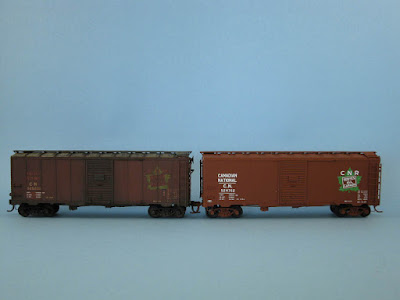
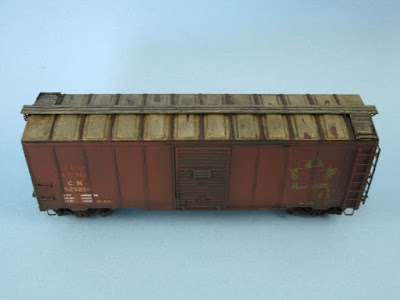
A few of you remember Hedley-Junction started as a mid-50s layout and evolved into an early 1980s incarnation of the same locale. Back then, I acquired a lot of cars including several Intermountain PS-1 boxcars I painted and decalled as old maple leaf CNR cars. Since Maple Leaf cars were still in revenue service in the early 80s, it's a great opportunity to bring these older cars on the layout to have some diversity.
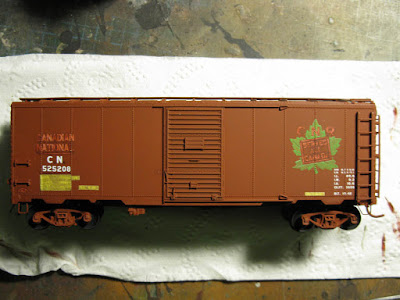
I've decided to reproduce the car of my youth using one as astarting point. The car was painted with Krylon brown primer and lettered with a C-D-S dry transfer set.
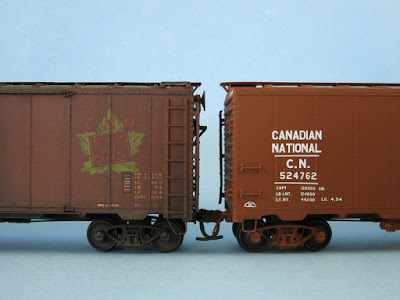
I started by masking lettering that would have been subject to patching and modification over them. Then, using a thinned down brown similar to the base coat, I overpainted the ghosting lettering found on prototype. I also erased the dots on CN reporting marks and the white line under the roadnumber. These are very old features that disappeared a long time ago.
C-D-S green maple leaf color was to dark and bluish to fit a decolored 40 years old logo. I used a small brush and overpainted it with thinned down olive acrylic. At this point, I added the ACI label and everything was dullcoted.
Next step, I gave the car a dark brown overspray to blend together myinterventions and give a basic coat of dirt to the car. I quickly found out the maple leaf logo was almost invisible, which wasn't the case on the prototype.
Using my trustworthy brush, I overpainted the logo again with a light yellow-olive color to make it pop up from the dirt and faded paint. This time, the color was spot on prototype.
Next step, painted the roof using a mix of white and aluminium color to represent a fully peeled of roof. Roofwalk were heavily drybrushed using a greyish-light tan color to give the impression very little paint was remaining. It was now time to coat everything in a dark brown oil paint wash to bring out detail and add the final layer of dirt. Model was then dullcoted and weathering powders were used to add some texture here and there, mainly dirt splash on car ends, underbody, trucks and wheels.
The final result is self-explanatory. I'm quite happy to have worked recently on many cheap cars. It was a good way to improve myself. As the time pass by, I feel I more able to get consistent results. My early weathering efforts a few years ago were highly a matter of luck and I could never be sure of how it would turn out. And now enjoy!
 |
| Before and after |
 |
| 40 years of weathering at work |
 |
| Heavily weathered roof |
 |
| B End |
 |
| A End |
Thursday, June 25, 2015
Improving a Roundhouse ex-Rock Island 50ft Boxcar
My never ending quest to improve my rolling stock while the canadian dollar is taking a plunge (now I understand why people call it the Loonie) and the recent hike in shipping costs is taking another step.
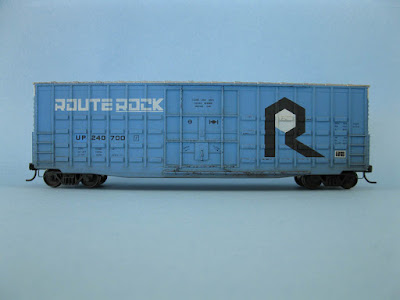
Once again, a foobie was salvaged from oblivion. This old MDC/Roundhouse The Rock boxcar was bought is a keepsake from Jérôme's childhood. It was purchased in the mid-1990s when Quebec City still had local hobby stores with decent railcar selection.
I did my homework but didn't find any waffle boxcar in Rock Island fleet. This particular model has UP reporting marks, indicating it is a post-RI bankrupt car. This is particularly interesting since it fits our time frame. Another interesting fact is this boxcar could have served realistically the south central United States cotton market. Thus, it makes a good candidate for Dominion Textile which was served by a large array of colorful US boxcars in the early 1980s.
The stock model from Roundhouse wasn't that bad but the paint job, though correct, was minimal. Everything was painted blue and no lettering or reporting marks found on the car ends. I could have replaced the molded grabirons but decided to save me the pain. In fact, I felt retouching the paint would do more harm than leave it as is.
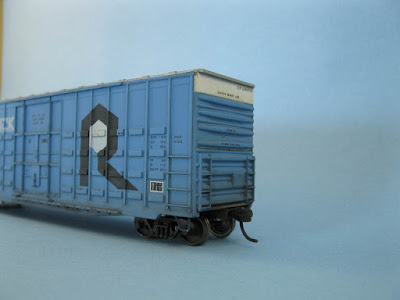
Modifications include replacing the brakewheel with a Kadee one, adding consolidated lube stencils, puttying and painting the roof aluminium, painting the car ends with white to indicate clearly it is a hi-cube boxcar and add a few more lettering. Some other details are adding A-line metal stirrups and painting the end platforms over couplers with aluminium paint.
As you can see, all those improvements are cosmetic and doesn't involve modifying the stock model. It's the proof a well detailed paint job can turn what looks toyish into something realistic as long as the model itself is decent (remember this horrific IHC boxcar I recently did).
Weathering was done in such way the car would look to be about 5 years old and well-maintained. Most pictures I found of ex-Rock Island blue boxcars shot in the 80s shown the blue didn't fade that much and there was little rust. I'm not a fan of turning every piece of stock into a rust bucket. In fact, I try to use various methods to make sure my fleet isn't uniform just like the prototype.
I used, once again, airbrushed washes of sand colored paint to fade the car, dark brown acrylic to add scratches and a very light wash of grimy oil paint. Weathering powders were used to add depth to the trucks and wheels. Honestly, I'm quite satisfied with the results as I feel I was able to keep things very subtle.
Wednesday, June 24, 2015
Playing With Photo Backdrop and Rolling Stock
We printed a backdrop from several pictures taken in Maizerets last Spring. This is cheap printing and thus colors ended up much more darker than intended even if I took care to brighten the image in Photoshop before.
At least, it gives us a good idea about what it would look. The forested area works well but there's something weird with the cityscape. It will have to be redone diferrently.
Also, blending decently the highway at D'Estimauville isn't that great. Seriously, it may work well with country lane or small urban streets, but large avenues are harder to blend together with the 3D scene. I actually have no idea how to handle this one.
Meanwhile, Louis-Marie finally fixed the electrical issue with the reversing loop... to my dismay. I was more than ready to rip it off at the first occasion. All evening, I kept a pair of pliers in my pocket to be sure I could get rid of it if the electrical problem wouldn't be solved. Unfortunately, I'll have to wait another time to finally put my scheme in action. On the serious side, I must admit I'm reluctant to build scenery there that could be destroy if we change our minds...
That said, before that, I have to complete the backdrop and then paint and ballast the cement plant tracks in Villeneuve. The next big challenge will be building the plant itself. Anyway, I'm lacking scenic material to go further in Maizerets.
Just for fun, I took various pictures of rolling stock displayed in Maizerets, including the final batch of woodchip boxcars now weathered. I once said this was a particularly interesting spot to shot rolling stock and it's even truer since we installed the temporary backdrop.
It's always fun to have some really old cars hanging around. I remember - when I was in highschool and college - a bunch of very old cars, including a maple leaf CN boxcars, stored in Maizerets on a derelict siding.
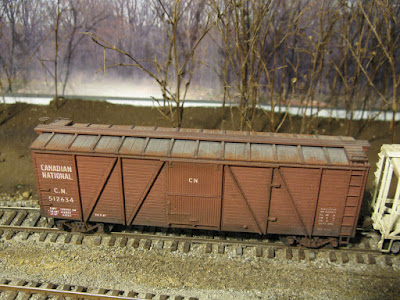 |
| I just love those Accurail OSB boxcars. Simple but effective. |
Here are some other shots.
 |
| A custom-painted Walthers Airslide hopper lettered with Highball decals |
All my woodchip boxcars are now weathered too.
Tuesday, June 23, 2015
IHC GTW 50ft Boxcar - Final Part
There's a limit to what you can do with a bad model. Even paint won't hide defect.
As Chris van der Heide wrote in a comment, fading the GTW blue a lot would probably help to blend things together, including the paint mismatch near the lettering. In fact, since my blue coat of paint was relatively thick (because of the white primer), the fading wash gathered in this small crevices and made the patching process more obvious. Because of that, I didn't fade the color as much as I wanted to minimize this counterproductive side effect.
Rust was kept to minimum, according to prototype pictures, but I went overboard with the roof. My guess was that if the roof can steal the show, eyes will be more foregiving about the ghosting effect near the lettering.
The rust was done by stipling dark brown acrylic paint with an old brush. It was sealed with Dullcote then weathered with oil paint and washes. When dry, I again dullcoated the model and used weathering powders to enhance the effect. It was then dullcoted a third and final time.
All in all, the model isludicrous. A little bit better than before but still not great. It looks bad when compared to crude Roundhouse and Athearn BB kits. The car rides too high on its trucks. But still, I'm happy with the result. It was a good opportunity to try different technics and work with weathering powders. It was also a good opportunity to see how my kitbashing ability improved during the last months. I was effectively able to hack and saw this model in a few minutes. After an afternoon, everything was glued together. Sure, I didn't waste time puttying some seams because I felt it wasn't worth the extra time.
Subscribe to:
Posts (Atom)


