Sunday, May 29, 2016

M420 & Operations


We took a break from scenery work yesterday and went back to operation. For this special occasion, I brought the kitbashed M420 to see if it was working fine before adding the last details and weathering.


Operations started in D'Estimauville by setting a few cars that would make the local switcher bound to Ciment St-Laurent. A set of Shawmut Line hoppers by Bowser were repaired (they had stability problems with their trucks - a common occurrence with Bowser's old cars) and put in service.


In Villeneuve the local train took the siding to meet a Budd car doing the Clermont-Quebec City morning run.

 
As you can see, Villeneuve's yard is almost at full capacity and a small switcher is already at work in the background unloading coal and gypsum.


Later, train 423 pulled by a shiny M420 is ready to leave D'Estimauville with cars bound to Montmorency and Clermont. While, the talks about Dominion Textile's imminent close down are getting confirmation, at least three large cotton boxcars will be set out en route.


At D'Estimauville Avenue, a new station sign now grace the station entrance per prototype.


Finally, later in the afternoon, the train from Clermont is reaching Limoilou yard at a snail pace.

The Fall of the Little Giants


Since a few weeks, the Murray Bay Subdivision landscape is radically changing. The old and venerable power line running parallel to the track is coming down after a few years of incertainties.


This line was built by QRL&PCo in the early 1920s to provide power to large industries and towns in Côte-de-Beaupré area (between Montmorency & St. Joachim).


According to 1980 CN videotapes, the towers were given extension to make them taller according to newer safety standards.


Since the power line have existed for almost a century, it has become closely associated with railroading on Côte-de-Beaupré.


 Sure, the broader perspective on the landscape gained from getting rid of theses industrial relics is impressive, but on another hand, I'm well aware this nice four hundred years old rural panorama is destroyed quickly by suburban sprawling and the growth of the most ugly steel warehouses you can imagine. You can't stop progress isn't it! ;-)


Anyway, with the towers laying on their side like slained giants, it was the perfect occasion to take a few measures since I'll have to reproduce a few of them on the layout. I remember, when I was in high school, I scratchbuilt one in HO with toothpick. The result wasn't half bad, unfortunately, I no longer know where I store it!

Monday, May 23, 2016

Railfanning in Maizerets

With scenery progressing at a steady pace, I felt it was time to take picture of my locomotive fleet in a more favorable light.


That raised roadbed near the bridge is starting to be a favorite spot of mine for shooting locomotives. I think it's time I replace the backdrop with something more permanent!


Sunday, May 22, 2016

Completing Scenery in Maizerets

Basic scenery is now complete between Avenue D'Estimauville and the staging area. It represent a 13 feet long scene. I'm quite amazed it only took 3 evenings to get there. Sure there's a lot of things to do, but it is extremely exciting to move forward and see our trains run in a real landscape instead of a brown latex paint wonderland.


Yesterday, the Boulevard Montmorency - a parallell road that runs along the small interchange near Limoilou - was completed. After installing the road (more on that at the bottom of this post), I was ready to apply ground cover following my usual 3 steps.


The land features and road were merged together using universal mud (latex paint + Celluclay). Trying to get that stuff not on the road was kind of nerve breaking!


Then, a good coat of my custom mix dirt latex color was brushed over the landforms. It serves to get a decent basic color before applying scatter material, but also it's an excellent adhesive for the aforementioned scenic material.


Finally, ground cover. As you can see, there's much more grass in this part of the scene. It's because the track enter a residential area and these public areas are well-maintained. A fwe large trees (orms) will grace the small plot at right while small brushes and trees will find their way on the other side of the track.


All week long I've been working on that road. It was made with thick cardboard and sprayed with several grey and automotive primers. Cracks were engraved with a metal point and enhanced with charcoal pencil. The road was then weathered by generously spraying a india ink-alcohol mix in the middle of each lane (a tip by Lance Mindheim).


The yellow line was painted with regular acrylic paint and severely scratched with a hobby knife blade to dull and chip it. In Quebec, most road markings don't last a single winter and are heavily faded. Some additional weathered was done using pastel chalks. It will require some more pastel chalk, particularly along the side of the road where winter dirt accumulates.

No doubt were are in Quebec City

Planting Utility Poles and Small Details


Yesterday was a good day to install the new set of utility poles. While I made many of them, I tsill ran short of about 9 of them to complete the D'Estimauville and Villeneuve scenes.


On the same occasion, relay boxes found their way on the layout while signs were brought back.


The result is very interesting and the next step will be to add switch stands (and perhaps make them workable in an unforeseen future).


Friday, May 20, 2016

Utility Poles Done

Painting and weathering the poles was an interesting study of colors. When you start to truly look at a real pole, you find out colors are more subtle than you could imagine.


Most insulators were painted gray, but for variation, a few ones are dark brown just like in real life. If I'm ever making a single transformer pole, it will probably be black. I remember a lot of thems were black back in the 80s.


Several colors and hues were used as full strength paint, washes and semi-diluted form. I'm quite happy that bamboo skewers and Atlas plastic poles are now impossible to tell appart. And you, are you able to tell me which ones are plastic and wood?


Wednesday, May 18, 2016

Utility Poles and More Mundane Details

Scenery work is progressing at a steady pace in D’Estimauville. To be honest, much faster than I ever anticipated. At this point, I’m not sure if I did a good thing in selecting springtime as the season. Getting the grass color right is quite hard in fact. What I see in real life is green grass and dead straw, but when I tried to do this on the layout, it looked garish and overdone (feel grateful I didn't post picture of it before I scrapped the small test patch).

I’m not sure, but I think the reason is that seen from afar, the mix of very green and yellow grass gives a general impression of

But that’s not my main point. While ground cover is a large part of scenery, roads, bushes, trees and other things need to be added. Among them are trackside details. Over the last few days, I’ve been building a few of them.

muted light olive green (just like pointillism in art). Since a model railroad is scaled down, we get a general impression and not a specific perception of every strand of grass. However, the general feeling is quite good and I’ll stick with it. I’ll be aware it’s better to experiment on a mock up for the next layout!


The first sets of details are relay boxes for crossing signals. On Murray Bay, they were small steel boxes fixed on treated wood posts. To make building easy, I used Atlas telegraph pole boxes. They are about the same size. I filled the hole in their back with putty and glued them on scale lumber post stained with a faded olive green wash. A small piece of brass wire was added to represent the pipe connecting the wire with the underground.

A stock Atlas HO utility pole

The other set of detail is the mundane power utility poles. I’ve already built a few of them in Clermont, but I wanted to simplify the process a little bit. On my first try, I used bamboo skewers that I sanded down to shape with my Dremel tool and coarse sand paper. The result is quite good but that means I must modify and add plastic crossarm independently. It requires to add small metal brackets later, which isn’t that easy.

At this point, I could use Rix Products crossarms which are already molded with the brackets. In fact, I think I have a better use for them. So, my new technic is simpler: use the Atlas telegraph poles and bash them. It saves a lot of cutting, sanding, shaping, etc. The big advantage is the pole and its details are monolithic, thus less prone to breaking. Keep in mind many of our utility poles are in the foreground, near the track. Fancy little models glued with CA won’t last long!

The only problem with the Atlas poles is their height. They are simply too short. They stand at 29-30ft, but according to my prototype, poles in Maizerets are about 36-40ft high. It’s one of the reasons why I wanted to use bamboo skewer. But I got the idea to extend the Atlas poles with plastic sprues. Imagine my joy when I found out Atlas poles sprues were the same diameter as the poles! With some sanding , the seam would disappear… seamlessly!


It did work. At this point, it is good to remember that plastic poles can get a realistic wood texture by scraping the surface with a metal saw blade. Once painted and stained, the illusion will be spot on.

For the insulators, I kept a few one and added the missing ones from scrapped crossarms. I wasn’t satisfied with the small pointy insulators that look nothing like electric pole insulators. To enhance their appearance, I decided to kitbash them a little bit. I used Tichy insulator and drilled their core with a drill bit the same diameter as the Atlas stock insulator. Then, I separated each insulator rings and applied them separately over the Atlas insulator. The result was a much more realistic mushroom-shaped insulator.


For transformers, I added insulators to the stock Atlas ones. They are Tichy ones save for one ring. Finally, the last detail was making the fuse. At first, I used Kadee springs and brass wire, but the look was far from right and it was quite labor intensive. Worst, it was hard to get them all similar. The answer came from a bunch of Accurail underframe parts. I discovered their gondola stirrups were the right size. Using brass wire, I made support brackets and epoxied them on the stirrups. Small holes, like the prototype, were drilled into the crossarms to insert the fuse brackets. So now, I have a decent and fast way to make utility pole details without losing my sanity.

With a good coat of paint and weathering, these new utility poles are ready to go in service. They cost a few cents each and can be built by the dozen. They can easily be adapted o several situation and I believe the Rix Products are a good way to customize Atlas poles when required. Yes, I tried to salvage Atlas crossarms complete with their metal brackets, but it’s a frustrating process that yields poor results. Be ready to lose many! Better make your own brackets than try saving them.

By the way, I found out india ink/alcohol weathered bamboo skewers are exactly the same color as Krylon Camouflage Tan spray paint and Citadel Karak Stone. It means there's no reason to fear blending plastic parts with real wood. I remember Harold Minky made a few experiment with white base and different washes that work well. My recipe is inspired by him since I use an oil-based wash to bring out details and add some color variation to the plastic parts.

More about the completed utility pole in a future post...

Sunday, May 15, 2016

Some Scenery Progress


Basic ground cover is almost complete in D'Estimauville, with the exception of the road near the staging area and a gravel parking lot near D'Estimauville Avenue crossing.


As expected, I'm getting used at the scenery steps and it took less time to apply ground cover than last time.


A new challenge was to paint the riverbed. I could have left the stones natural, but I felt it didn't look right. When I walked by the river this week, it was evident everything under water was covered by a fine layer of dark brown sediment.


A dirt brown paint wash was then mixed and applied to the rocks and shores of the river to blend everything together. A second darker wash was applied next to definie the riverbed itselft. Then, a third very dark wash was used to locate the river main channel. This was a good opportunity to fix a few issues about the location of the meanders all thanks to optical illusions.


Prior to apply any scenic material, I took time to paint the ditches with a muddy dark brown. These places hold water almost year long and pouring some water over the depression won't be enough to convey the actual look of the prototype. My trick was easy, I painted the ditch areas with my general purpose earth color then applied a generous coat of dark riverbed color  where I want water.


Next step was to spray the ditches with wet water used to glue scenic material. It naturally blended the dark color with the surrounding paint resulting in a subtile but realistic gradient.

 
Among others, I also added a small path running from the right of way to the woods just like the prototype.


Until the next session, I'll have to complete the street  and glue it in place. I'm also working on several other details like power poles, relay boxes, cement blocks, wild grass (cattails) and a definite version of the backdrop.


Saturday, May 14, 2016

Trailer Truck Decals


A few readers asked about the TNT trailer and the decals I used.

These decals were made by a small Quebec-based company called Rick Decals. Since 2011, the company changed its name for SRD Models.

Their website was updated as recently as April 21th 2016, so they are still in business.

Website address: http://rdmodels.angelfire.com/index.html
Email: srdmodels@gmail.com

Address:

SRD MODELS
7 ST-ANDRÉ STREET.
WINDSOR, QUEBEC
CANADA J1S 2H8

I couldn't locate their online decals catalog, but feel free to contact them for more details.

Friday, May 13, 2016

Jean-Pierre's Last Train Ride

"There is a season for everything under the Heavens" says the Ecclesiaste...

Jean-Pierre Veilleux left us this morning after a short and fierce fight against cancer. He was well-known among railfans in Eastern Canada and, I'm prt wrong obably noin saying that he was a great gentleman and that he befriended all of us whatever our age or background.

"There is a time to speak..."

Railfanning or discussing with him was always a special moment as he could be dead serious and at the same time find his way in the weirdest conversation possible with witty remarks. His particular sense of humour was much appreciated and many of his colorful expressions passed down into regular speech among local railfans. There's not a single evening at the club without someone uttering "Toé, j't'aimais bien" or "Une autre de même pis on ferme".

My last railfan trip with Jean-Pierre was about two or three years ago when we followed the brand new Massif de Charlevoix touristic train in Charlevoix. Back then his health was already uncertain and it was evident he made everything possible to make sure the trip would be a success. Indeed, it was...

"There is a time to build..."

Jean-Pierre was a living encyclopedia and when we started building the layout, he was a key person in providing factual information about Limoilou and Murray Bay Subdivision. He gave us access to archives (both personal and Groupe TRAQ) without condition. His sharp memories from the 50s and 60s, when he was just a kid, were instrumental in understanding the operation pattern, motive power and commodities moved over rail. His vivid stories about CPR trains running in Quebec City Downtown, the Prince Edward Rounhouse, QRL&PCo station at Carré Parent and CNR C-Liners pulling freight consists in Limoilou Yard will stay engraved in my mind as if they were mines. Without him, many aspects of the layout would be lifeless.

"There is a time to mourn..."

When I visited him at the hospital last Wednesday with Louis-Marie, it was no secret between him and us it would be the last time we would spend together. While he was only a shadow of himself physically, his mind was sharp as ever and he made sure to make this moment a significant one for us and him. Truth to be told, you couldn't separate Jean-Pierre's deacon vocation even in the end... He seems to have been a spiritual force to everybody who witnessed him in his last moment...  Rarely you have the occasion to discuss life and death with a person having a deep and genuine spirituality like Jean-Pierre. While he knew how to put a smile on our faces that evening, it was nevertheless heart wrenching when he explained that the one departing was also a mourner, even if he was prepared and ready for the next ride...

"There is a time to laugh..."

And while there's a time for everything, I can't stop thinking this time, Jean-Pierre took a one-way ticket for the last train to an unknown destination... and knowing him, he is traveling first class in a classic Ocean Limited stainless sleeper car, gently smiling gently as he used and enjoying this new road he never travelled before...

It will soon be the time for us to wave our hands for a last time while the train leaves the station.

Wednesday, May 11, 2016

Maizerets - The Next Step

Scenery work as finally started in Maizerets, but a few questions remains. Among them, what to do with the road and the real estate lying in the foreground.

I'm trying to make a relaxed scene with only the required amount of elements to make it credible. So far, the temporary backdrop holds its ground and we have grown accustomed to seeing Quebec City iconic skyline as our trains reach the staging area.

The yellow square shows the new building location. The bike trail at left won't be modelled.


The sweeping curves described by the tracks and road converged toward a focal point and I feel the scenery must help to frame this concept of the train finally reaching the big city.

Maizerets is well known for its row of tenements built between the 1930s and the WWII. I wasn't sure if there was a possibility to install any buildings in the area, but a quick overlap of Google Earth pictures on the track plan convinced me it is possible. Another positive thing is the fact the area is full of large trees covering the streets and buildings with their canopy. They are a great way to hide the fact the layout is reaching a wall and disappearing in a hole.

So, until then, I'll build the road, sidewalks and cutter. The tenements will be mockuped to see if the idea makes sense. In the worst case scenario, only the back yards and large trees will be kept in the final version.

Sunday, May 8, 2016

Maizerets: Sayonara Plywood Central

It's been years since I did scenery on Hedley Junction. My most recent try at scenery was my small Harlem Station project which ws useful in getting some worthy experience.

When I visited yesterday, I was more than fired up in completing some scene than ever. Nicely build and weathered structures and rolling stock amount to nothing if they are set in a least than realistic miniature world.

Beware, this post will be heavy on pictures.

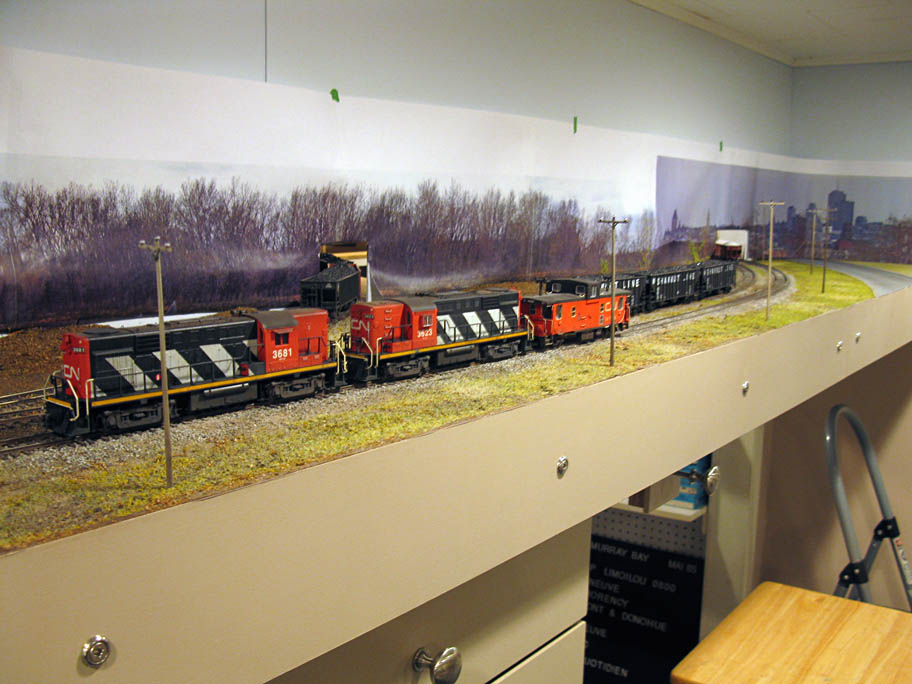
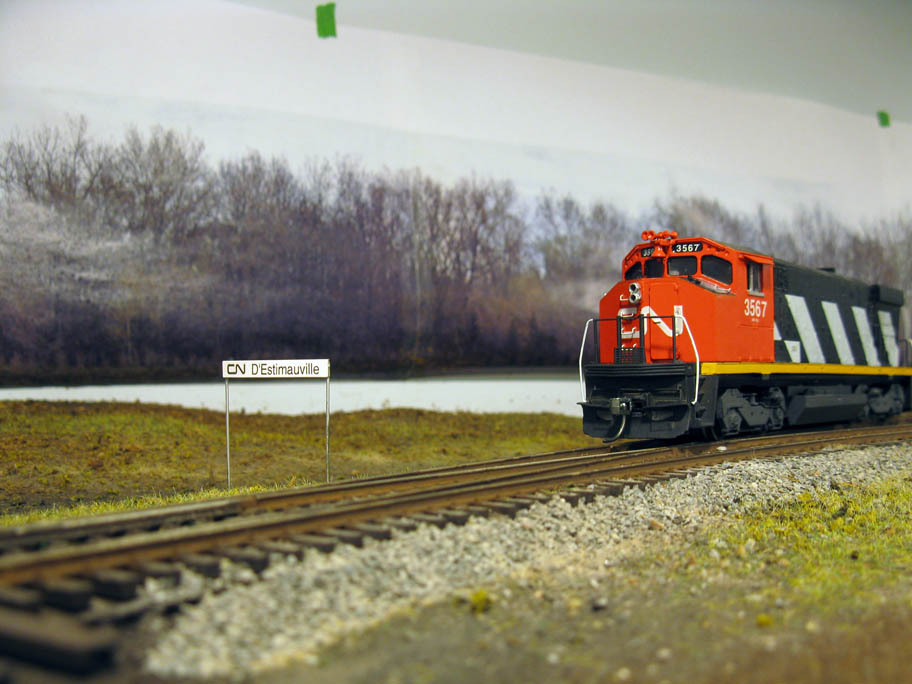
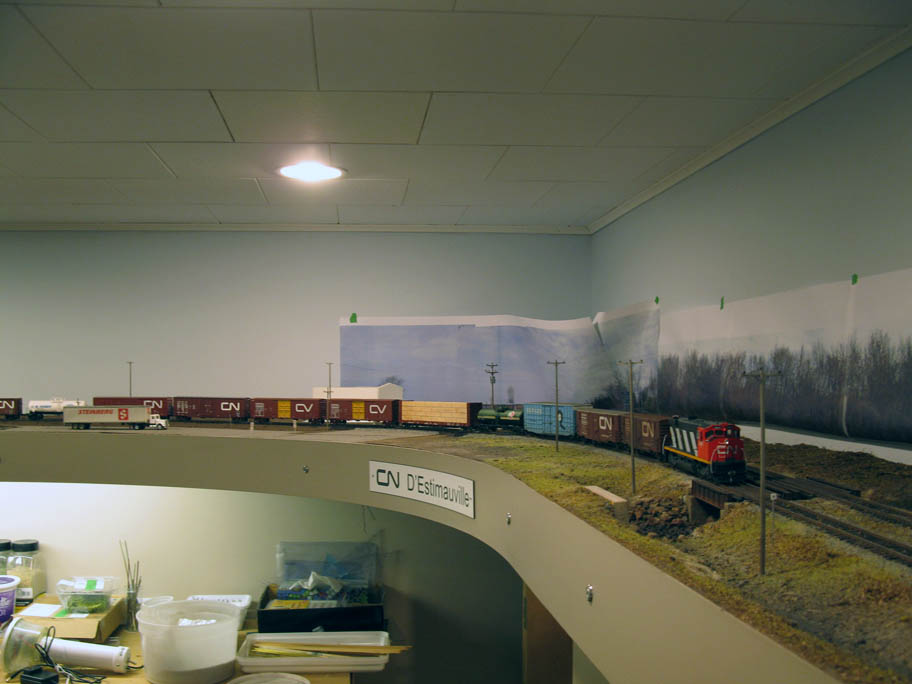
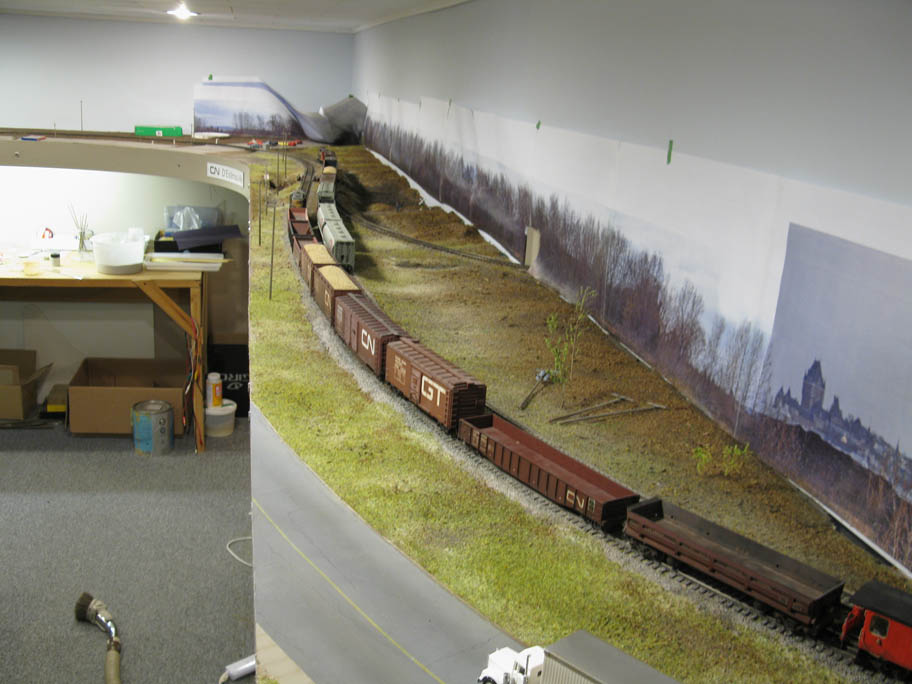
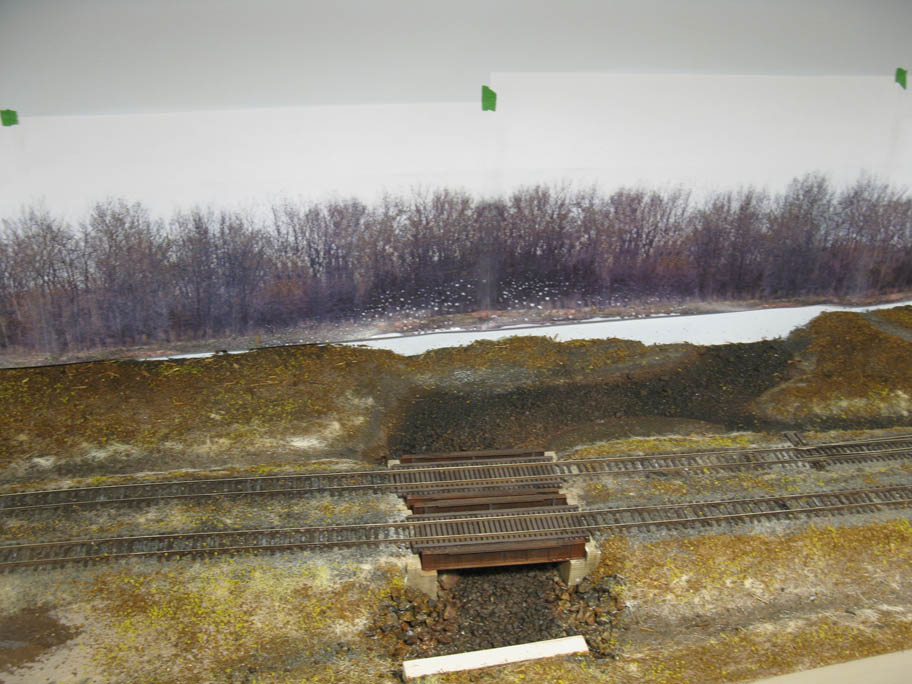
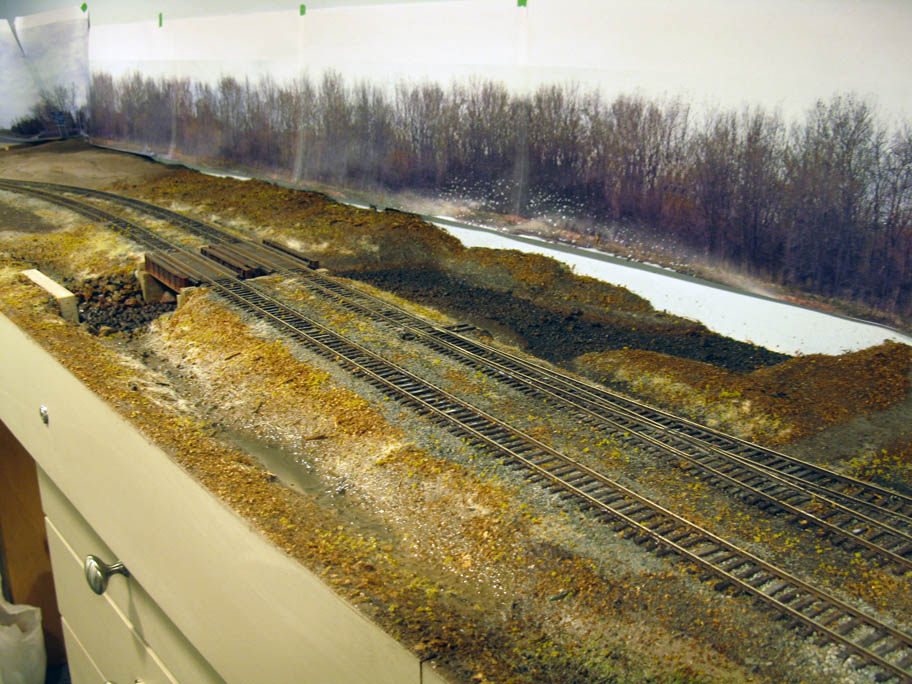
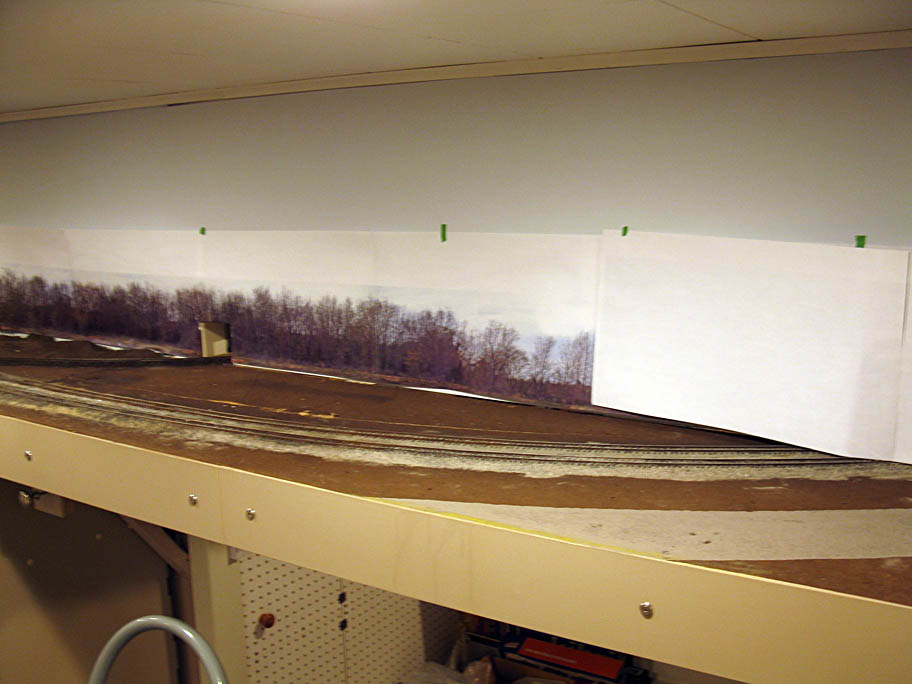
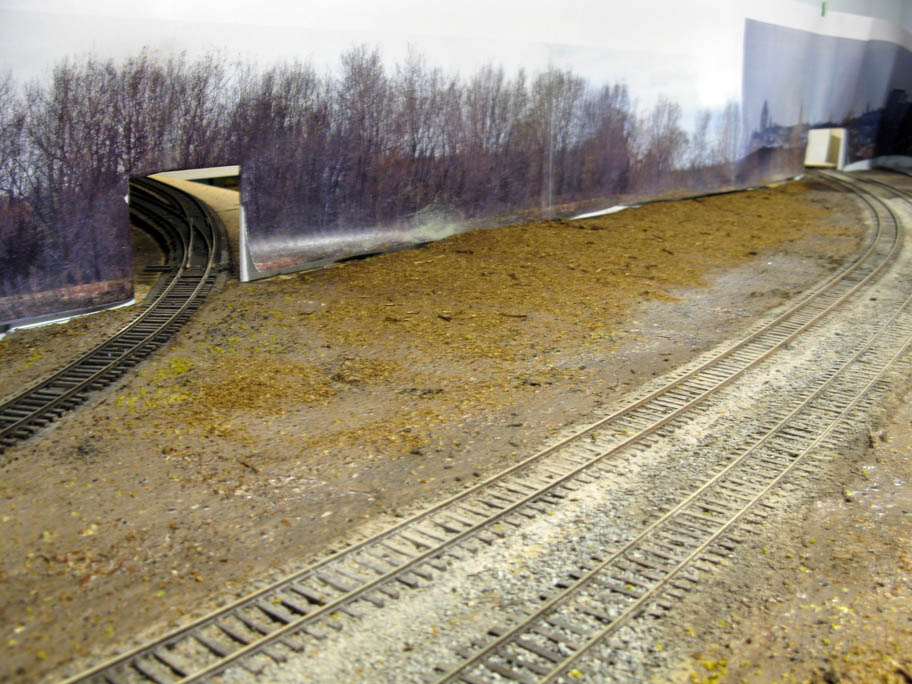
I decided to work on the simpliest scene of the layout which is the staging area in D'Estimauville. The general landforms are all in place and it was ready to get a coat of scenic material.

Here's the area at 7:00 PM before any work started:


My first concern was to get rid of the unrealistic flat lands behind the double track mainline. This area will be heavily forested and I prefer to plant trees in floral foam instead of fiberboard.

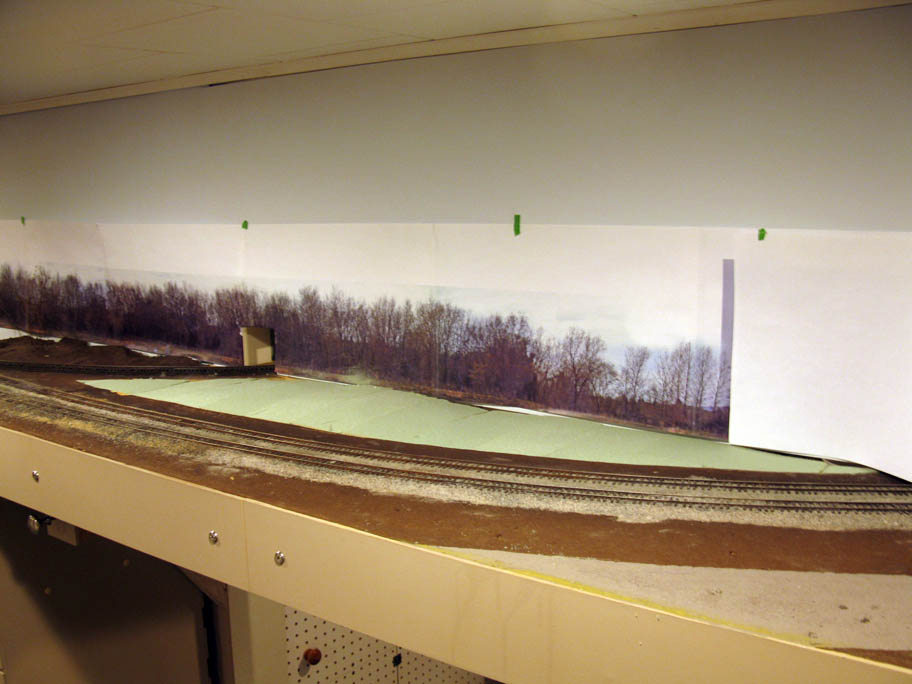
The fiberboard was cut  and removed. The area was then filled with irregular 1/2" slices of floral foam. I didn't care about their precise alignement because some sanding would do the job.


I've seen many tricks to shape floral foam, including scrapping the edges with a metal spatula, using rasps, knives and other such tools. But this time, I found out sanding the surface with a medium grit sanding block yield the best results. It's fast, doesn't make to much of a mess and you have absolute control over the process. The best part is that is merge the landforms seamlessly and realistically. No near to plug holes and cracks like before.


Once done, the result was a gently rolling surface similar to what you expect to see in forested areas.


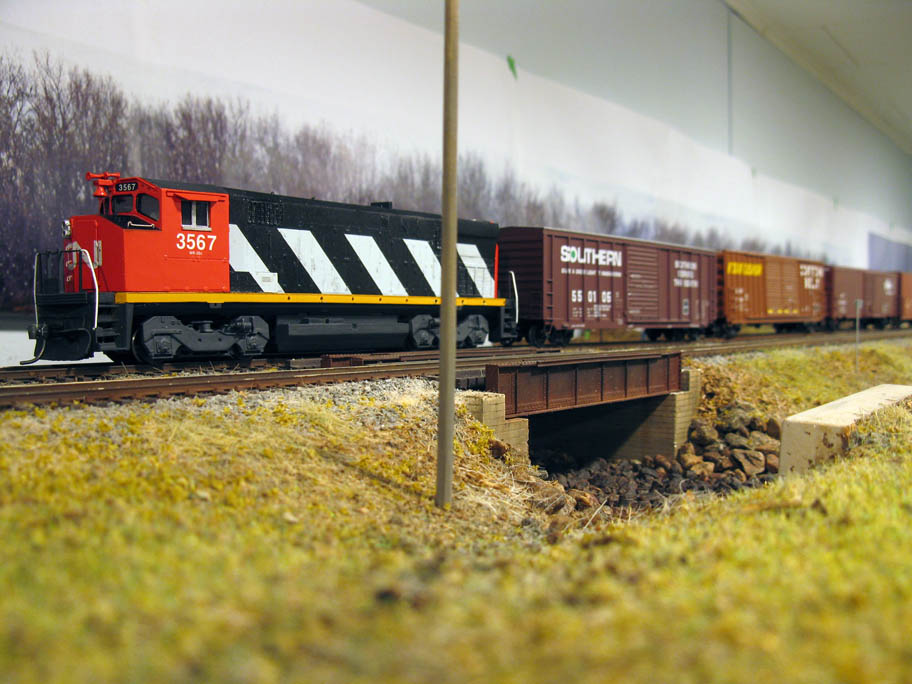
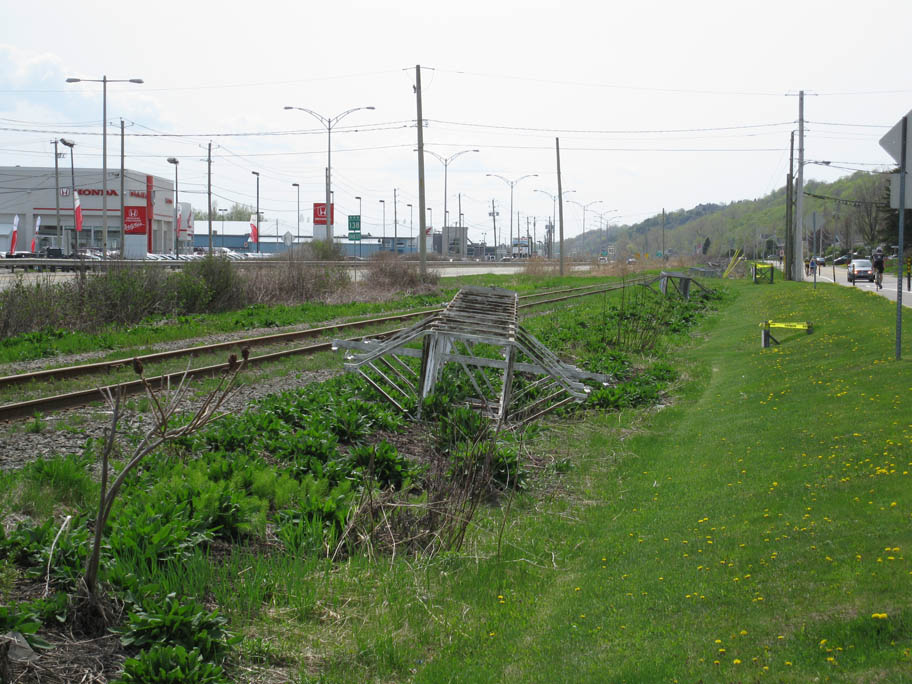
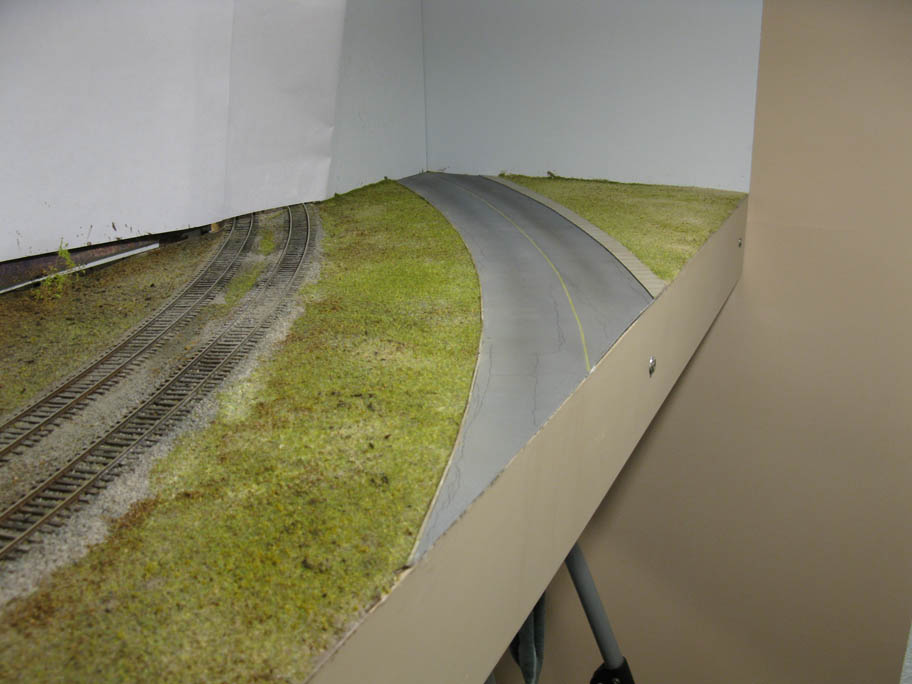
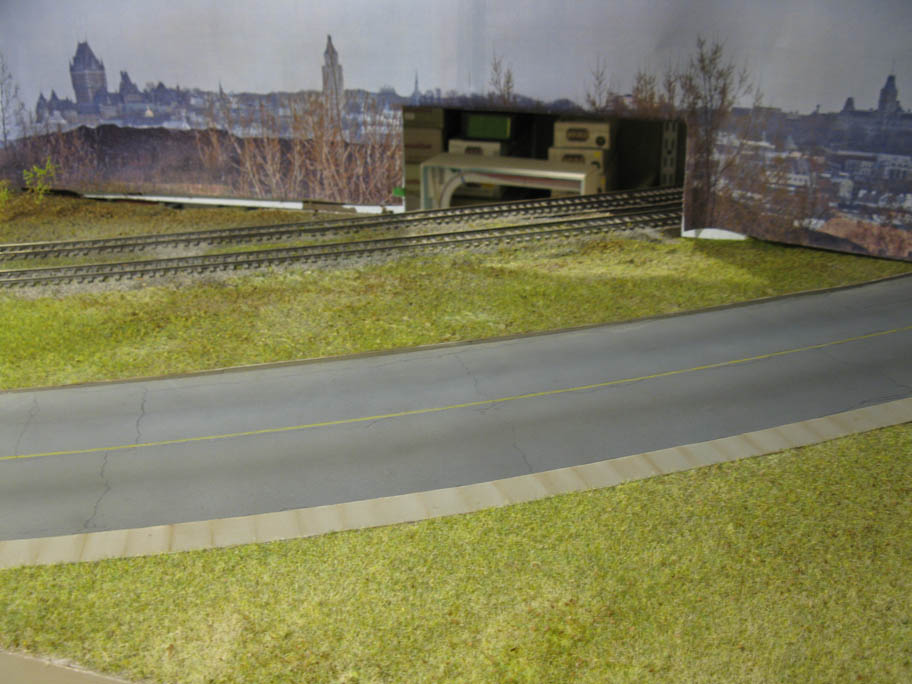
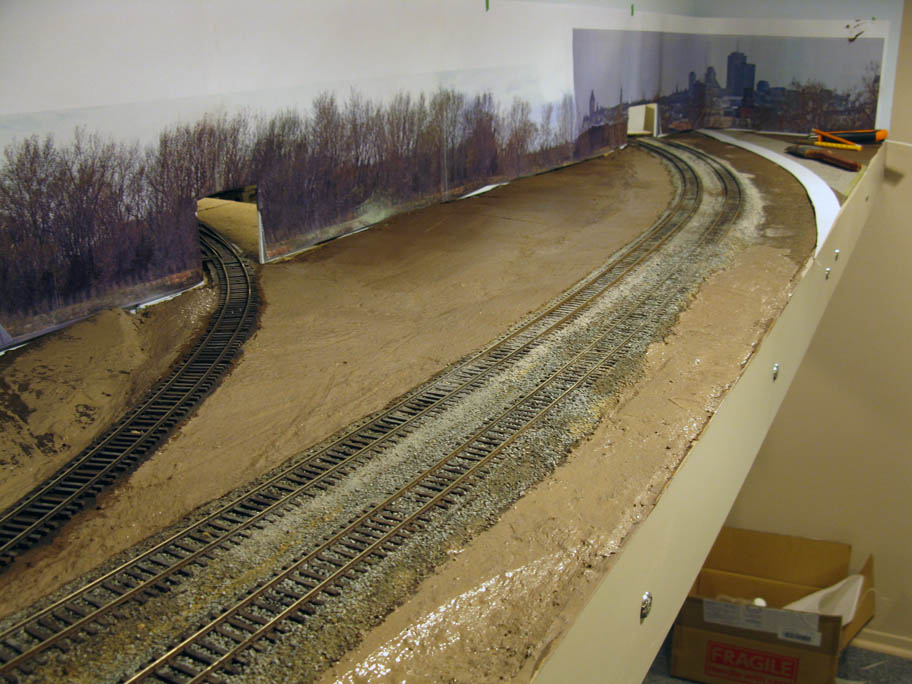
Next step was to use drafting paper to locate the road parallel to the tracks. The spacing and dimensions are exactly prototypical. As you can see, I entertained for a while the idea to include the bike trail that runs along the track since 1986-1987. But I refrained because it made the scene look cluttered. Also, in this par tof Maizerets, the trail isn't near the track. Less is more! By the way, the road will be made out of cardboard and painted before installation.


At this point, a batch of universal mud was mixed and applied along the roadbed. Actual pictures of Maizerest show the ballast to be at the same level than surrounding ground. The surelevation is quite minimal. Carefully using a spatula, I shaped the mud in such a way the track now looks to be part of the terrain. It seriously improved the appearance of the whole. At this point, I must stress Murray Bay Subdivision was never a big mainline. Most pictures, even the oldest ones, show that grading was minimal: they dug the ditches and put the material on top of the roadbed then ballasted. After few years, everything sank to ground level.

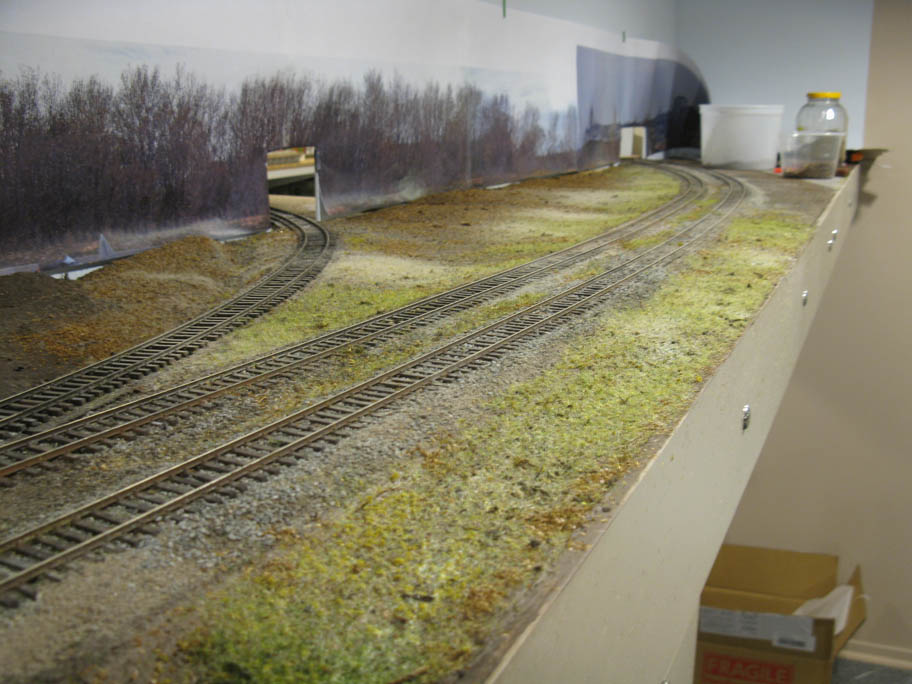
Then, everything was blended together with a generous coat of paint. I usually work with a dark brown, but this time, I mixed it with the gray paint used to paint road. It gave a color much similar to the dirt I used. I left the dark brown somewhat intact in forested areas.


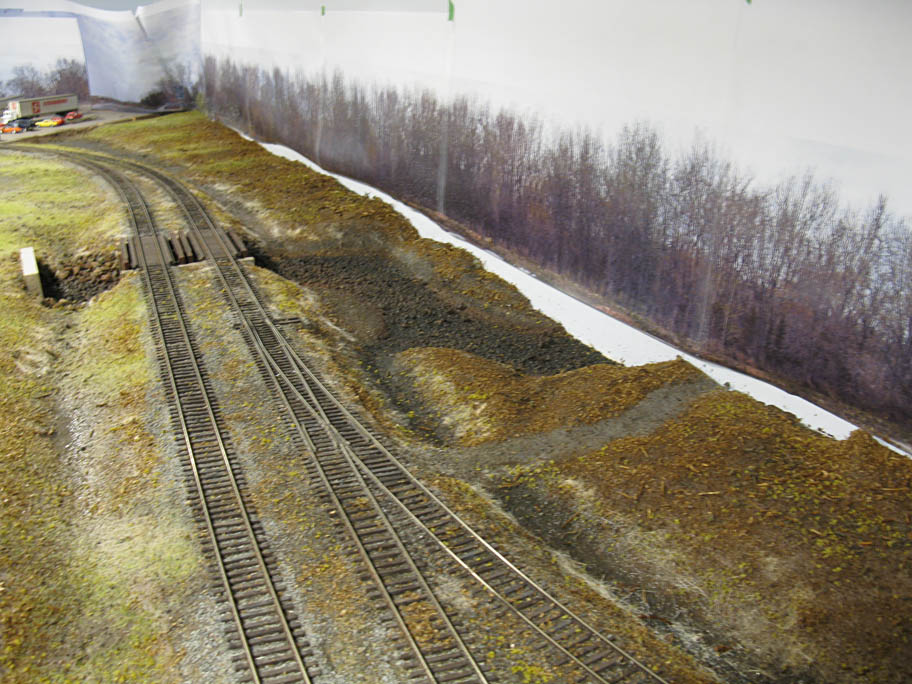
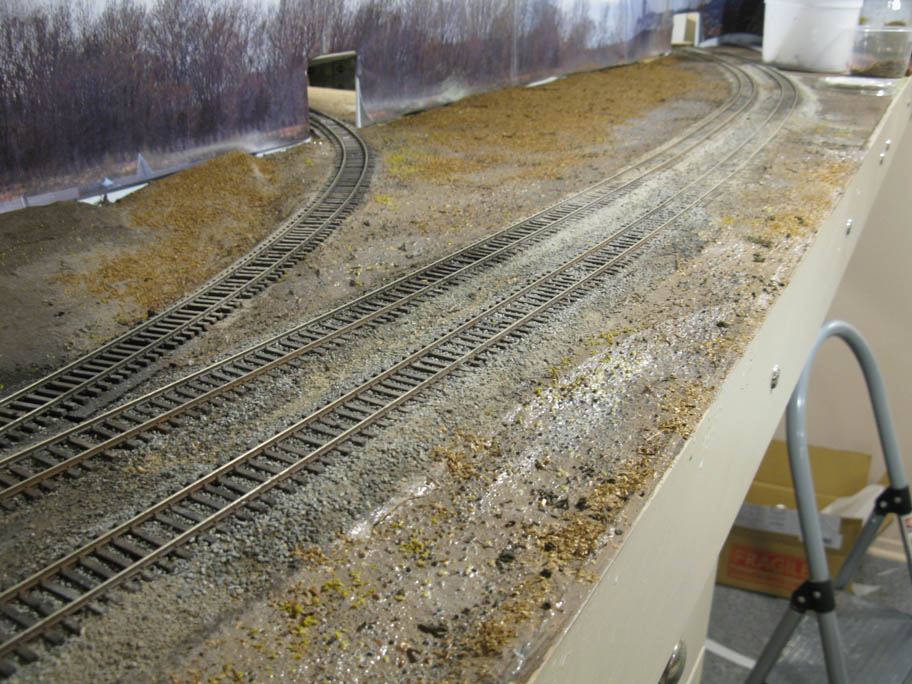
At this point, I followed up Trevor Marshall's scenery technics described in the Road Show last year. I like Trevor's approach. It's intuitive and you can work as you go. The key thing is to work the scenery as a multiple layer thing, just like the real life. Also, I didn't care to wait the paint was dry. In fact, wet paint is an excellent way to cement scenic material.


The first step was to sprinkle dirt over wet paint using an old nylon stocking. I got the trick from Gordon Gravett's books and it works pretty well. If you want a light coat of dirty, that's the way to go because you don't get irregular spreading patterns caused by a spoon or a cut.

After that, I scattered more coarse dirt, small rocks, crushed tea leaves and some olive-color ground foam. While the application was generally random, I did follow the topography and made the spreading pattern irregular and random to some extent. There's no straight lines in nature.


After the dirt application, I sprinkled a heavily coat of ground oak leaves in the forested area. Maizerets is full of trees and thus dead leaves are everywhere. This trick is from Mike Confalone and works wonder. I think next time I'll use different colors dead leaves for more variation. This custom-made mix beats any product on the market supposedly made to represent forest floor. Seriously, a mix of branches and green ground foam doesn't make any sense at all!


According to my spring photos of the area, lots of leaves are also still visible on the right of way and tracks themselves. For this reason, I applied leaves here and there. The leaves blanket was soaked in wet water then received a generous coat of diluted PVA glue.


Finally, it was time to apply some static grass! This is my first ever use of this technic and it was less scary than I thought. But before that, let's talk about the choice of color. As you may know, the layout is set in late April-early May. In Quebec City, it means trees are leafless but grass is starting to get green again. Over the last week, I observed grass everyday when going to work to better grasp the color variation. First of all, the idea every grass is dead and straw-colored when the snow melt is bullshit. Nature is much more subtile than that. In fact, yellow grass is mainly dead tall grass still standing or crushed into a thick blanket by snow. Where grass isn't very tall, the dead grass isn't that much visible and you can see green colors while the snow is still melting. To get it right, you must try to recreated a patchwork of green and yellow grass. Some area are blended, others are mostly green and others are yellow. If it rains, in a matter of hours, the grass will be green as if it was summer. On the layout, I decided to make it appears as if it didn't rain since the snow melted.


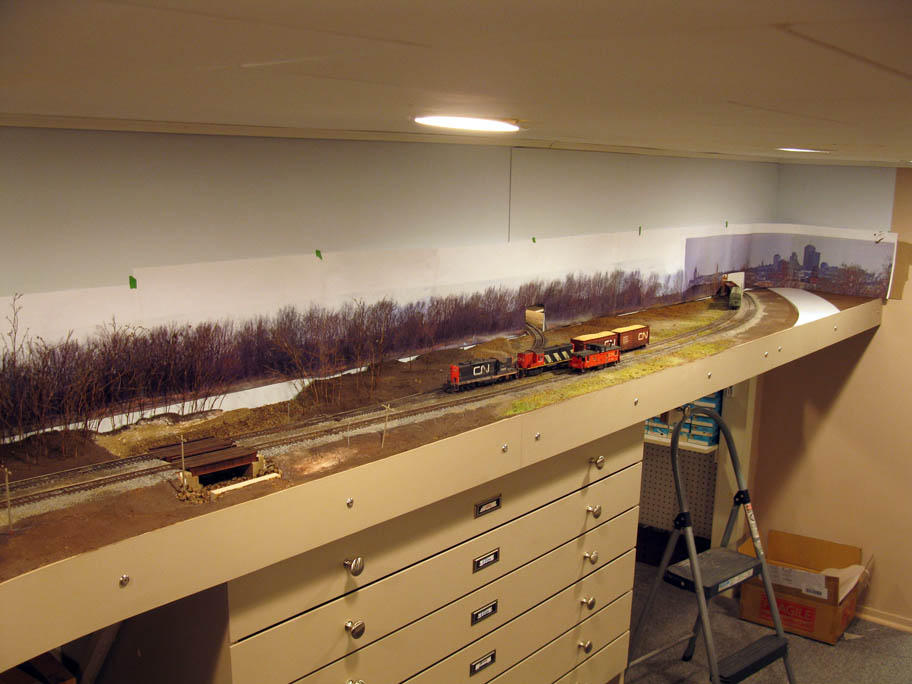
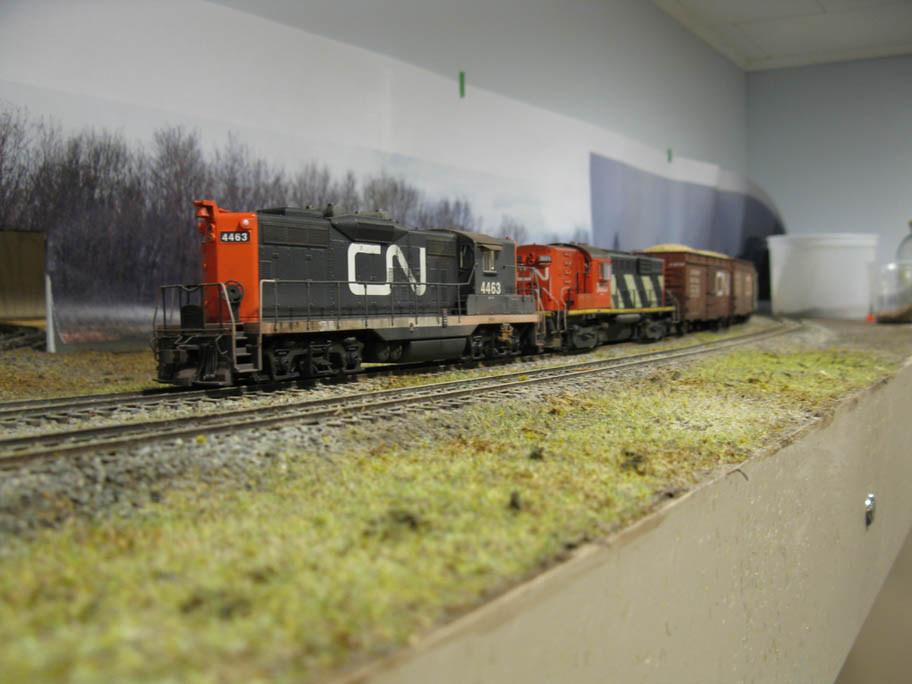
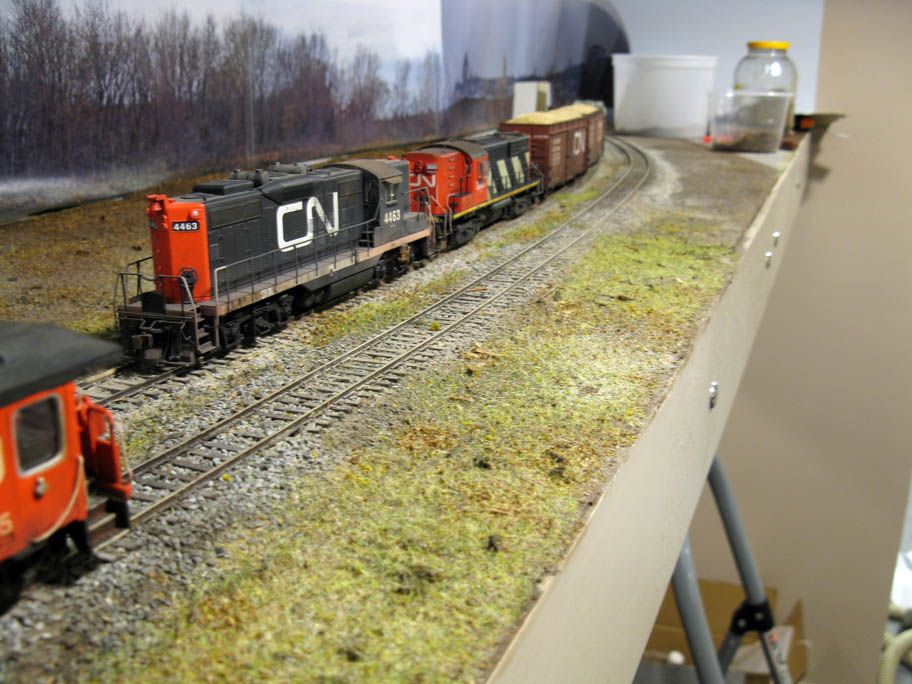
And here's the result after 5 hours of work. It was now midnight. Be aware that the glue isn't dry yet and colors will likely vary. I'm quite satisfied with what I got. I'm aware this is only the first coat of scenery and lots of bushes, trees, gravel, grass tuffs and dead tall grass will have to be added. What I like, is that scenery dwarfs the tracks and makes the layout appear larger.

 
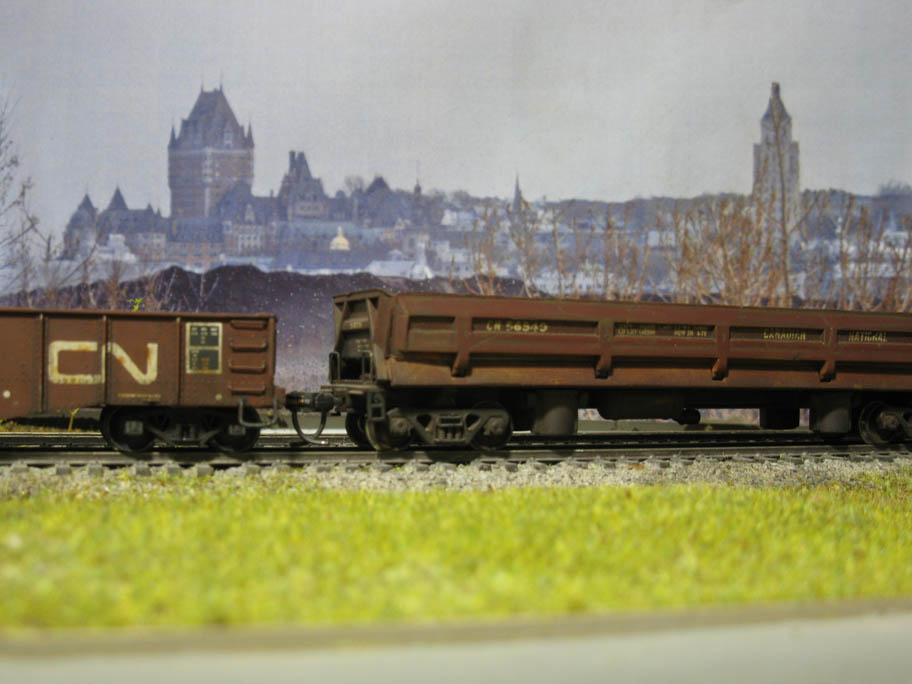
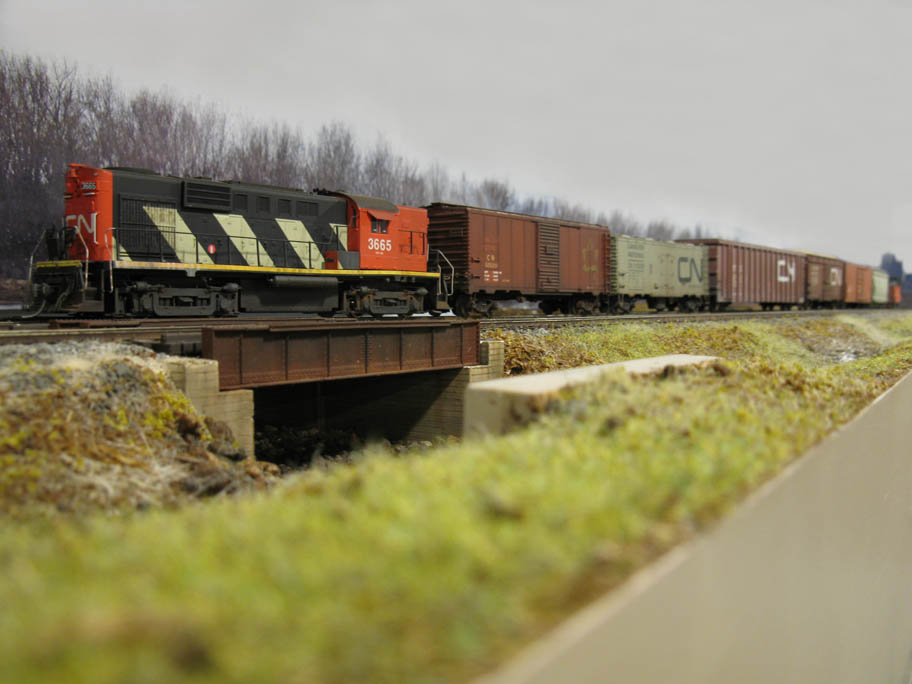
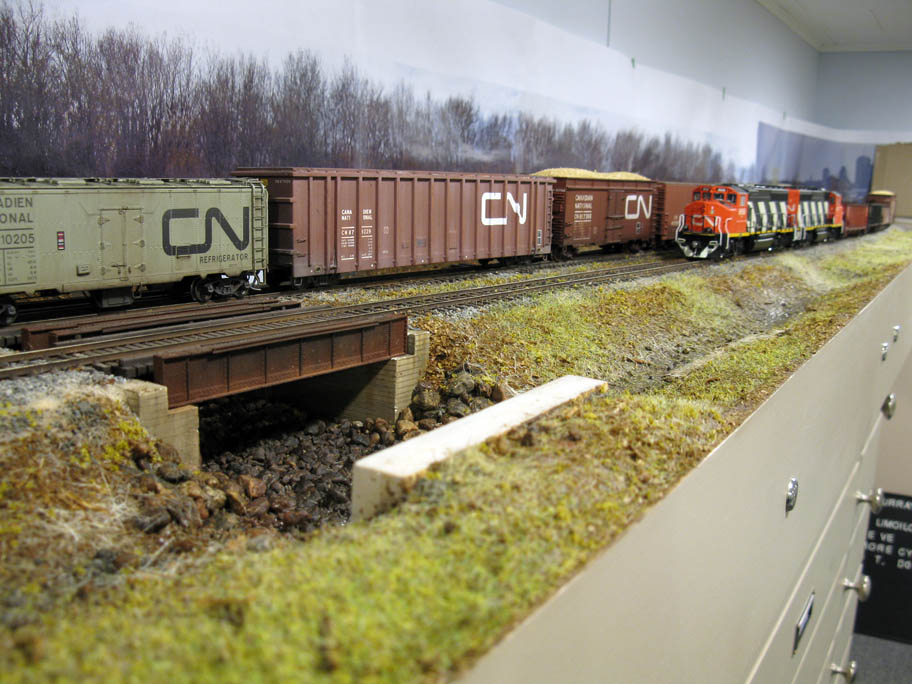
And now enjoy the ride!