Showing posts with label Scenery. Show all posts

Monday, November 6, 2023

Village Montmorency – Part 1


When I wrote the last article about grass, I couldn’t predict it would be once again true. Since Louis-Marie wasn’t there to assemble the cement plant, scenery was once again my main concern and I turned my attention to Village Montmorency, that small neighborhood nestled between D’Estimauville Car Shop and the plant. The apartment buildings there have been kitbashed years ago, but I never completed the any work on them nor their surroundings. Now, things can change.

Cardboard sidewalks are always fun to build
 

The big positive thing to talk about this scene is the fact the fiberboard base is movable. We designed it that way back in the days knowing that applying scenery in such a hard-to-reach corner of the room would be a real nightmare. As a module, it’s much easier to apply scenery, build roads and fences directly on the workbench while sitting.


A light coat of spackle to smooth the road surface
While our work session was quite short due to visitors, I was able to model sidewalks, cutters and apply a light coat of spackle on the asphalt road. I still have a few ground details to add such as garage entrances and parking lots, but it was so fast to create scenery in such a way that I will probably reuse that module approach with Monk Subdivision. Chris Mears has been exploring that for a while with his The Shove module and it seems to be indeed a very practical way to approach scenery, particularly on cramp areas or when you try to mock up scenic elements you aren’t 100% sure. Anyway, I’m quite excited at the idea of modelling Montmorency Village and hope to see it come to fruition during the next few months. Also, since most details are hard to see from normal viewing angles, I’m thinking about using some modelling shortcuts to make it faster. Once again, textures and colors will be the most important aspect of it. Don’t expect manholes or small details like that. It will be a more impressionistic work…


Friday, November 3, 2023

If In Doubt... Apply Grass

I often find myself at the layout wondering about what I should do... When I hit the proverbial creative block, I look around me at some random piece of land still covered in fiberboard and bring some scenic material nearby...

The bagging plant is now surrounded by grass...

That happened last week when I was about to add some asbestos cladding on the cement bagging plant only to find out the corrugated cardboard I ordered was too coarse for the job. Fortunately, the ground around the said warehouse was still in dire need of coverage and I obliged. The surface was about 2 square feet around the siding which, on the prototype used to be buried in a nicely maintained lawn. After 45 minutes, it was all becoming reality and I needed another victim...

Subtle ground variations blend the 3D world to the 2D backdrop

My attention turned to Villeneuve were a large parking lot had been planned in the foreground. I reduced by 2/3 the surface, preferring greatly to put emphasis on the mainline rather than its surroundings. This is a place where we skip about 2 or 3 miles of track, so it made sense to keep it simple and generic to get a sense of separation.

Simple but well executed grass often does a better job at scenery

Learning from my recent work in Clermont, I added some ground elevation in the backscene to replicate an embankment that exist in D'Estimauville to fence the snow depot during winter. I thought it would be a much better transition with the future backdrop.

This trio of F3s sit on the exact original patch of grass

While all this is kind of repetitive as applying grass as been covered more than once on this blog, I've reach that point where my new efforts are now juxtaposed to my earliest ones. I remember struggling with the grass applicator and gluing very little grass in fear that too much wouldn't look like spring time. Since them, I've been applying grass in a more generous way, most of the time by hand in clumps. As you may have guest, it's only a matter of printing a new photo backdrop for this area and it will be rescenicked on par with the rest of the layout.

Monday, September 18, 2023

Brique Citadelle - Part 2

The next logical step to Brique Citadelle is painting and installing the road better known as Avenue du Sous-bois which used to be the main access to this industrial park until the late 1990s.


I'm certainly no reinventing the recipe. Not by fear of experimenting, but because I want the layout to have a common color palette and techniques to bring in an air of familiarity. As I mentioned in a recent post, just using some different color grass can have a huge impact and I certainly didn't want to gamble.

As always, it's a carboard road painted with Krylon grey primer and camouflage beige. Some light airbrushing blends everything together and add a touch of blue to better capture local tarmac. Powders and colored pencils finish up the road, which is then glued in place with latex caulk. 


Grass is the same blend I always used. The static grass applicator was helpful for some zones, but I must admit I preferred to complete the job with my own fingers. It seems to me each techniques has pros and cons, hence they need to be mixed together to yield the best results.


There are still a lot of things to do, but this area of the layout is taking shape nicely. I particularly love its understated appearance. Indeed, I'll need to add more grass and more ground cover, but I'm not planning to crowd the place with more than a few bushes and trees, utility poles and probably a weathered Volvo front loader reminding us that the site is currently being decontaminated for future redevelopment.

Saturday, September 2, 2023

Brique Citadelle - Part 1

Brique Citadelle used to be a major brick maker in Quebec until its spectacular demise at the end of the 1980s and early 1990s. Engulfed in several multi million dollars lawsuit regarding catastrophic quality control that led so several building enveloppe failures, the company which roots went back to the late 19th century, sank like a rock at the bottom of the proverbial pond.


While all that happened when I was was an elementary school kid, I can still clearly recall the intricate structures that made the plant. Each Saturday noon, we would take the industrial road behind  the plant to reach a well-known snack bar after visiting my grandparents living in Villeneuve or shopping in town. The brick and corrugated steel structures were covered in a reddish clay powder that gave an eerie Martian look to the compound. By the mid-1990s, it was in serious disrepair and everything was demolished, leaving piles of rubbles and concrete pads that would endure well into the mid 2000s. I recall the concrete floor was once used by a bike driving school as their formation center.


When the neighboring cement plant went down a few years after Brique Citadelle demise, projects started to emerge. Redeveloping are became a thing and the old industrial remnants were removed and soil decontaminated. At the time our layout is set, Brique Citadelle was nothing more that an abandonned fields with growing vegetation, dirt roads and piles of gravels and discarded demolition bricks. That's exactly what I wanted to replicate: a demolished and long gone industrial structure.


It all started with a coat of universal mud, aka Celluclay mixed with interior latex paint. A thin coat, about 1/16'' to 1/8'' was apply on which I poured sifted sand, various small rocks and scale bricks I once bought from Eastern Europe for that very purpose. They were available in all scales, including HO. They are generally used for military dioramas and are made from clay, which gives them a very realistic texture.


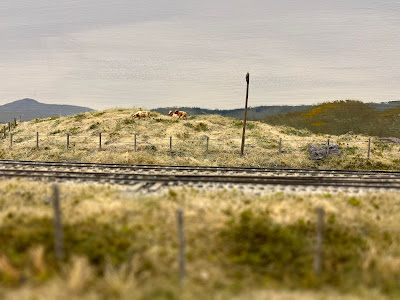
Most bricks were pushed into the mud with my fingers to show they had been mix with the ground and ran over by trucks for years. Others were simply left as piles on the surface. A light sprinkling of limestone powder was applied to merge the bricks with the surrounding. They look quite shiny and new and will require some weathering at a later date.

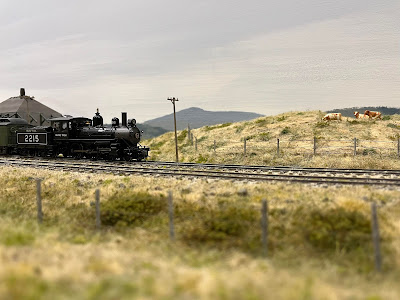
Before everything had dried, I started to apply some static grass by hand as I usually do, followed by crushed dead leaves and ground foam. I tried to overdo it it, leaving enough bare ground visible to suggested trucks and heavy equipment are frequent visitors.


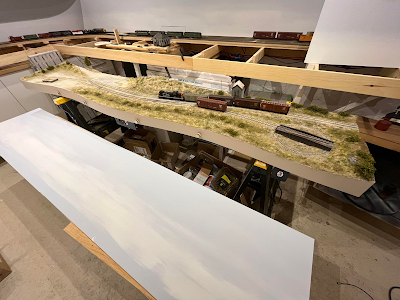
When the background scene was done, I move my attention to the foreground where I started scenery last week. I didn't like it because I ran out of my regular static grass. Using different colors and jute rope to achieve the same blend was a foolish errand. Hence why we ordered the old stuff during the week.


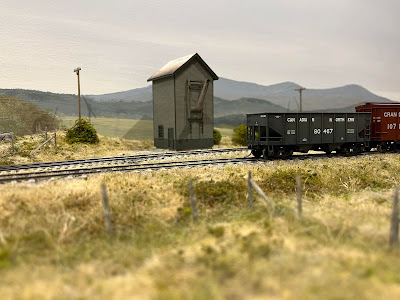
There is still a lot of work to do with this scene, including trees, ground weathering and small details such as relay boxes and bushes. However, I'm quite happy of how it turned out. More grass will be applied on siding tracks to tie up this scene with the cement plant, but that's a footnote as far as I'm concerned.


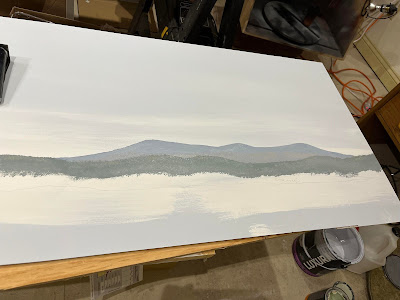
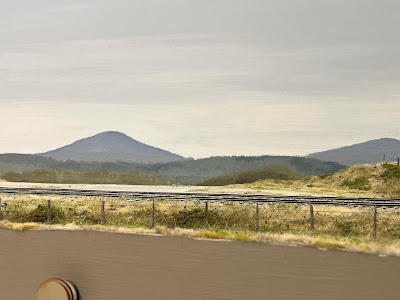
A few unexpected results of this new scenery is it makes the mainline look longer and the lighter shade of ground makes it more luminous, two thing that works in our favour. I can't wait to finish the road and continue this work.

Sunday, April 16, 2023

One scene at once..

I suspect long time readers are probably getting tired of hearing me pushing my drivel about grass. It seems the remaining work on the layout is all about applying more vegetation and after some time, it's just a case of repetition. I have, truth to be told, nothing new under the sun to share with you in terms of technical advices on this subject. However, I think sharing before and after picture may provide some kind of genuine interest and show how subtle changes can make a great difference.

The backroad in Clermont was an afterthought. The village scene and Wieland weren't intended to blend together, but at some point in time, it became almost natural they should connect. Hence, the creation of a gravel road. We had serious reservation about that, but I think it worked out fine. Louis-Marie also played with some forced perspective on the backdrop to make sure the asphalt road didn't end in the middle of nowhere. I honestly thought it would be dubious, but his little cardboard cut out just shows he was absolutely right. It will be improve and turned into a permanent feature.


In the vicinity, the hillside is also now completely covered with leaves and grass. Instead of gluing a carpet of dead leaves, I added some death grass and bushes to add more depth to the scene. I consider the results are much better than the rest of the forest and may, in the future, add some spots there to improve the scenery.


On the left, it's just crushed leaves... lacks texture!

Another spot was the locomotive shop in Wieland. It now has a nice parking lot. As with the road, when the gravel is dry, I also use a large 2" paintbrush to add a layer of powered limestone/unsanded grout to add that light dust layer so typical on mineral surfaces.


Brushing limestone powder changes everything!

The old off spot cars siding has also received more dead grass made of jute and various static grass fibers to be closer to prototype. Same thing happened with the ditches. I simply glue more material over the first layer of scenery. It adds colors, volume and textures.


Friday, March 10, 2023

Clermont - Lawns and grass

The latest work session on the club layout was all about completing the village scenery. Louis-Marie has been very adamant about it for a few months and it’s long time due to act.


The goal is always to blend everything together in a coherent picture

Having learned new techniques on how to create grassy patches of vegetation with Stanstead, I decided to reuse them for the small rundown farm house. If the houses on the other side of the road have very well kept lawn, this is not the case with the old farmstead.

On the horizon, straw colored grass blends with the backdrop 


I applied a generous coat of white glue, pinched static grass of varied length and color and dabbed it. It was all about creating random patches, but also taking into account where dead grass is more prevalent and were new growth manifests first. In that regard, the photobackdrop had that caracteristic straw colored field at the junction with the layout. I thus used static grass of similar color to blend the photo with the 3D world.

The randomness follow patterns observed in real life

As always, I also sprinkle ground foam and dead leaves to add texture and create the illusion of weeds growing everywhere in a haphazard way.


Well-kept lawn at right and untidy grass at left

As you can see, the difference between the manicured lawns and the more natural one is striking. One looks very artificial wile the other is organic and blends together with the rest of the scenery. There is indeed a lot to be learned about applying static grass that go far beyond using an applicator.


I’m also myself impressed by how far my modelling has gone. It is reaching levels far beyond my initial expectations and I’m delighted at what I see taking shape before my eyes.

Thursday, March 9, 2023

Model Railroading as an Art

Many years ago, when I launched my series of “Thinking Out Loud” articles, I had that urge to shout my anger at my approach to the hobby. It was a call for freedom of thoughts in a hobby where I felt I had to check boxes. It was more against my own delusion than the hobby itself, which can be practiced in various ways. Almost 10 years later, as my modelling skills mature, I have the great satisfaction to have finally found my groove, or should I say, my own personal style. Sure it has been informed by many modellers, but I’m far beyond copying others and expecting “realistic” results. Like a painter, I look at a scene and reinterpret is using my own palette.

And to be bluntly honest, it has been quite a surprise. It’s not exactly the way I expected my work to turn out. I has a rougher edge than previously imagined in my mind, but it is counterbalanced by texture and colors, two things that I learned to appreciate.

There is this myth that recipes exist in model railroading, which is true. However, these are tools we master to acquire a vocabulary. They shouldn’t be restrictive but enable us to tell the story we want to craft for ourselves and others.


I’ve learned to frame scenes, I’ve learned to balance space around tracks, to create natural landforms that compliment trains… I’ve also learned I don’t care about what is exceptional in railroading, preferring to put my effort on mundane things, the ordinary life and way we appreciate real trains. Lowly boxcars, unassuming houses and F-units are, as they should always have been, part of my vocabulary. Techniques are no longer how-to but extensions of myself, like a pen and a brush.

I used to draw a lot when I was a kid, mainly landscape with farms, old houses and trains… this passion of mine somewhat died out when I reached college years. Yet, progressively, this old passion of mine is blending seamlessly with model railroading, which makes me wonder if I’m no longer building layouts but drawing 3D train landscapes. Deep inside me, I’ve always wanted to build layouts like you paint on a canvas and it seems I’ve stumbled on that road in a clumsy but rather fascinating way.

Saturday, March 4, 2023

Stanstead - Painting a Backdrop

 I've always been a little bit intimidated by backdrop, be they photo or painted. For some reason deep inside me, I'm afraid of ruining my work. But as they say, if the mountain doesn't come to you, go to the mountain.


I suspect my fears were fuelled by the fact I had a very vivid mental image of what should be the correct backdrop for Stanstead and felt I wouldn't succeed to make it reality. Fortunately, I have a few cheap 1/8" MDF panels laying around, so I can afford to miss and redo the job. One thing was sure, I've been a big fan of Mike Cawdrey's painted backdrops for more than a decade and I wanted to try it myself.


My idea for the backdrop was informed by two pictures. One is an old postcard of the station, looking south toward New Port, Vermont with Jay Peak visible far away on the horizon.

Source: Eastern Townships Archives Portal


The second picture was from the late 1970s, shot at Highwater, QC, looking again toward the Jay Peak and I felt the mix of Appalachian mountains and rolling hills was perfect for Stanstead. To give me some help, I screenshot a view from Google Earth as inspiration and started to paint the backdrop.

Inspiration picture from Google Earth


The project started with a very light blue color which I used extensively on Charlevoix Railway. Using white, I feathered both colors to create a bright horizon and a darker sky just like my reference picture.


The second step was to draw the mountains profile with a somewhat darker blue-grey. What is interesting to know is the peak looks darker than the mountain base due to the atmosphere. I dabbed a lighter shade there and even added some burnt Sienna to it to get that warmer tone depicting deciduous trees.


It is then followed by a conifer tree line on the horizon. Once again, several shades of the same color are used to create depth and variation.


Then, the foreground is painted, including several wooden areas, bushes and fields which colors are selected to blend with the layout scenery. It really is that step that helps to tie everything together. Many details at the bottom of the painting will be lost behind the scenery. Is it a shame? Not really, as I believe the horizon line should be low and that mountains shouldn't be higher than structures surrounding them.


After two hours and 30 minutes of drying time, the backdrop was ready for installation.


At the end of the day, I've learned I can paint decent backdrops, that it's faster than stitching and tweaking photoshop pictures, and that it doesn't need that much talent. Could it be a interesting option for Monk Subdivision? Most likely because I don't see myself fighting with photos in such a crammed space.