The Japanese layout discussion also sparked another interesting point, which was about showcasing trains instead of showcasing railway trackage.
In this hobby, it is often assumed that if you want to represent the essence of a prototype, replicating at least one station is the sure way to go. For obvious reasons, it is indeed a strong design position. Stations have signature buildings and industries typical of a specific locality and railway company. They are strong affirmative elements that define the peculiar identity of a company. On the other hand, this strong association means that any deviation can be annoying for most modellers who knows too well their prototype.
From my own personal experience, I find out that I barely interact with station scenes. They are nice to build, nice to look at, but at the end of the day, I find myself always railfanning my own miniature trains in the most mundane settings on the club layout, i.e., along a single track mainline, disconnected from the “signature” elements and grounded into the landscape.
At this point, it is indeed a matter of personal preference and I find no wrong way to tackle design as long as the premise correlates you own interests. Also, modelling mainline has always been an interest of mine dating back to childhood. But let’s play with that idea a little bit and see where it can leads you.
Thinking outside the room has opened a wild and long exchange of ideas between Chris Mears and I. It would certainly be great to share these raw thoughts here, but the format would be hard to translate in blog form. That said, many interesting concepts were shared and are worth exposing here.
The first thing is that a loop staging outside the room is a no go. It seems I made serious dimensional errors when I made a proof of concept. For some reason, I made the length much longer than it was in real life. Thus, it doesn’t fit the intended space. Another option was simply to expand the loops outward in the basement large woodworking shop. As you can already figure out, this is highly undesirable. Sacrificing a precious working area to run trains in a dusty environment is not a sound nor sane proposition. I’m mad, but not THAT mad!
Thus, it’s back to square one… or is it? Once again, our friend the Japanese N scale layout in Hokkaido will lend a helpful hand. Could the returning loops be incorporated into the layout room? They are huge aren’t they… fitting them in corners is pure madness... No, I’m not into building the next bridge over River Kwai!
But could the loops be located in the center with the layout surrounding them? I know it’s an unusual proposition as it means to remove entirely Armagh from the picture. But is that a viable proposition? Wouldn’t it remove the core of the layout, or worst, dilute entirely the signature scene that hold together the layout around a narrative? Maybe… if the goal was to depict Armagh, QC in the early 1950s or in the 1960s. However, nothing is more removed from my initial intentions than fixing the layout rigidly in a specific reference frame. Armagh and Monk Subdivision have always been a useful tool to provide inspiration for a generic yet realistic layout depicting the South Shore. It could be anywhere in between Southern Quebec, New England and New Brunswick, which I stated more than once on this blog.
 |
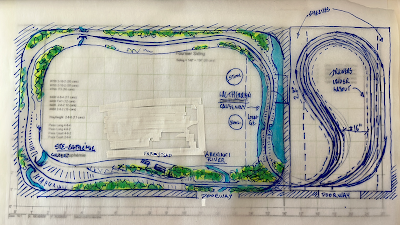
| Chris' sketch about 3 scenic modules an one left for future use |
Reaching that point, one can ask itself if the station scene isn’t too specific to fit several eras and prototypes. The answer, at least mine, would be yes and no. Yes, because it comes with a signboard with a specific location, but also no because most rural stations around the continent shared a good deal of common features. At this point, just replacing the buildings could be enough to trick most people. But they are also a point where things happen such as stop, refuelling, switching, etc… In my own personal experience of trains, they are moving on the mainline about 98% of the time. Not that it’s entirely true, but it’s how I encounter them. They are floating dreams running in front of my eyes, filling up my field of vision and impossible to stop… Once they are there, later they aren’t. Destination unknown most of the time, except for a faint idea about the next division point.
In that regard, maybe the station is no longer the mundane point of view of the railway, but rather something out of the ordinary. As I mentioned to Chris, I’ve realized over the last decade how little I care about switching moves when I’m at home. I don’t care at all, it bored me to death. I just want to see rolling stock moving on the mainline, watching them from a fixed vantage point, immersing myself. If I want to switch, I go to the club layout and get my fun there. So why should compromises be made to get a half decent switching layout with a short length of mainline? Murray Bay has only switching districts and no mainline… thus the home layout should provide something different.
 |
| Displaying trains on the mainline... |
When you think about it, is the layout made to “play” with trains or to “display” trains? Both genuinely worthy goals, using similar structures and components, but not exactly the same. Knowing myself, I’m in the second category and it comes to my mind a small basement layout should provide for that. A good stage with exquisite scenery. Something achievable, easy to maintain, that can be built in a decent amount of time on reasonable budget.
 |
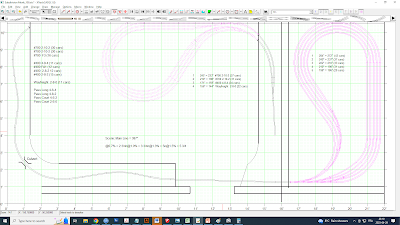
| No station, but a central staging area... |
Thus, the central set of staging loops starts to look appealing. Sure, it eats a lot of space, but on the other hand it leaves more space for the scenic layout to develop itself under the IKEA cabinet. With such a layout, there is no longer a need for selective compression since it’s only a slice of railway from the prototype between nowhere and nowhere. A mile or two, it doesn’t matter. The mainline is just finding its ay around the hills and the small rivers to reach a final goal I can’t fathom and which, ultimately, doesn’t really matter.
 |
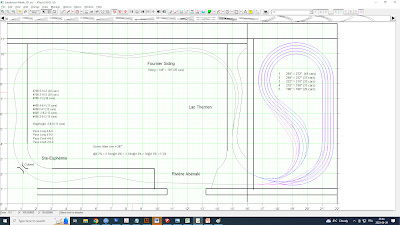
| The "Dragon head" as dubbed by Chris Mears |
This is also a proposition that makes sense. The staging “bulge” can be built independently from the walls and be highly accessible for maintenance. It also creates alcoves from which you can watch the trains, which are always an interesting spot to stand.
It is also possible to hint at some rail traffic control by having the first turnout of each staging loop on the layout, as if they were depicting the beginning of a passing track (which, they are indeed). The main layout thus becomes one long occupancy block. A stage for trains to play their game and be displayed. In some way, the scenic portions are now a large panoramic screen surrounding the viewer. It’s an immersion experience, which is one of the things I always loved with model trains… when they trick you to believe it’s the real world.
From a more pragmatic perspective, this kind of layout takes away a lot of construction issues and limitations. It’s simple, yet sophisticated, and I like it that way. In fact, I recall that early ideas about that layout also tried to capitalize on that before the FOMO factor tricked me in adding “stuff”.
 |
| Staging loops in the center for ease of access |
Another big point in my eyes is the sheer staging capacity provided by the loops. I got the idea from some fanciful European modeller I’d rather keep the name untold, but it works very well for its purpose. Just in term of capacity, the longest track on the loop can hold one locomotive and 37-38 40ft cars. By HO standards, this is huge for a small 16’ x 10’ feet layout. It really captures the essence of big railroading without compromise nor need for a basement empire. Even the Cabot, that very long CN passenger train from the 1960s linking Montreal with the Atlantic, can be staged in its longest iteration… imagine, two Alco C424 pulling 16 heavyweight and stainless cars through the Appalachian Mountains! If I’s a pre-1918 NTR train during the war, we easily reach forty 36ft cars in tow behing a large and mighty 2-10-2 .
 |
| Serious staging capacity! |
As you can see, the language has changed. It’s no longer about modelling “that place”, but about modelling “trains” in their natural environment. For that reason, I like this idea! And for the bulge, I’ll find a way to give it a useful purpose; be it covered with a tabletop to create a lounge or install a clever diorama or rolling stock display on it. The spray booth and other useful tools with find their way in storage under it… You know, you never have enough storage!
 |
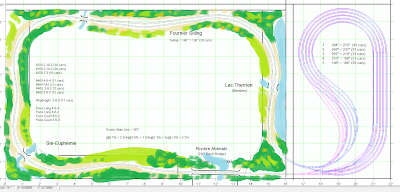
| With some scenery |
As for the scenic aspect of the layout, it captures three of my favourite spots on Monk Subdivision: the Lac Therrien causeway along the marshes, the neat girder bridge over Abenaki river and the cool concrete culvert spanning Rivière du Sud at Ste-Euphémie.
 |
| Lac Therrien near Monk (credit: Google Earth) |
But as you can already guess, this bulge design is only one step on the road to finding an acceptable solution for the layout. Stay tuned for the next installment where we will go back outside the room to loop the loop.