Earlier
this year, I experimented with the idea of finding an efficient way to upgrade Athearn 40ft boxcars without breaking the bank. The idea was not about turning
these cars into prize winning or finescale model (because at the end of the
day, almost nothing would remain from the original shell), but rather to erase
their ubiquitous lineage so they can merge seamlessly into a fleet.
While my
experiment went well, I also encountered a problem: the lack of suitable detail
parts, more precisely doors. As you know, the Athearn doors are quite wrong and
far too short. Back in the 1950s and early 1960s, gimmicks such as operating
doors were all the crazed due to O scale influence. Oversized door tracks and
claws were inevitable and for this reason, the doors were smaller than they
should have been. Add the fact the detail wasn’t great, and you have more than
one reason to scrap them completely.
 |
| The door before adding rivets and hardware |
Unfortunately,
finding suitable 10’ high 1937 AAR doors is now a fool’s errand. Both Atlas and
Intermountain parts are getting extremely hard to find and they cost quite a
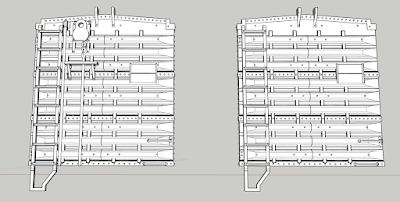
lot for what they are. For these reasons, I decided to design my own doors
using Atlas, IM parts and pictures as blueprints. The process was fast and
about 30 minutes later, I had a nice door ready to 3D print. Given the part
height, it’s about 90 minutes to print, which is more than reasonable.
Later, I
decided to convert other boxcars, namely Roundhouse old 40ft tooling which wasn’t
that great when compared to Athearn. Their later retooled efforts with fixed
doors from the late 1990s and early 2000s were much better. That said, I
decided to do something different and make them early CNR steel automobile
boxcars. These were built in 1936 by NSC and CCF with Murphy flat panel steel
roof and a 10’-0” interior height. By 1946, they were raised by 6 inches to
increase capacity. Since the Roundhouse cars need a lot of work along the sill,
I felt they were perfect for this project since the dubious details had to be
removed anyway.
 |
| CN automobile boxcar (credit: Chris van der Heide collection, nakina.net) |
I selected
the ECC cars since they had Dreadnaught ends with the same 5/4 rib pattern than
the Roundhouse cars. NSC had they own distinctive rib pattern (NSC-1) which
would be cool to replicate but using a much better plastic shell has a starting
point.
 |
| Filing down raised panels is easier than you would think |
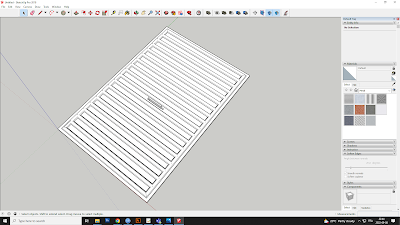
For the roof,
I did a compromise. Since I didn’t want to cut the shell apart, I simply cut
and filed down the raised panels. Real Murphy roofs have a very different way
to be attached to the boxcar sides, but I overlook that detail since it’s not
the goal of this project to be 100% accurate.
Finally, I
need a pair of double doors and decided to tweak my previous 3D design. It took
about 15 minutes to get it right with the correct hardware and the same time to
print.
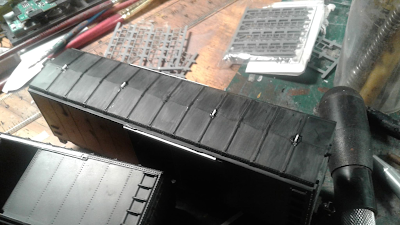
Another
detail that bothered me was the cast on ladders. Athearn ladders are decent for
what they are, but the Roundhouse ones are thick and looks wrong at first
glance. Also, the lower rung is missing. I gave it some thought and ask myself
if it was efficient to remove a ladder and replace it or if it was better
trying to upgrade it by adding the missing rung. I didn’t want to waste A-Line
stirrups if possible.
 |
| Roundhouse ladders are just plain wrong and unsalvageable...
|
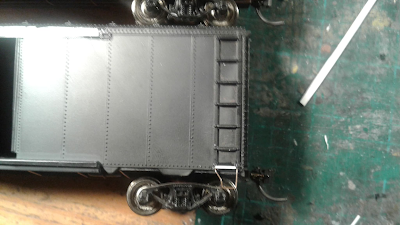
I tried to improve
the molded ladder but results were poor and it was a slow process. In a word,
it was counterproductive. Then, I chiselled the ladder off and found out it
took about one minute per ladder, which was much more efficient. Now, it was
time to design a replacement ladder with 8 rung and an attached stirrups has
was customary in Canada back in the days. To keep the car level of detail
consistent, I used the same design parameters that Irv Athearn set for his
boxcars 70 years ago. I could have made very fine ladders, but what I needed
were ladders that would blend with Athearn and Roundhouse cars. In my mind, you
can’t have finescale ladders with chunking ends. Make it all the same and it
will look better. If you go all in with prototypicalness, embrace it. If you
want to stay middle of the road, be consistent too.

Designing
the ladder took about 5 minutes at best… it was a breeze. The result was nice
because now the boxcars had that distinctive Canadian vibe as if Roundhouse had
released, in the 1970s, a real Canadian automobile boxcar.
I won’t
pretend these cars are prize winning models, but in a fleet, they do a fine job.
In themselves, they have no merit, but you can convert about 4 of them over the
course of a few evenings without turning mad or loosing hairs.
Furthermore,
they may be a little bit incorrect, but they try to stay true to prototype as
much as possible. And finally, the key is to bring them to life by applying
realistic weathering. As I get more experience in this hobby, I’m learning
everyday that right colors and right weathering should be among the first
criteria to attain realism. Realism and accuracy are somewhat different in my
mind. They work together, but I would say that realism is what makes a model
plausible while accuracy is the measure by which the model is close to its
prototype. There is no hard line between both concept and each has to chose
what is adequate for his purpose.