This is the sad story of how cautionary tales comes to life...
I've been working a lot on British-American Oil tank cars and customizing several old DMP and Magnuson kits recently. Fantastic projects, but quite time consuming. Having a goal of going through my pile of unbuilt kits in my stash, I thought a good old Tichy USRA rebuilt boxcar would be the kind of activity that requires very little mind power for a change. How wrong I was!
As always, I started assembling the model per instruction (loosely to be honest!). The shell, the floor, the ends and voilà! Then it was time to have a good look at the prototype in Richard Yaremko's Canadian Rail Car Pictorial. I had a faint memory CNR cars used grabirons instead of ladders and wanted to make sure I would get that detail right!
While looking a the picture, I noticed that puzzling shadow under the car... a fishbelly sill! Oups! I'll have to scratchbuild then, but nothing very hard... Then looking I went online to search for more pictures and found a beautiful one showing perfectly the car end and the grabirons! Great! Until it became quickly apparent I should have used a Tichy boxcar end with ladders and not the plain one... Oh, and the CNR ladder had 6 rungs instead of 7... Carefully, with a chisel, I started to pry off the plastic ends from the shell then fitted the correct ends. But right before cementing them back in place, some very small detail caught my attention. Indeed, the rib pattern on the Murphy 5/5/5 ends was wrong. CNR used a 8/7 rib pattern instead! Imagine my distress! It was supposed to be a straightforward and relaxing project!
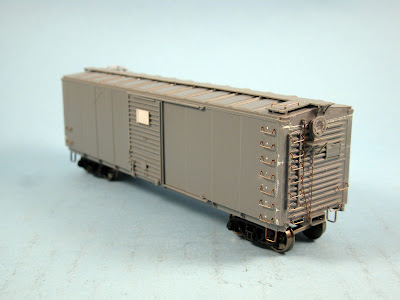 |
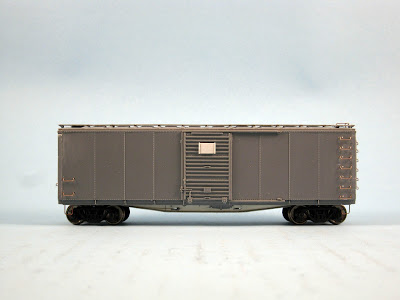
| Completed car with chopped up Murphy ends. |
After a few long minutes, I figured out I could rebuild a 8/7 Murphy end by splicing together parts of Tichy ends together. On the positive side, I could also build the ladder exactly like I wanted it with its 6 rungs. Fortunately, the surgery went well and after one hour, I now had 2 prototypically correct ends.
It was now time to install the grabirons. Using Tichy drilling template, I started to drill holes only to discover the template was made in such a way it had to be used before gluing the ends!!! All the holes were now offset by about 2 mm!!! What a mess. Reluctantly, I plugged the holes with putty and drilled new ones in the correct alignment. A pure waste of time! But I was starting to see the light at the end of the tunnel... or so I thought.
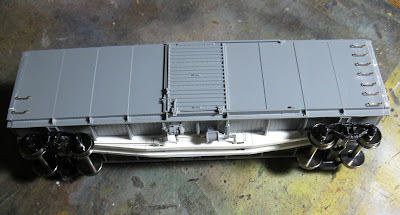
Happy with the assembled shell, I installed the doors and their tracks, gluing them permanently. I decided to install the trucks and see how the car was performing on track. Strangely enough, the rear axles were touching the fishbelly, which added friction. No a very free rolling car if you ask me! I was puzzled because I used an Accurail fishbelly boxcar to get the dimension rights. Seems I was off by about 1mm. Unfortunately, I did such a good job at gluing I couldn't remove the fishbelly. Using my X-Acto knife, I pried the steel angle, then cut by hand the excess material from the fishbelly. Let's just say it was awkward! I left more material than required and filed it down smooth. I then glued back the steel angle. Let's just say I was happy at this point!
I took the car again for a test on a piece of track. Perfomance was now flawless, but the boxcar was so light! I put it on the scale and it was barely 3.5 oz. But how do you add weight in an enclosed car you can no longer open? Simple, you take a chisel and you gently pry a door. Since I use very little solvent cement, one door easily popped out and I gained access. A few wheel weights were added until I got the weight I wanted then the door was glued back in place. I had finally overcame all the hurdles for real!
Why do I call it a cautionary tale? Simply because a cursory look at a prototype picture from the start would have saved a look of work. Maybe I was tired, but I overlooked many crucial things like making sure the weight was correct, how the drilling template should be used (the instruction weren't clear, but it was a very old Tichy kit and I recall their newer instructions were much more precise about thing specific task) and making sure I understood what I did. If I had done this, I would have saved probablt 6 hours of my life and the car would already be in the spray booth with a nice coat of primer.
We could easily believe customizing a kit is hard. In this case, it was not: replacing an underframe sill takes a few minutes only, splicing correct Murphy ends takes about one hour. But I rushed and went auto-pilot, which was my downfall and made the project less enjoyable. Nevertheless, I'm glad to have learn again to slow down and understand what I'm doing before commiting to glue. Woodworkers often say: "measure twice, cut once"... and it's still relevant to my story.
That said, I also think it's a good attitude, when making mistakes to access them and find a way to correct them. At any point, I could have said good enough and called it a day. However, I've became a better modeller by finding ways to correct my mistakes. And as a bonus, I'll have a fairly accurate model on the layout!
No comments:
Post a Comment