Saturday, August 26, 2023

Restarting the Modelling Season

The last two months have been quite calm due to vacations outside the country and taking some time off after the big effort to complete the Charlevoix section of the layout. There are still some little elements to add or finish, but we can consider it mostly done. Thus our attention is turning toward an area that was left alone for too long. In fact, many years!

First train of the season, fresh from the shops!


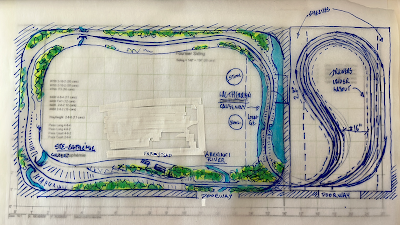
Indeed, it's time to work again on Villeneuve, with fresh eyes and experience gained while working on Charlevoix. Lots have been discussed yesterday, including inverting the scenes, adding an overpass and other ill-thought schemes. As always, after exploring crazy ideas, we generally go back to the original plan! Which is to complete the scene as it was originally designed. While it could be interesting to remodel Villeneuve, we have to keep in mind the track plan was carefully designed and swapping elements that seem trivial could lead to serious operational incongruities.


Track plan and operation aside, the big challenge is getting the backdrop right. As most of you know, the cement plant was demolished a little bit less than 20 years ago and the land has been redeveloped as condos. It's virtually impossible to take pictures of the area and expect it fits an industrial setting anymore. Also, with trees growing a lot since then, many vistas are now impossible to capture on camera. Something else will need to be done... another similar area with similar topography.


Another big issue is using if we really want to continue the early leafless spring theme. This comes with several limitations, including the difficulty to cut the tree line on a photo. Sure, we could print the sky too, but we have had not stellar results in Charlevoix due to humidity affecting the paper. Also, it's quite hard to install full length backdrops. Another issue is that leafless trees are the greatest thing to hide seams, gaps, building junctions with backdrop, etc. Vegetation is great to hide what should be hidden. Don't get me wrong, I like the leafless season, but something must be done.

A quick grass test near Villenuve


First, Clermont is north of Quebec City, in the mountains. Spring starts later there, maybe one week or two. It would mean that if leaves start to appear in Clermont, then they would be fully there in Quebec City. Certainly, they would have a tender green to them, but there would be leaves.


We think it would be easier to shoot adequate pictures in that time of the year, making our life easier. Meanwhile, we could wait until next spring to take pictures and start the scenery right now, leaving a small gap to insert the photobackdrop later. We did the same in Clermont and it worked well.


This backdrop issue aside, our biggest challenge will be to complete the structures. The large cement plant will need to be enlarged at the back. It will be fully modelled. The bagging plant is almost ready to receive its cladding and details and several ancillary buildings could be done rather quickly. As for cladding, I now have a very hard time finding HO scale suitable corrugated cardboard to imitate asbestos panels. From now on, I think I will simply 3D print them according to my needs. It will be more cost efficient and prototypical that way.


I'm really looking forward to start modelling again.

Highball! A new season arrive...

On a positive note, Jérôme was able to revive our duo of GP-15s. Better sounds and keep alives have now made them very reliable locomotives, so all the frustrations associated with poor performance are gone... at least for now!

Friday, July 7, 2023

Building Monk Subdivision – Mark 2

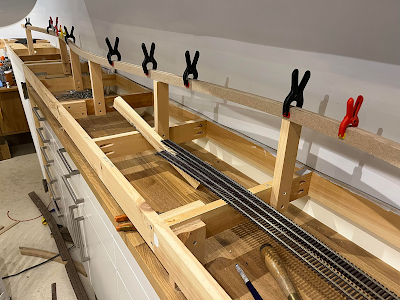
The first Monk Subdivision didn’t get far has it got entangled in issues such as hidden trackage and steep grades. I took a few days last month to strip down the incomplete layout to the benchwork. Better to start from a clean slate. However, lessons learned from this previous iteration were quite precious to get moving fast with the second one. My soldering skills are better, my grasp of spline roadbed building too. Also, I’m more comfortable with laying tracks.


Settling down with a much simpler track plan also help to speed up the construction, which is quite a great factor for motivation. Add to that Quebec was plagued with a heatwave during the last few days, it was just a good reason to spend my evening in the cool temperature of my basement rather than suffering the debilitating 32 degrees Celsius of my modelling room/office.


As always, working with spline roadbed is so natural to create free flowing track on a scenic layout. I love that technique, which is relaxing to build. It goes beyond simplistic geometry and provides much more subtlety. No wonder many large layouts use it.


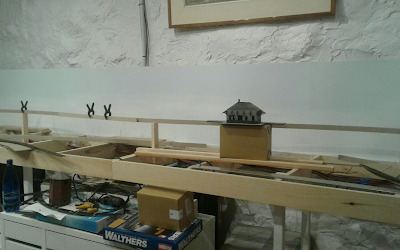
With that said, it’s also a good occasion to test ideas in real time. Moving mockups and structures around to see where they belong, which is always, to a certain extent, a tricky business on paper. At this point, it has become quite clear the station building must be located on the aisle side to provide a more engaging contact with the railroad. As for the sidings, they look better against the backdrop because, in a sense, they are a backdrop when trains parked there are passed by express freight and passenger trains.


On the other hand, I’m no longer sure the water tank looks good in the foreground. I’ll have to find a better location for so it can’t obscure the nice view of a train leaving the big scenic curve. This is the kind of thing that only manifest themselves when working with physical models.


The same can be said of the grade. Until now, I had reservations about it. And now I feel it is a must… the train must climb the hill to reach the station. Visually, it doesn’t look right if everything is flat. For sure, we are talking about a 1.4% grade and nothing really serious… Just to add that little visual impact but not to the expense of reliability.


So far, I'm excited by the project and have found a good way to build in in meaningful steps, which is crucial to ensure success.

Wednesday, July 5, 2023

Thinking outside the Room - Part 4

For some, building a layout is something relatively straight forward, and for most of us, it’s just a long and windy road toward a goal.  For Monk Subdivision, the adventure started more than two years ago when I started to explore the idea of modelling a single mainline in rural Quebec. An early post had all the key ingredients boiled down to a cohesive recipe: a small town with a team track and almost nothing elsewhere.

While this approach seemed simple, I got lost more than once and at some point, fell victim of the “I want it all” curse. The small village became a large division point, then other branchlines started to grow here and there in hopes of creating “interest”. Later on, I explored the possibilities of staging yards, which devolved into a madness of hidden trackage that became a liability for trains. Fortunately, I was able to see the light and to rationalize the layout back to its roots: modelling a generic Canadian mainline in Southern Quebec. Operations would be simply watching trains meeting at a small siding and running the local switcher working the team track. Nothing less, nothing more.

Simple tracks mean less issues. As Joe Fugate likes to say, you can’t have quality if you seek quantity. Less turnouts, less problems… less problems, more fun. Yes, it’s simplistic, but with model railroading, you can’t escape reality and physics.

As for staging, I’ve come to a hybrid solution that ensures I can meet all my goals without compromising too much. The issue was about having two returning/staging loops depicting both end of the line and reducing the grade between the lower deck and the upper deck. My solution consists of creating two identical staging yard and shifting them about 1 foot apart so the aren’t overlapping. This provides two benefits: 1) all tracks are directly accessible from the top and 2) the vertical separation doesn’t need to be more than 4 inches.


Another issue was how to build the layout… what about the phasing? Build the staging then build the layout? That would require me to postpone the project until I could add a room in the basement to house it. Not fun if you ask me. Another option, as suggested by Chris Mears is simply to build the roadbed in the layout room, create a temporary loop and run trains. Elevation can be modified later by altering the risers supporting the spline roadbed. It has the advantage of providing a working layout and a lot of time to work out wiring, signalling and controls while the staging room is being built. Once done, it’s all about drilling a hole in the wall and rerouting both ends of the layout to their respective staging loop. Risers will be adjusted accordingly to get the correct grade.


That said, I’ve already committed to build during the last few days. Old roadbeds, tracks and wiring have been removed and the new spline roadbed is being built. The previous iteration was a failure as a layout, but I learned a lot about splines, soldering and wiring. All that knowledge is making the rebuilding a breeze. 

Splines are such a fantastic way to build roadbed

Well, after a lot (too much) of careful thoughts, I've come to the realization I really wanted a two level set of returning loops/staging yards. The layout goal has always been about railfanning trains and it's the best arrangement to get a lot of traffic and manage it easily with current technology.

The difference this time is that I reduced the number of tracks on each loop and offset them so they aren't hiding each other. It's much more practical for access and maintenance. Also, vertical separation can be reduced dramatically to 4", which creates gentle grades in the layout room.

First train on the layout!

Speaking of the layout room, the grade out of Joffre staging (the lower loop) is about 1.6% then it's reduced at 0.4% between the turnout/signals and the team track. This gentle grade reduces the drag that could affect longer trains or less powerful locomotives. Lesson learned from the previous staging.

As for the scenicked layout itself, things are now much simpler. A small station, with a passing track and a team track acts as our point of contact with the human realm. Sidings are on the backdrop side so cars and trains on them never obscure the action on the mainline. They are part of the background. Another advantage is having the depot in the foreground, which enables me to have more details, trucks, cars, and actions taking place and setting the scene.

Wednesday, June 21, 2023

CN Woodchip Cars - The End

Almost a decade ago, I started working on CN woodchip cars 3D model to be printed. It was a very long walk through several hardships that made me learn a new trade, new skills and how designing model cars can be an excruciating exercise in compromise...


Now, after all that wait, 8 completed cars are ready to enter service. All of them built and weathered, using my design printed and sold by Kaslo Shops. In that regard, I wish to thank John Whitmore who was always very supportive of the project and made it possible. As I assembled the kits, I found a few things I would like to improve, including the decals. I hope to forward these improvements to John during this summer.

As for the model themselves, I went a like bit further with weathering. No new technique so to speak, but just cranking it up a few notches. Since 3D printed cars have always slight artefacts due to the process, I thought I would use an approach based on Tom Johnson grain hopper weathering techniques mixed with a few armour modeller tricks shared by Martin Kovac at Night Shift on YouTube.


Basically, I faded the paint with a substantial amount of white then added another fade layer to which I also added some light orange to make it even lighter while keeping a warm hue. The real trick was to apply that layer in an irregular and cloudy pattern on flat panels only to replicate the highlights created by distorted steel plate. When combined with regular weathering, it really gave an amazingly realistic look to the cars, replicating that beaten up appearance so characteristic of gondolas.

Once again, I can't help but urge modellers to keep their mind opened, look at what is done outside our hobby and take chances with their models. Modulating colors and hues before applying decals is truly a radical yet easy way to improve drastically your work! Try it!

Monday, May 8, 2023

Thinking outside the Room – Part 3

As promised, we are now back for the third and final installment of Thinking outside the Room. Having selected a few good design elements, it’s time to tie things together for a “final” plan of action.


Many observed rightly that the staging bulge right in the middle of the room was an atrocious waste of prime space and I agree. But it was a step required to further my thoughts. In architectural design, we often explore ideas that are deemed useless or not optimal to figure out “why” they aren’t and what is good about them. They won’t be the final option, and we know it, but they are useful steps to learn more about the project, our priorities and the potential of the space available in front of us. Maybe 90% of things will be wrong or unwanted, but there is a 10% that could provide a key for another option. It is also a way to learn why a bad idea is a bad idea. Simply discarding designs based on feeling doesn’t provide a great deal of foresight. And if you are asked why it’s bad from people who think it’s good, you have zero argument to sustain a positive conversation about it.


In the case of Monk, drawing this option with the bulge proved many things:

-          The bulge does take a lot of space;

-          Looking at a staging with entering a room is far to be appealing;

-          A working surface on top of the bulge would be to deep to be really useful and it would reduce access to tracks for maintenance;

-          Framing the best scenes under the cabinet is a winning move;

-          Superposed staging yards are indeed a neat use of space, particularly if they have exactly the same geometry.

Staging inside versus outside the room

Armed with that, we know that we have some good elements to work with and a few deficiencies to work out. First, let’s take the staging yards outside of the room. We explored the workshop option earlier in part 1 and it didn’t make sense. But there is also some space on the right side which is full of storage shelves. Many things on these shelves are hobby related and must be protected from dust. It isn’t the case right now so building a new room to protect them would not reduce storage space and provide for shelter from wood dust. Storage shelves could be installed under and over the staging layout.

The full mainline run is now restored


As you can see, we are now addressing two completely separate issues by building a single 6’ x 10’ storage room. Something completely unexpected, but very fortunate and practical for the house.

Some scenery to tie hings together

With the staging outside, we can restore the continuous scenic mainline around the room and let scenes breath. Since both staging are one over the other, the entire visible track is thus a long gentle grade typical of mountain railroading. It’s about 1.1%, which is quite acceptable in HO and in line with prototype National Transcontinental Railway design guidelines of the 1900s.


Refining ideas by hand; a better lakeside scene

It also opens another door which is of uttermost interest. It is, once again, inspired by the siding at Lac Therrien that was built on a causeway. This siding, in the middle of nowhere, acts as a place where you can stage meets between trains. It would be long, capable of holding trains pulling about 20 cars. I can already imagine building a shelf to rest on and a control panel in that area to railfan trains meeting there. It’s also a good excuse to implement a realistic yet extremely simple signal system. The visible part of the layout would then be 2 CTC blocks: a stretch of mainline and the siding, sandwiched between two staging yards.


Jérôme's drawing explaining CTC blocks

On the visual side of things, this new track plan has a powerful argument for it. Both staging areas punch the wall in the exact same spot. Also, the Abenaki bridge scene no longer needs to deal with a nasty curve. Having the swing gate to the room crossed only by a straight piece of track makes geometry much easier to deal with and is more forgiving with track alignment. I also like the fact both scenes under cabinets are no longer linked together in front of the doorway. This connection felt clumsy and was broken when the gate was opened. Now, they connect in a more natural way around the wall instead of being broken at the doorway. It’s a natural spot for a vertical separation too.


Lac Therrien seen from the aisle

I’ve discussed that plan with friends and most of them agree it’s a much better and elegant version. It is a serious contender and can be built easily, economically and can run in a matter of a few months. It’s now up to me to make a long due move.