After countless hours making individual bundles, three lumber loads are complete. A fourth one, made as partial load have been done with excess material. It will be used to represent half-loaded cars, adding interest during operation.
Meanwhile, I also decided to complete my seventh and last RS18 as a RS18u. This locomotive is a Frankenstein made of Atlas RS11 and RS32 parts, an old Kato drive and a heavily Life-Like RS11 shell. I'm trying to reproduce ex-NBEC 1816 RS18s which pull trains over Murray Bay Subdivision circa 2006. Jérôme always wanted me to make a RS18u and I thought it was a good thing to do one relevant with our layout theme.
Sunday, February 25, 2018
Wednesday, February 21, 2018
Modelling MMA St-Guillaume Subdivion - A Layout Project
I've recently been commissioned by Jérôme to build him a small switching layout that will be installed in his 13' x 11' office/spare bedroom.
Some of you will remember I mentioned last summer I had explored yet another layotu design based on Quebec South Shore. I didn't have the occasion to share it since then but Jérôme thought it would make a neat little project can be followed on my Quebec South Shore Railway blog.
The project is all about modelling a single station with minimal compression, short grain trains and that unmistakable ragtag MMA look that used to be charming though Lac-Mégantic events more than enough shown us the disastrous results of negligence.
Tuesday, February 20, 2018
Bulkhead Flatcar Wrapped Lumber Loads
Finding suitable wrapped lumber loads for your flatcars used to be a little bit tricky... until Chris van der Heide provided us with relevant information and several genuine Canadian lumber wraps a few years ago.
This project was high on my list, but I got sidetracked more than once before I decided to actually tackle it once for all. However, I was mistaken thinking such a project was something you can in one evening. Wrapped lumber loads are a true labor of love that requires several hours to complete. Cutting the wood, wrapping each bundle and finally assembling and adding steel bands is quite taxing in term of time. And while I generally don't care about Olympic Games, it made for a good background noise while building the loads.
However, I must confess the first batch of wood blocks were sawn on Louis-Marie table saw which is now nearing the end of its revenue life. The unreliable tool yielded less than consistent results, which I learned too soon would have a serious impact on the final result. My word of advice is quite simple, make sure your wood blocks are exactly the same height and width with perfectly square angles. Anything short of that should be scrapped.
Anyway, I still assembled my first load with the crooked bundles. The result was better than I thought, but I'm actually in the process of building a second and third load, each one being better than the first one. As always, practice makes perfect and takes times. Yep, just like Olympic athletes who must repeat again and again the same set of motions to ensure they master their sports.
Once again, a big thanks for Chris to have provided useful information to Canadian modellers.
Sunday, February 11, 2018
Modelling 122th Street - Part 4
Another productive club meeting yestarday. Among many other things, we managed to decide how the working class housing area will come together. Interestingly, we found out that we didn't need 11 structures to make it works. As you can see, this is quite enough to get the feeling right.
We added some mockups to see how it would look with more houses and the scene composition was starting to crumble apart. It was decided two other houses will be added on the other side of the road, but we won't expand the scene longitudinally.
As you can see, our trains now have a quite interesting backdrop in front of which they can operate.
Also, Jérôme decided to install the cement plant mockup once again to operate this part of the layout. I'd say it was a good decision because the room felt empty and it was a little bit depressing. Given I don't expect the model to be built before the end of the year, it's a more sensible decision.
I'm quite happy how the ballasted and weed-infested Villeneuve yard looks like the real thing since the cement plant is now back on the layout.
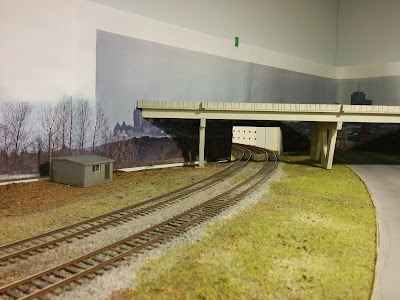
We also worked on menu details about Henri-Bourrasa overpass. Safety railing are almost ready to assemble. Oil piping connecting the pumphouse and oil reservoirs were also kitbashed from two Walthers oil loading platform. The scene is coming along well, but more on that later.
It was also decided trees in Villeneuve will have leaves (with a tender green tint characteristic of springtime). The reason is simple, we found out many of our scenes require trees to hide seems, awkward building transition with backdrop, etc. This can hardly be done with leafless deciduous trees. But be afraid, we are not changing the season. In fact, when studying the Clermont backdrop, it was clear many trees had already leaves. Since there is about a one to two week seasonal lag between Quebec City and Charlevoix, it makes sense indeed to have trees fully covered in leaves in Villeneuve.
And finally, I performed a operation session for the first time in many months. In fact, I don't recall the last time I was in charge of a train! I was quite surprised it took me more than two hours to do a full run and I wasn't following prototypical practices like setting handbrake and other such things... Once again, it's crazy how little track is required to sustain long operating sessions. If one was more prototypical and switched every industries as CFQ did, it would probably require about 3 hours to model the job. Quite impressive.
Tuesday, February 6, 2018
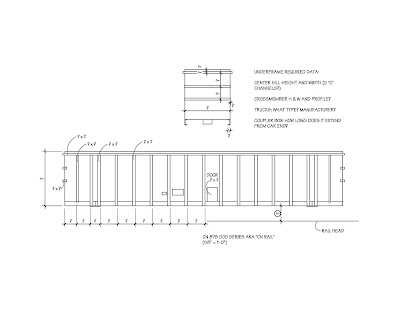
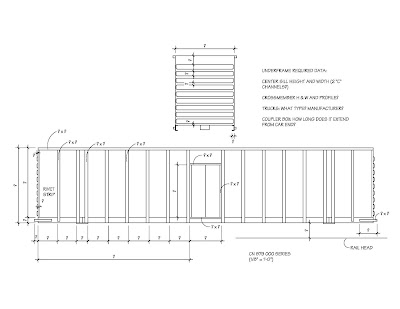
CN Woodchip Cars - A Follow Up
The CN woodchip car project is still going on. Given it is the only set of cars
missing on the layout before calling the rolling stock roster complete, I’ve
decided to work again on it as information will be available. I won’t stress
enough the help Justin Babcock has already provided and which insure these
models to be as accurate as one can be. This is even more important since these
cars have not visited Quebec City area since many years.
 |
| This is a sketch, not a scale drawing |
One of the
reason why I started the project again was Julien Boily’s interest in acquiring
a few of these woodchip cars. A few years ago, printing one car in Shapeways
Frosted Ultra Detail (FUD) material was expensive… really expensive. Well over
160$ (Canadian dollars) per car and mind you, I worked a lot to make sure to
trim down any excess material I could to drop down the price. A recent visit on
my Shapeways account shown these cars could be printed in FUD for about 72$,
which is quite high, but an impressive improvement. Given the price halved over
a few years is a testimony to this technology becoming more mainstream.
In the best
of worlds, I would print prototypes, make a few silicon molds and recast them
happily. The truth behind this is I’m not equipped to do so and know very well
it would cost me a sweet amount of money just to get started, experiment and
get comfortable enough with the process to handle it with confidence. I’m
always happy to learn new things, but I’m no super hero and I still have plenty
of stuff on my benchwork (highway overpass, roads and streets, several
structures including very large ones). However, I’m open to work with anybody
wanting to push it forward.
 |
| This is a sketch, not a scale drawing |
In the case
of Hedley Junction, we need about 10 cars. Given series 878 000 had 300
cars and series 879 000 had 500 cars; the ratio is 3:5. In our case, having four 878 000 cars and
six 879 000 cars would be plenty enough for our needs.
As thing
are standing now, series 878 000 (of CN Rail fame) 3D model is complete. I
still want to refine a few details, but I would call it almost ready for
printing. For series 879 000, nothing has been done yet. However, both
cars have similar features, meaning what I’ve learned on the 878 000 can
be adapted to 879 000. It is my goal that both models can be available on
Shapeways at some point.
Another step
will be to create accurate decals for these cars… That could be tricky…
Monday, February 5, 2018
Modelling 122th Street - Part 3
As you can see, some of my projects are lagging a little bit. Mainly due to seasonal health issues but also because I'm in the process of building a new spray booth. It means many projects are stuck at the primer/paint step until the new device is up and running. It's why the Henri-Bourassa overpass project is now on hiatus.
Meanwhile, I continue assembling structures for 122th Street. So far, two garages and two houses are built. They are ready for paint and will require some additional detailing to bring life to them.
While they are quite mundane, I do take time to replicate as best as I can some features in a realistic manner. This is particularly true about roof. I probably won't surprise anybody, but flat roofs aren't flat, except if you want problems. They are generally shaped like a large rectangular funnel with a central drain. The roof slope about 2 degrees, generally more on older structures. When the roof is very large, multiple draining bassins are required.
That kind of detail is generally overlooked by most modellers and manufacturers. A flat slab being much easier to build than intricate facetted surfaces. However, since these small houses are low and their roofs are in plain sight when operating, I felt it was better to replicate this detail.
And don't believe it is hard to model. Here's how I do it. First, I glue a real "flat" roof about 2 mm lower than the walls top. This is for structural integrity. Then, I cut another piece of flat styrene and score it so it divide the rectangle in four triangles. Applying a light pressure on styrene, I bend each triangle to create the funnel shape. However, be careful, the goal isn't to separate the styrene parts, just bending them a little bit. You don't want them to break off. When this part is correctly shaped, I then glue it on the walls top making sure the middle touch the subroof. If required, I'll add some styrene supports along the wall perimeter to make sure the roof sits at the right height. For overhanging roofs, this isn't required.
Subscribe to:
Posts (Atom)


