Monday, April 26, 2021

Kitbashing a Better Tender for President's Choice Hudson

 Like many people, I acquired at discount more than a decade ago a President's Choice CNR Hudson trainset with the intended goal to improve it later. And like many of them, I never committed to start this project, having shifted focus on a much more modern era. However, after kitbashing the tender trucks, I had no longer any reason to delay this funny project.


To be honest, I'm not sure I can even consider this project to be prototype modelling nor pure fantasy. It falls in this uncomfortable grey zone where you seek realism while knowing perfectly it isn't the real thing. Lots of compromises have to be done and at the end of the day, it will still be a cheap stand in for real CNR Hudson 5703. However, if the vibe of the prototype do materialize, I'll consider it a success.

***

The original Mehano tender is a toy at best

The first step consist in kitbashing the horrible Pemko vanderbilt tender. That large coal bunker was oversized because it originally housed a motor. When IHC took over the molds, they didn't care about retooling that unrealistic feature even if they completely changed and improved the drive.


The tank without the unsightly coal bunker

I recently acquired a used President's Choice Bullet Betty CNR 6060 which provided me with another useless tender. Fortunately, the general shape of the real 5703 tender is quite similar to the profile of the old Pemko tooling. It is, however, not long enough. Thus came the idea to remove the coal bunker from both shells and splice them together. A few quick sketches based on CNR drawings and pictures from a Van Hobbies brass locomotive provided a key measurements to make the project a success.


I first started by removing all the extra details on the shell that aren't required, including rivets, walkways, hatches, steps and molded grabirons. Only the basic tank shape will be kept and later, redetailed. At that point, I spliced both shells and let them dry a few days. The tank was then cut to lenght with a jeweler saw. A lot of care was required to make sure every cut was square. Then, I carefully plugged most holes on the top and sanded them flush. In hindsight, I guess I could have kept the original stanchions holes as they where since they fit the prototype location.

Plugging the many holes with styrene rods

The next big step was modifying the tender frame. I quickly found out the rear bolster was in the correct location and kept it as is. A few unwanted details were removed and sanded down. The front bolster and the adjacent frame were cut from the second tender and spliced with the rest of the assembly. I took great care to make sure the original IHC/Mehano screws still aligned so I would get a strong shell assembly than can be disassembled to had a sound decoder later.




Tuesday, April 6, 2021

Better Commonwealth Trucks for Your President's Choice Steamer

Back in late 2006, like many Canadians, I acquired for $50 a President's Choice Mehano trainset that was released the before in Loblaws and Provigo groceries around the country. On the advice of a local hobby shop owner who demonstrated the mechanical virtues of the locomotive, I went to the supermarket and picked up a set for half its original price with the intent to once kitbash it into a more realistic version of locomotive CNR 5703.

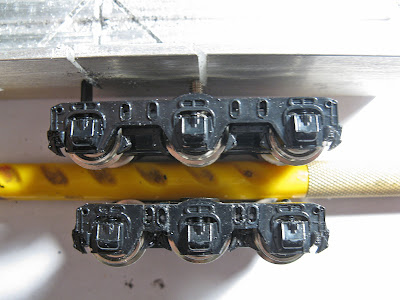
Left: modified truck, right: original truck


While the model was crude, it wasn't bad and Mehano had a decent reputation for good drives at a fraction of the price. We ran the locomotive until it no longer fitted our era of interest then back on the shelf it went.  Regularly, I would look at pictures and drawings of a real CNR Hudson. The biggest issues were the wrong cab and the Vanderbilt tender. This one was particularly unrealistic as it was based on an old Pemko design which had the motor into the tender. Due to that poor design choice, the coal bunker was large and clunky. Many decided to simply swap the Mehano tender with a Bachmann Spectrum Hicken one, however, this line of tenders has been discontinued long ago and they are now sold at ludicrous price. I thought it wouldn't make any sense to pay so much for another stand in, albeit a better one.


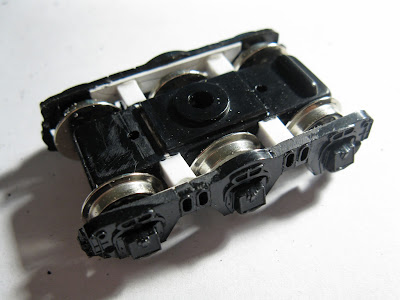
After taking some measurement, I came to the realization I could splice two kitbashed Mehano tenders together and make a much more prototypical CNR Vanderbilt tender. However, the big challenge was the trucks. While fairly accurate, they were much longer than the trucks used under CNR tenders. I had two options againt: source new prototypical trucks or bash the Mehano ones... Only recently, Rapido started to produce good Commonwealth tender trucks and I purchased a pair. But I still wanted to try the kitbashing route because it could be useful in the future and I thought the Mehano trucks were well designed and would be easier to attach back to the underframe.

Top: original Mehano truck, Bottom: modified truck

So yesterday evening, I disassembled a Mehano tender to harvest a pair of trucks. Before any work started, I tested how the plastic reacted to solvent cement. If it was Delrin, the project would stop right there, but if it was styrene or a similar plastic, I could proceed. I knew IHC heavyweight passengers cars - which were also Mehano products - had styrene trucks that could be glued together. So my guess was they used the same plastic. Imagine how happy I was when the plastic started to melt!


The first step was to use a jeweler saw and remove the sideframes from the truck assembly. It was done quickly. Then, I removed the brake shoes and kept them for further use. The big challenge with the sideframes was to harvest the parts with holes in the casting, remove extra material to shorten the lenght and glue everything back together. It went surprisingly well and using a paper jig with key measurements, I was able to make sur everything would fit the prototype dimensions. On my first trucks, I unfortunately glued the holes to close together and they don't look that great. But on the second one, the spacing is much better. I also added a 0.5mm thick styrene strip behind the sideframe to reinforce the assembly.


Next step was to remove the lugs on the truck wheel cover and shorten it to the right length while keeping the screw mounting holes intact. I also did the same with the truck wheel housing, using styrene stripes to reinforce all the spliced joints.


With that step done, I cut new square styrene mounting blocks and glued them on the wheel housing. Mehano sideframes were attached to the wheel cover, but I felt I would get a much stronger assembly by gluing the new "pins" on the wheel housing. It was also a good way to clear space to the brake shoes. Each block was cemented with the metal wheels in place to make sure everything could run without friction.


Finally, I modified the brake shoes. Since the trucks were shortened, the brake shoes where closer. I cut the excess material, spliced them together, remove extra material and added a small mounting block in styrene behind the shoes to provide a larger surface for a stronger bond. They were then cemented under the square mounting blocks holding the sideframes.


After a few hours, the kitbashed trucks were completed and surprisingly sturdy even after all the splicing required to get there. They roll perfectly free on a piece of track. The next step will be to hide the seams with some putty and sanding, then modify the copper electrical pickups that are housed within the trucks. I also started to add brake cylinders from my spare box following the prototype.


I still consider the Rapido trucks to be much better detailed. However, the way the wiring is done, I feel my modified Mehano Commonwealth trucks will be easier to attached to the modified tender. I'll keep the Rapido trucks for another project where they will be more useful. Now, it's time to think about bashing the tender for 5703. As for my new Mehano CNR 6060, I'll probably modify its tender truck too, but scratchbuild its tender from a PVC pipe. I almost purchase a Van Hobbies brass tender for it, but felt it was overkill for a cheap and unprototypical locomotive! Building stuff is much more fun!


Sunday, April 4, 2021

Weathered MMA Walthers Centerbeam Flatcars

 A few weeks/months ago, I hinted to the fact I was watching a lot of military modelling tutorials to improve my weathering skills. Martin Kovac also known as Night Shift on YouTube as provided a lot of inspiration about color modulation, washes and chipping. Certainly, these techniques take time and are for patient people, but they provide far superior results. I won't explain all the techniques, but simply share a few observations that may help you and which were a game changer for me. Don't forger these cars will probably receive some more touch ups when I'll add loads some day. But let me asses the model.


Walthers centerbeam flatcars have been on the market since the 1990s and have been a staple on many layout. They are sturdy and affordable and represent a common prototype... but they are outdated. Like many old Walthers cars, the details are crude and bulky, Many steel shapes aren't correctly designed due to molding process limitation. Worst, the newest batches are poorly glued together. As I was working on them, they started to fall apart. I have one from 1999-2000 that is perfectl assembled, but not the newer ones. I would also add that many parts are warped. Given these limitations and the fact a few better models are available, I can't  recommend these cars. The are good to build a large fleet or if you want that specific prototype, but otherwise consider other brands or a serious rebuild. With some hindsight, I should have replaced a few grabirons with wire ones. However, you'll notice I did add brass handrails at car ends and COTS on styrene panels as commonly found on prototypes.


I started with Canadian Pacific green cars and redecalled them later in the process with Highball Graphics  MMA patching decals which are a perfect fit for the prototype.


The first major step was to bleach the paint by using several mists of thinned down white. MMA flatcars are extremely chalky. As pointed out by Martin Kovac, it's better to overdo that step and make it garish to some extent because washes and other weathering techniques will considerably obscure it. He was right. On some car, I had to spray another coat later because it became to dark.


Another military technique was pin wash. It means you apply the wash where you want it. Then, after most solvent is evaporated but paint is not hardened, you use a brush with very little solvent on it and stipple the effect to smooth it and remove every unrealistic shadows. In model railroading, we often add a wash all over the model and wish for the best... military guys don't play games and they work the effect as it should. It really improved the realism on the model and made many details, including the panels, to pop out without looking clownish. 


Chipping was the last big technique I used. It's about rust spots. Using a very fine brush, I painted the chips individually starting with a rust color. Then, with another fine brush, I added a second coat of very dark brown over it to simulate dark rust on steel. I made sure some of the fresh rust color was still visible. Then I dabbed some burnt umber oil paint over the paint chips and, just like the previous washes, worked it over to create streaking effects on the paint. Later, with a sponge, I added much smaller chipping effect made of dark brown paint. They are much smaller and subtle, but add a lot of texture without overwhelming the appearance. The cars aren't rust buckets.


Finally, pastel was used to add dirt and grime on the floor panels just like in real life. It blended together several coarser weathering techniques in a convincing way, creating a darker background to make cleaner ribs pop out.


What I will have to explore later on other cars will be dirt and mud. I barely explored that subject, but should pay more attention to it in the future.