Sunday, December 31, 2023

Monk Subdivision - Moving Forward

As the year comes to a close, I take some time to reflect upon what as been accomplished over the last twelve months. In the case of the Murray Bay Subdivision, the layout progressed once again at a steady pace and has reached maturity. No need for words, since deeds and pictures do speak for themselves.

A nice and welcoming room

I have also been able to complete a few personal projects such as Stanstead that can be considered as a forerunner for Monk Subdivision and a way to push my skills further. Speaking of skills, I also had the pleasure to see my article on extreme weathering that documents my custom CN snow plow be publish under the care of Scott Thorton who has been a joy to work with him. I think he has some other ideas in store for me and I may soon take up the challenge. Model railroading is indeed taking me where I would have never thought I would go... In a sense, I'm glad to have picked up that hobby when I was a kind.

Building the benchwork piece by piece

That said, the big elephant in the room is indeed the Monk Subdivision. A lot (too much) have been said and written about this tentative layout, but little has been accomplished. The biggest hurdle has always been to deal with the stating yard. To move forward, I built a new 7-1/2 feet x 10 feet room in the basement just for that purpose and it explains why I was relatively quiet over the last week even if there was a lot I wanted to share. It was indeed a battle against myself, procrastination and relying too much on others to do the odd jobs I don't feel comfortable to tackle done by myself. We all know these feelings and sure, I can spend many hours fanning over some great layout build by master modellers but I won't reach that level if I don't put the effort in it. And thus, I cut Internet for a few days to make room for my hobby.

Two holes leading toward a wonderful project...

It started a few weeks ago when it became clear the new room was almost ready, i.e. plywood walls and drop ceiling. It didn't look pretty and felt oppressive. No surprise the architect in me decided to crank it up a few notches to make to make it a nice and comfortable space you want to be for long hours. Why? It had to be bright and cheerful. And also, it will probably be dual purpose to display and operate my small dioramas and modules.

This old Rapido Supercontinental coach is unforgiving!

Building the room took about 2 months and at the end of the day, I elected to wainscot the entire thing, add a few custom made mouldings and install a drop ceiling with powerful LEDs. Honestly, I'm not regretting a single minute my decision to go to such length with this lowly basement room. Because, indeed, I've been spending a full week now building the staging benchwork. Working in a nice environment made it much more interesting and felt less like a chore. I'm also starting to imagine how I will display models in the room and set the storage.

Standardized curves mean standardized roadbed pieces

The benchwork took about 2 days to complete and is made of 1" x 3" pine fastened with pocket screws. I was surprised how fast it went. The next morning, I found out that I made a 1/4" vertical alignment mistake with the main layout in the other room. Fortunately, due to my semi modular approach and use of screws, it only took 30 minutes to realign everything and I was back on schedule. I spent the next few days cutting plywoods, adding shelf brackets and cutting fiberboard. As I worked, I updated my XtrkCAD plan to improve track flow and remove short radius curves as much as was possible, setting a minimum radius not below 27-28".

Joffre yard is taking shape

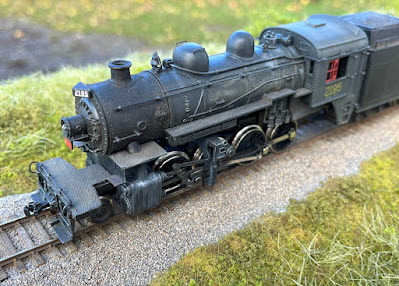
Laying track was also a straight forward process, even if I redid long sections to increase the radius. My biggest fear was using Walthers Code 83 curved turnouts with 24"/28" radii. I wish I could have used larger turnouts and if possible, Peco ones, but that was a compromise that needed to be done. Fortunately, even my largest 2-10-2 and 6-axles locomotives run fine on them and let me tell you I tested them at full speed and tender first! They aren't not as great as Peco,  but they have solid rail points and decent quality inherited from Shinohara. I also tested them with Branchline heavyweight cars and first generation Rapido Supercontinental cars, both products known to have serious truck issues and they perform OK. Take into account they are really poor runners, so having them naviguate decently and without derailing through the curved turnouts put my mind at ease.

The 2-10-2 didn't mind the curved turnout!

At the moment of writing these lines, Only 4 flextracks remain to be nailed down to complete the first staging yard that will represent CN Joffre in Charny. Louis-Marie has already started to develop a design to control and automate the yard with various electronic modules and detectors. Switch machines are in the mail and should arrive in early January. I can see a lot of experimentation waiting for us, but that's a meaningful challenge I looking forward to.

This refurbished BLI SD40 is testing the yard throat once again...

Also, while thinking about it in the last few days, it has become clear that Mon Subdivision isn't a layout centered on operating a train, but rather about operating a small piece of railway. In some way, this is closer to the European way to do things. And can easily imagine someone in the staging room that acts as a dispatcher and send orders at the station in the main layout room. The person there doesn't "operate" trains, but manage the meets at the station, receiving order, controlling the turnouts and making sure that trains meet as they should and safely. In some way, this isn't surprising because my limited knowledge of Monk Subdivision is generally based on pictures showing train meets, dreadful accidents caused by mistakes in traffic control and the fact it was also a line that received a poorman's ABS signal system that made an impact on local railfans.


I'm also convinced my concept of having only one town on the layout is worthy. I was recently visiting Yvan Déry and I was absolutely convinced that the less you have, the better you are. A single town is immersive and has less compromises, which creates a realistic setup. I remember starting a discussing about one-town layouts many years agon on MRH forums and which was revived and expanded upon by Jim Six. Jérôme who often speaks highly of La Mesa club layout in California had an influence on me because years ago, I watched a very long tour of their layout on YouTube. That feeling of running trains in the middle of nowhere made a big impression on me. We all wish we could have that space for our layout, but we forget that we can get a part of that action by simply modelling a slice of it. I've seen plenty of modellers doing that in recent years, which confirms me it is a viable option.


With all that said and done, I wish you all a Happy New Year and hope that 2024 will be a year to nurture your skills and make that hobby a meaningful way to create and grow. The last few years have been quite hard for most people and we should be glad to participate in a constructive hobby that can soothe the mind and steer us away from idleness. This is indeed, a priceless gift!

Thursday, December 21, 2023

Montreal & Southern Counties - A Small Railway to Model

 In 2018, George Riley and Otto Vondrak published a series of 9 articles in Railroad Model Craftsman urging us to Consider the Commuter. This series made a great deal of effort to underline the attractiveness of commuter and interurban railways of all era as worthy modelling projects. They also made it clear they could take very little space while yielding a quite substantial amount of operation. I was quite enthralled by that series and read it quite often over the years, trying to apply it to Quebec Railway Light and Power Company. As expected, it failed because I'm too much aware of that prototype to have a healthy distance to make the required compromises.

However, I know Montreal & Southern Counties Railway only from a handful of attractive photographs and a general idea of the line on the map. I thus have that critical distance required to make required compromises and strive to nail down the spirit of that line.

Using a few pictures from the internet, I was able to piece together something that could make sense, would be rational and small enough to fit a standard bedroom (in this case, an upper level over Monk Subdivision staging).

An achievable M&SC layout in a 10' x 7'6" room


The main goal would be to run a commuter or a small freight train from the terminal in downtown Montreal to the other terminal in Granby (in this case, I've used Marieville as the defacto terminal because I find it more scenic). A small passing track is added between both location to create a meeting place, somewhere where trains stop to add spatial and time. 

Montreal terminal in 1954 (credit: trainweb.org)


The first scene is Montreal in a very simplified manner. I only cared about providing the runaround track, a siding to park equipment and a small two track freight yard to do some train building on the layout. The station is based on the real M&SC terminal that still stand to this day and was an exquisite brick structure that can be built full scale. Surround industrial and commercial brick buildings add a sense of urbanity. The entire scene is thus framed by an interlocking tower and the terminal, making it a railway pocket in a dense urban setting that isn't that different from New York City ones.

The entire terminal circa 1948 (credit: Canadian Pacific Archives)


Montreal McGill Terminal circa 1910 (credit: Library & Archives Canada)


Since Montreal is an island, I put the Richelieu river as a scenic divider between the metropolis and the so-called Southern Counties. People will say I'm completely mad to blend together the mighty St. Lawrence and the calm Richelieu, but I personally feel it's alright and the long Richelieu bridge had some real charm that set the place. In this case, since space is at a premium, the bridge would have about 5 short 50ft steel deck spans on a curved piece of track to give a sense of grandeur and distance. This is also the perfect place to railfan you trains.


The next scene would be based on Ste-Angèle where a small flag stop/depot existed near a rural road and which was framed by two beautiful mansard roof houses, one which served as an inn and brought life to the area. I don't believe a passing track existed there, but I don't care at all since it's irrelevant to the layout's goals. These houses were framed by tall trees which help to divided the layout in different scenic units to make it look bigger. All structures would be kitbashed, but since there aren't a lot of them, it would be quite easy to achieve.

Ste-Angèle in 1955 (credit: Joseph Testagrose Collection)

We then enter a wide curve crossing vast fields typical of Southern Quebec. I would imagine a very far away horizon to give it great depth. Think about Tom Johnson's old Indiana Northern Railroad layout.


After the rural scene, we enter "downtown" Marieville, a sweet little town sporting a neat and distinctive late 19th century two storey depot. It is indeed the main feature of that place, with the passing track/runaround a small team track serving the local industries such as a feed mill that can be modelled if one wishes it. The scene is very railroady with tracks, a long platform, a parking lot and some gravel patches around the team track. Main street runs behind the depot where neat wooden townhouses and small shops gives a sense of a thriving community sustained by the rails. Imagine also lush trees and overhead catenaries framing the scene and giving it personality. That's how I envision Marieville: simple, yet utterly relevant!

Marieville, QC in 955 (Credit: Novak/Joseph Testagrose Collection)

Operation would be rather simple, implying small communter trains made of a diesel (probably a F-M H16-44 or a MLW RS-18 or even a RS-3) pulling a baggage/RPO car and a coach. Electric interurbans could also be featured, pulling a typical milk car or even Budd cars. The idea is to hint at changes, at mutations, at that very moment the traditional traction line becomes diesel, just before disappearing. A sort of swan song.

Small freight trains, made of 2 or 3 cars and a caboose, could be pulled by the same locomotives. They would perform simple yet immersive task at both terminals. Trust me, it may sound simple, but one can get very busy if working slowly and with a modicum of prototype practice. Also, if you want to run small steamers, be my guest!

Such is the M&SCR layout I propose, grounded and inspired both by Riley and Otto's articles and a handful of evocative pictures. This layout also shines because it is close and personal. Both terminals are located in alcoves for an immersive experience, you never see the entire layout from one point and each modelling subject is both mundane and yet a challenge. Certainly, if you recognize a bit of Trevor Marshall's Port Rowan in this layout, you won't be wrong!

Tuesday, December 12, 2023

Understanding Classic Boxcar Red Weathering

Over the last few years, I've been experimenting with boxcar red weathering. Understanding that ubiquitous railway color is central to most modellers' work and can be useful. When we think of adding weathering, the first step we learn is to add some grime and darken the model. While true, this is now the entire story and I've written quite extensively on that subject.


In the last few months, I've been sampling colors from pictures and creating color swatches to get a better grasp of what colors I should use as base paints. Except if you model a car that has been freshly painted less than a year, you can be sure that your models will display some level of discoloration. Let's look at what a bunch of CNR boxcars shot in 1955 in Armstrong, ON can tell us. This picture was published in Robert Wanner's book "Across the Canadian Shield".


In the picture, the steel boxcar is extremely weathered. While we can't figure out the roadnumber, this car is a 10'-0" high boxcar with a flat or Murphy raised panel roof. The paint scheme is barely visible and completely faded. There are no trace of green paint on the maple leaf, which indicates this is most likely a car that was painted before the white leaf paint scheme was discontinued in 1944. At the time of our picture, the car hasn't been repainted for at least 12 years. It must be noted that it was common for white paint to disappear on CN boxcars of the era while the green paint stuck for longer though it faded badly. This would be the equivalent of the ghost lettering on modern Railbox cars.

Let's look at the colors. On the roof, it is clear most paint has flaked from the galvanized steel panels. Paint back then didn't stick well to zinc applied on steel and would disappear almost completely after a decade. Note that the steel color isn't shiny, but rather a flat grey. Sometimes, you can perceive a few hints of blue depending on the galvanization. In this case, it is a very neutral gray.

The car sides are brown, but a rather freshly color. The red brown has turned into a warm and light leather color with some variations in darkness where grime accumulate. Miniature figure painters will recognize these dark flesh colors that are offered by paint manufacturers serving that hobby. Why bother starting with real red oxyde when you can just skip the fading process and paint with a faded color?

The very grimy parts near the door are interesting because it has a grey hue. It's kind of pinkish, but rather dark.

The ghost lettering is almost the same color as the car body, but a little bit lighter. To replicate such an effect, one could paint the model with the dark flesh color, apply and seal the decals, they airbrush a filter made of the same color to blend everything together. That would make for a very cool effect which I'm kind of interested to replicate.

Finally, the Fowler boxcar on the right is also very interesting. We find the same leather/dark flesh color on the sides, however, the roof is dirty pink with a lot of white in it. Was the roof repainted with a different red oxyde paint that weathers pink? Maybe... or the UV rays attack roof paint in a more violent way that car sides due to the angle of exposition. I would go with that later explanation since I've often observed on old pictures that roofs are often very pinkish compared to the sides.

With all that said and done, it's clear the debate on boxcar red is basically irrelevant if you base your work on the observable world around you. Look at leather and flesh colors and add them to your arsenal. They will be extremely useful to filter, modulate and fade your base colors... and may even replace them altogether!

Thursday, November 30, 2023

Hindsight 20/20 Virtual RPM 16.0 on December 2nd

Once again, I'm pleased to announce my participation to Hindsight 20/20 Virtual RPM as an invited clinician. It's always an honor to answer to Hunter Hughson's call of duty and prepare some material to share with others.


This time, instead of focusing on a specific modelling subject, I will present Hedley-Junction: Finding Yourself Through Modelling. We will visit a layout I've been building for over 17 years with two good friends and based on our shared memories of ex-CN Murray Bay Subdivision in Charlevoix, QC. It will focus mainly on the process and struggles that led to the current success after years of confusion and what can be achieved when you finally find your groove. Big dreams come in a variety of sizes and it's important to openly discover what fits yourself.

As always, registration is free on Speedwitch Media's webpage and a fine array of respected modellers will be sharing their research and recent work.


Thursday, November 23, 2023

MLW RS18 Madness - Part 21 - The RSD-17 tale 3


Work on the RSD-17 has progressed quite steadily with a good coat of paint and some decalling. I thought it would be more straightforward, but as with most projects, the issues always arised in the most unexpected way.


When decalling, I started to apply the obvious and easy pieces, such as the CN name, the logo and lower flares on the hood ends. Things went pretty smoothly until it was time to apply the upper flares on top of the hoods. They are always tricky because they overlap with several details and have to wrap around curved shapes.


To make my life easier and find a fool proof way to apply them, I made a template using tracing paper. Instead of decalling in one shot, I had this idea about cutting the motif in smaller parts that would be easier to set in place. I would say it was the good way to do it, but with some hindsight, I sure would cut them differently to ensure better results and a faster process.


That said, the biggest surprise was to discover the upper flare overlapped on the CNR logo on the front end. At that specific spot, RS series MLW locomotive have a recessed brakewheel housing which require the logo to be located much higher than the other hood. Such an issue doesn't arise with EMD locomotives became the brake is located elsewhere. At first, I thought I made mistake but the more I looked at my sole CN RSD-17 picture in color, the more I discovered the flare on that end was different. The bottom part was flatter to accommodate the logo. I thought it was a specific thing to this particular locomotives, but when people on Facebook started to share pictures of RS-18s in the green paint scheme, it became evident that short hood flares had always been squished. It was both a fascinating discovery, but it also proved that once again you can't trust commercial decals completely. Not that I want to criticize the work behind these decals, but just to show you that when they write "please always refer to prototype picture", they do mean it.


Making a custom flare wasn't that hard and the end result was convincing! As from completing the flares, I pieces together as much decals as I could. However, the headlights and numberboards weren't covered by decals due to their intricate shapes. Also, some voids remained here and there. As was the case with the CV GP9 I did two years ago, I simply mixed some acrylic paint to match the color and painted over it. As a matter of fact, I made sure to apply a perfect coat of white paint in the spots to be painted. It was absolutely important that coat was even and perfectly white because yellow pigments are notoriously poor at coverage.


Once done, we have an almost complete rendition of a CN RSD-17 which only existed for about 3 months in real life back in the late 1950s. It's always fascinating to resurrect things from the past that most living people have never seen. Also, when I started to paint the model, Chris Mears ask me how I thought the classic CNR paint scheme looked on a longer locomotive. At first, I was under the impression that it looked a little bit silly because there was much more green empty space around the yellow motifs. However, when it was almost completed, I changed my mind and must now admit it looks good on a big power locomotive... to the point I feel almost some regrets this locomotive didn't became famous later as a Canadian National icon instead of a CP one.


Sunday, November 19, 2023

Village Montmorency – Part 2


Work on Village Montmorency is progressing at a tremendous pace. No time is lost and this is a matter of achieving a good balance between efforts and results.

The missing curbs and garage entrances were added and a good coat of Krylon camouflage beige and grey primer was applied. The bluish hue on the road and the camouflage one on the concrete elements. I didn't mask anything so colors would mix and feather together.

Since I had applied some spackle before painting the fiberboard, it created all kind of random patterns in the paint. If it was a main road leading to the foreground, it would look horrible, but for a backstreet that will be hardly visible and weathered later with powders, this is in fact a fast and interesting way to add visual variation and texture to what could have been a solid grey slab.

After everything dried, I then started to apply grass. Structure footprints were drawn with a pencil and white glue was added to a single plot of land at a time. Why? Because lawns are generally different from house to house depending on their age and the care the received from their owners. I felt it would be easier to replicate that by adding grass one property at a time.

That said, after careful examination of real lawns, I found out the main grass color is always the same. For this reason, I made sure to always use Noch 8300 Spring Meadow grass as the basic color, adding more dull or straw colored grass when I wanted to model a less pristine lawn. Some got large patches of dead grass while one lot got a very well maintained lawn.

Meanwhile, I also completed the grass missing in the open field and defined the new gravel road linking it to d'Estimauville.

For the sake of visualizing the overall results, I reinstalled the structures and placed the board on the layout again to see if it met my expectation and sure it did! What a lovely thing to see another big chunk of the layout taking shape in front of our eyes.

Friday, November 17, 2023

MLW RS18 Madness - Part 21 - The RSD-17 tale 2

The painted RSD-17... not bad considering the ruined shell

Moving along with the project, it was time to apply a generous coat of Mahogany Mr. Hobby Surfacer Primer, which is quickly becoming a favorite of mine. When thinned with Mr. Hobby Levelling Thinner, it creates a nice smooth finish. It was a crucial step because it would help to notice small surface defects that could be still visible on the shell and sure there was a ton of them.

Applying decals to Tru-Color paint is a breeze

Using small fine sandpaper scraps, I endeavored to smooth the rough surfaces, mainly on doors and the cab roof. A second coat of Surfacer was applied and where I spotted obvious rough surfaces again, I polished them with a very fine sand paper. I knew they wouldn't never be perfect, but the goal was to make sure they would be smooth enough for decalling.

The doors rough surface is visible in this glancing shot

For painting, I used Tru-Color paints. There CN Green is nice and gives a very nice thin yet glossy surface. I've read a lot of nasty comments online avec this line of paint. People complain it doesn't airbrush well and it's clear they get the paint-thinner ratio wrong. Honestly, this paint is a pure joy to use. It sprays well and self level nicely, the paint layer is very thin which doesn't obscure details or affect interlocking parts and it dries fast... very fast. The magic behind that paint is that it uses opaque printing inks. They cover well and fast. The curing time is so fast you can litteraly paint and mask several layers in one afternoon.

It's taking shape!

Just to give you an idea, the shell was painted green at 13:00 yesterday, masked and painted black by 14:30 and decalling started by 16:30. This is an incredibly fast schedule which is a sizable gain of hobby time. Sure, I would use that paint for mixing custom colors or dealing with weathering. But as a based coat, it's hard to beat.

Adding the hood yellow "flames" will be a challenge!

Saturday, November 11, 2023

MLW RS18 Madness - Part 21 - The RSD-17 tale

RS-18 kitbashing projects - like James Bond - never really die. Rapido may have made the RS-18 classic Canadian modelling tradition dead, there is still some room for the lovely MLW RSD-17. This locomotive was MLW version of the Alco RSD-15 which wasn't that much popular but kind of acquired some fame on the Pennsylvania Railroad. While RSD-17 sales never materialized, a demonstrator unit was built in May 1957 and went on a one year trial one over several Canadian railways including Canadian Pacific as #7007, Canadian National as #3899 and PGE as #624. At the end of this demonstration, the unit went back to MLW shops were is sat idle for a while as evidence of its failure as a viable commercial product. It was no fault of the locomotive itself, but it wasn't suited to the customers need. One day, when CP was making an order at MLW, the lone RSD-17 was thrown into the deal and CP got it for a song. It would work mainly in Ontario and got famous later as the Empress of Agincourt. When one truck failed during the early 1990s and couldn't be repaired, the elegant locomotive went into preservation. It may have been a commercial failure, but it certainly got famous and memorable later in life.

RSD-17 CN 3899 in René, QC back in 1957 (credit: Larry Russell)


My interest in this project started when I saw a color picture of RSD-17 moving a long freight train over the National Transcontinental (NTR) La Tuque Subdivision near René, QC. In my eyes, the Empress had always been an Ontarian thing and now, I had proof it performed its duty in Québec. The same happened when it ran over the CP as a few pictures can testify. Thus, the venerable locomotive became much closer to my heart and to what I'm currently modelling: the NTR.


For this reason, a few months ago, I acquired a used and slightly damaged BLI RSD-15 with the goal of converting it into CN #3899 and equipping it with a nice LokSound 5 decoder. A few days ago, I started the conversion project by trying to stripe the paint with SuperClean. It did absolutely nothing and I had to resort to something else. I did remember that BLI shells were notoriously hard to stripe and plastic could warp. I was about to do an internet search when I simply decided to dunk it into 91% isopropyl alcohol. It would be alright isn't it?


Move forward the next morning and the paint was still adhering on most parts except the cab. As always a good help from the ultrasonic cleaner would make it easier... Meanwhile I observed the cab and remarked the surface was rough and there was some creases forming on the plastic. I was a little bit worried, but not too much. After a few hours, it was time to finish cleaning the body shell and I was out for some nasty surprises. The shell was basically ruined. The surface was rough and several details like door edges were damaged. Cracks appeared here and there. It was time to do the long due internet search and discover I should have never used alcohol on a RSD-15 shell. Oh well... too late for regrets. I contacted BLI for a spare shell which they had in stock for US$95 including shipping. That's about CAD$140 plus customs which is quite costly. That said, the shell BLI sells is complete, including all the details, running boards and handrails. I think its a fair price by current standards, but I wanted to see if I could restore my shell with some care.


I tried a few techniques on various small spots and concluded the most efficient method was to burnish the surface with a dull round hobby knife blade. It closed the porous surfaces and generally helped to straighten the edge deformations. In more severe cases, glazing putty came to my rescue and I also resorted to sand the surface with 600 grit paper. Everything was then polished with 1200 grit sandpaper. At the end of the day, the shell wasn't perfect, but certainly serviceable enough to warrant some detailing.

Detailing was fast and straightforward. Adter building so many RS-18s out of  RS-11s, it's now ingrained in my muscle memory. Hood notches were filled with styrene and I started to add grabirons, horns, carve a brake wheel housing and craft sand hatches. I reckon some doors weren't exactly on the same spot on RSD-17 than RSD-15, but I came to the conclusion it was good enough to leave them were they are. Also, pictures from the Empress and brass models are full of contradictions about these doors, so I'm not concerned that much about it.


Now the model is almost ready for primer. I expect this will show more surface defects to address, but it shouldn't be that hard. I'm surprised how the project went considering the horrible mistakes made at first. But here we are and the madness continue!


Monday, November 6, 2023

Village Montmorency – Part 1


When I wrote the last article about grass, I couldn’t predict it would be once again true. Since Louis-Marie wasn’t there to assemble the cement plant, scenery was once again my main concern and I turned my attention to Village Montmorency, that small neighborhood nestled between D’Estimauville Car Shop and the plant. The apartment buildings there have been kitbashed years ago, but I never completed the any work on them nor their surroundings. Now, things can change.

Cardboard sidewalks are always fun to build
 

The big positive thing to talk about this scene is the fact the fiberboard base is movable. We designed it that way back in the days knowing that applying scenery in such a hard-to-reach corner of the room would be a real nightmare. As a module, it’s much easier to apply scenery, build roads and fences directly on the workbench while sitting.


A light coat of spackle to smooth the road surface
While our work session was quite short due to visitors, I was able to model sidewalks, cutters and apply a light coat of spackle on the asphalt road. I still have a few ground details to add such as garage entrances and parking lots, but it was so fast to create scenery in such a way that I will probably reuse that module approach with Monk Subdivision. Chris Mears has been exploring that for a while with his The Shove module and it seems to be indeed a very practical way to approach scenery, particularly on cramp areas or when you try to mock up scenic elements you aren’t 100% sure. Anyway, I’m quite excited at the idea of modelling Montmorency Village and hope to see it come to fruition during the next few months. Also, since most details are hard to see from normal viewing angles, I’m thinking about using some modelling shortcuts to make it faster. Once again, textures and colors will be the most important aspect of it. Don’t expect manholes or small details like that. It will be a more impressionistic work…


Friday, November 3, 2023

If In Doubt... Apply Grass

I often find myself at the layout wondering about what I should do... When I hit the proverbial creative block, I look around me at some random piece of land still covered in fiberboard and bring some scenic material nearby...

The bagging plant is now surrounded by grass...

That happened last week when I was about to add some asbestos cladding on the cement bagging plant only to find out the corrugated cardboard I ordered was too coarse for the job. Fortunately, the ground around the said warehouse was still in dire need of coverage and I obliged. The surface was about 2 square feet around the siding which, on the prototype used to be buried in a nicely maintained lawn. After 45 minutes, it was all becoming reality and I needed another victim...

Subtle ground variations blend the 3D world to the 2D backdrop

My attention turned to Villeneuve were a large parking lot had been planned in the foreground. I reduced by 2/3 the surface, preferring greatly to put emphasis on the mainline rather than its surroundings. This is a place where we skip about 2 or 3 miles of track, so it made sense to keep it simple and generic to get a sense of separation.

Simple but well executed grass often does a better job at scenery

Learning from my recent work in Clermont, I added some ground elevation in the backscene to replicate an embankment that exist in D'Estimauville to fence the snow depot during winter. I thought it would be a much better transition with the future backdrop.

This trio of F3s sit on the exact original patch of grass

While all this is kind of repetitive as applying grass as been covered more than once on this blog, I've reach that point where my new efforts are now juxtaposed to my earliest ones. I remember struggling with the grass applicator and gluing very little grass in fear that too much wouldn't look like spring time. Since them, I've been applying grass in a more generous way, most of the time by hand in clumps. As you may have guest, it's only a matter of printing a new photo backdrop for this area and it will be rescenicked on par with the rest of the layout.

Wednesday, November 1, 2023

CNR 2195 - Kitbashing an IHC 2-8-0


My kitbashing adventures continues as I completed this conversion work for my friend Yvan Déry. It started with an IHC Consolidation of dubious lineage which was nothing more than a USRA 0-8-0 with a pony truck. However, the weird proportions were in fact quite close to a real CNR engine that worked on Quebec North Shore back in the days, making her a potential candidate for kitbashing.


I went quite far with this one, modelling in 3D the very peculiar Ellis-Chalmers rivetted vestibule cab to grasp the essence of that prototype. The tender was also shortened and heavily modified to follow CNR practices. I also went overboard and added a lot of lead inside the cab and boiler, following Yvan's request to make her a good puller for his less than perfect tracks and steep grades. Domes were reshaped using epoxy putty until they got the right silhouette and smoothed by fingers with water. 


I didn't weather too much the driving wheels because I wanted to keep them in good shape to pick up electricity. Had it been my own personal locomotive, I would have probably done it and suffered from frustration at less than stellar performance.

The original model before kitbashing

All in all, it was a fun project than was relatively straightforward. It proved the USRA boiler and chassis can be a good starting point for some stubbier CNR Consolidation. A light weathering consisting mainly of modulating the color and glossiness over the model brought the details to life and I can't wait to deliver her where she rightly belongs!