Showing posts with label Tools & Equipment. Show all posts

Thursday, December 3, 2020

Applying Dry Transfers... With a Q-Tips

I didn't post a lot recently not by lack of modelling to show off or ideas to share, but due to a severe case of workload. The kind that leaves your mind numbing and unable to write anything. However, I did work on a few Bachmann diesel kitbashes (mainly my Central Vermont and Maine Central locomotives), a caboose, several kitbashed CP 50ft double door boxcars and a bunch of cheap Accurail and Atlas Trainman hoppers.


I've also built a module for my basement layout... which proved to be a huge mistake. Too large, too overwhelming and not very useful. I'm glad to have tried it because I now know better how the room can be used and I'll revert back to my original idea under the IKEA cabinets. More on that on a next post.


Modelling kept soothed my mind and I thought it was about time to finish my 50ft CP boxcar project started 4 years ago when I entertained modelling CP Tring Subdivision. Let's just say I'm still debating what and which era I'll model but the Quebec South Shore theme is strong, mainly the early 1980s, but also the colorful late MMA-CMQ era.


Most of these cars are decorated with old CDS Lettering dry transfer. To be honest, I hate dry transfer as much as the next guy, but truth to be told, CDS did an amazing job providing so many design back in the days. Dry transfers are a pain to apply, but they cut on a lot of steps and you don't get silvering. The big issue though is making sure you rub them correctly in the exact position. The later point can be dealt without too much problem using Scotch Tape, the former is a little bit tricky. In the following picture, misses are underlined in yellow. From a certain distance, they are hard to notice, but even with a decade of experience, I still have a hard time to get perfect results with most recommended tools.

Dry transfers applied with a dulled pencil (about 4 to 5 passes)

Dry transfers applied with a cotton sawb (about 2 passes)


Over the years, I've tried mechanical pencils, worn pencils, ball-pens, metal point, plastic scraps, blending stumps, burnishers, etc... and always got less than perfect results, particularly when dealing with smaller lettering. Whatever you do, it seems you always miss bits here and there. Worst, after rubbing the transfer a few times, it often no longer want to stick to the surface. Over rivets and irregular surfaces, forget it, pencils are too hard to follow the complex pattern.

Then, it occurred to me a paper shaft from a cotton swab could do the job. It is relatively smooth yet sturdy, has a larger burnishing area, can conform itself to many intricate surfaces and can be reshaped easily. It worked wonders! It is faster, requires less passes, you can easily see where transfers are applied and where they aren't yet, and better, they do a great job with small lettering!


Basically, I cut the cotton buds at one end and then I use a hobby knife to shape the end in a roundish-pointy end and voilà! Now, I have a second life for my cotton swabs I use for weathering effects.


Friday, November 6, 2020

My New Friend...

 As life goes on, you lose a few friends and make new ones. Sometimes for the better, sometimes for the worst.


Up until now, my single tool for measuring was my old trusty clear acrylic ruler. It was handy, but on many case, it was somewhat hard to determine exact dimensions due to parallax errors, geometry or simply because dark numbers on a dark object can barely be read. Also, when dealing with small scale project a small discrepancy - let's say 0.1 to 0.25 mm - can make a huge difference between a part that fits perfectly and one that needs putty and shims.


So, late last summer, I took my bike and rode to the local home improvement store to purchase an electronic caliper. Nothing fancy, got it in sale for about $25. But from day one, it completely changed my workflow and made it more efficient. Nowadays, I barely use my ruler, only for general dimensions. Most of the time, I use the caliper. Obviously, it is a great tool to measure diameter or inside dimensions. But it is also quite useful when you need to calibrate the thickness of a scratchbuilt profile or check the gauge of various materials, even wheelsets. Also quite handy to figure out if the general dimensions on a car or locomotive are prototypical.


I've found many other uses, including placing correctly decals and tracing parallel lines. I've been impressed by the many new uses I discover everyday. I can now be certain many parts will fit snuggly, that my scratchbuilt effort are perfect, I can know I need one or two more passes with a file to get the correct dimensions on a part.


It basically eliminated a lot of guesswork, meaning I no longer waste time guestimating dimensions, I waste less material and get more precise cuts. It's also a great tool for aligning parts, which makes the process faster. I also found I could use it as a marking gauge if handled carefully. A light scratch on a plastic surface is much more precise than a pencil line.


At this point, I'm pretty sure you'll ask yourself why I'm talking about such a common tool as if it was a discovery. I've seen people using caliper in this hobby for decades. But I always thought about it as that tool for snobs or brass builder. As a matter of facts, I try to keep the number of specialized tools quite low on my workbench. A caliper always felt to me like one of these tools only used to measure diameters or sheet thickness. However, I was absolutely wrong and found out it was definitely more versatile. Better later than never isn't it!

Wednesday, October 21, 2020

Modelling with Paper: Getting the Architectural Details Right

I'm glad to announce the "big day" is near the corner for the next Hindsight 20/20 Virtual RPM Meet. For the first time, I'll be presenting a railway modelling clinic based on my numerous experiments with paper and cardboard over the last two decades.


While it may sound less glamour than working with styrene, paper and cardboard can often better represent the real architectural materials used on the prototypes. Working with paper has been a staple of modelling in France, Germany and UK for more than a century to create masterpiece. Unfortunately, on this side of the pond, it is often considered a bottom tier material rarely used for anything serious.

The clinic will cover various materials, adhesives and techniques that can be useful to create realistic buildings, intricate architectural details, streets and even locomotive and rolling stock details. A few step by step case studies will help to go through the entire process of building several structures and creating different cladding and roofing pattern. I don't claim to be a master at it or to know every trick in the book, however, I've worked enough with these materials to know they are quite resistant to abuse, easy to shape and fast to build at a fraction of the price. Believe it or not, for less than the cost of a standard Evergreen styrene sheet, you can build almost half a dozen mid-sized structures... not to bad if you ask me!

If you are interested, don't forget to fill the registration form at speedwitchmedia.com.

Tuesday, September 11, 2018

Old Habits Die Hard... But Must!

I can consider I've been an active model railroader since 1996 when my English teacher rekindled my interest in miniature trains. More than two decades have past since  then and stuff accumulated. Locomotives, cars, paint, detail parts, structures, scratchbuilding supplies and many mores. Many project started, many aborted before reaching the goal line and all that stuff accumulated... It was a one way ticket.

In the last few months, I finally completely ran out of space. No storage alternative. Boxes started to clutter my office room until last week when out of hospital, the sight was unbearable. One side effect of my medication is that I have to stay away from the sun as much as possible for a few weeks. It could be seen as a very sad thing, but with my very low level of energy, I must admit it isn't that much. However, this is an excellent opportunity to sift through the collection and start clearing up a path toward better days. Thus started my endeavour to put some order in my modelling life.

A typical locomotive project storage box.

The first step was to take a look through the locomotive collection and determine what I would keep and what would have to go. About a dozen of models were selected for sale, all based on the fact I rarely or never used them in the past and had absolutely no interest in using them in the future. Other locomotives were carefully stored and then I moved on my various detailing and kitbashing projects. Each locomotive requiring extensive work was placed in a sealed plastic box with part containers. Yes, it's basic, but I certainly didn't work that way before. Now, no excuse for missing parts or not finding the drive. The same was applied to freight cars WIP, which are now neatly stored in plastic boxes.

Freight car parts typical storage box.

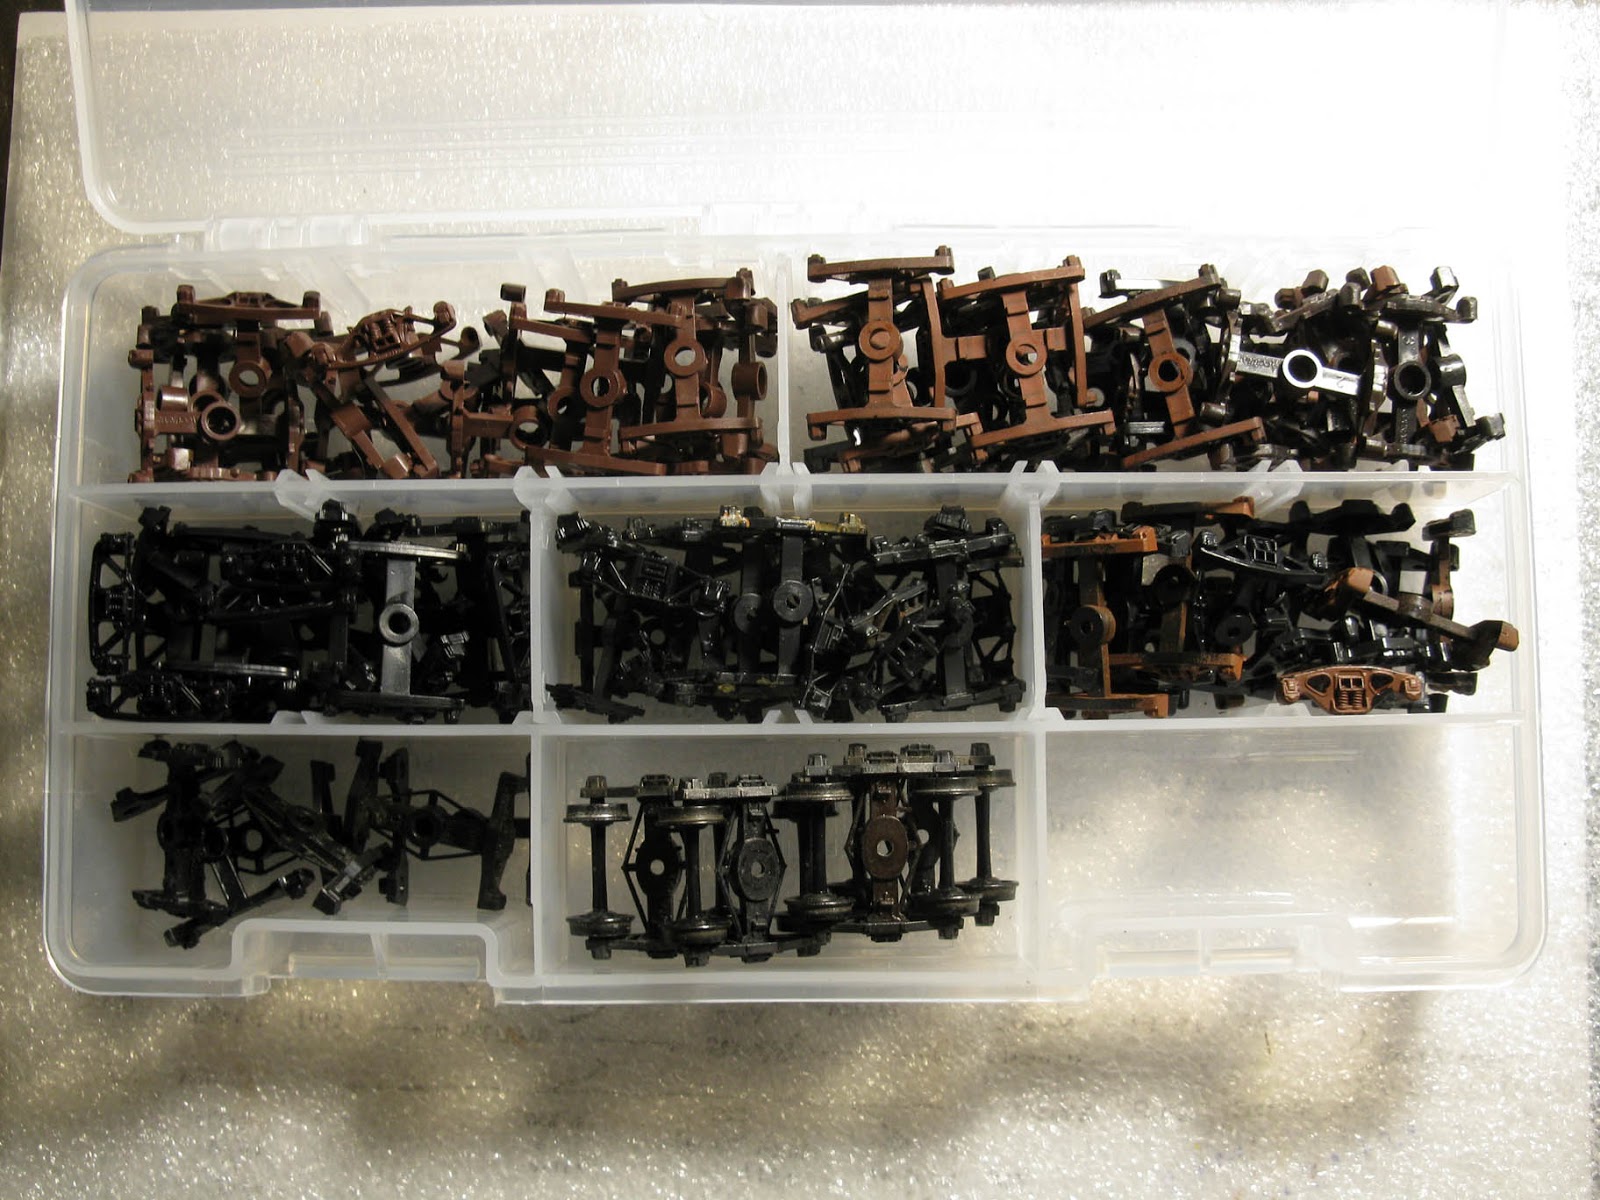
Taking care of various kind of trucks is easy with a bait storage case.

Then I purchased several fishing bait storage boxes and went through my growing inventory of freight car parts. All these details were in various cardboard boxes all over the house and I quickly lost the count over the years, often reordering parts I already had on hand but couldn't locate. Now, there is a box for trucks and wheels, one for brake rigging and ladders, and another for carbody parts such as roof, walkway, doors and car ends.

The sloped bottom makes retrieving parts easy.

Smaller parts such as grabirons and stirrups are stored in a pills organizer case, which is both handy and take very little space on the workbench.

Choosing windows, doors and structure details is now intuitive.

I also did the same with my structure detail parts and supplies. The bait storage boxes were perfect to put some order on hundreds of Tichy parts. Now, at a glimpse, I know which doors and windows I have. It was also a good excuse to take apart several old structures given by fellow modelers over the years. Most were unusable for our layout, including many European kits, and certainly glued together by the most unskilled people out there. We kept them for almost ten years thinking they could be useful some day for parts. Well, I took a few hours and removed every bit of details that were deem good enough including doors and windows. Everything else was trashed, freeing a substantial amount of space!

For scratchbuilding supplies, a second box containing styrene sheets of various size and texture, roofing material and larger parts was necessary. In my office closet, several hooks have been installed inside the door where Plastruct and Evergreen styrene profiles and brass rods and plates can now be seen easily.

Parts organizer for diesel and steam locomotives.

Each drawer is divided in two sections for sealed parts and loose parts.

Finally, I ended my journey by putting some order in my locomotive parts. Back in high school days, probably around 1998, I acquired a small part organizer and started to fill it with details. At first it went well, then all kind of junk ended up there. When I moved in my actual house in 2009, I put it in the back of a closet which was a bad idea. Accessing the organizer was quite hard and soon I stopped to go there. Meanwhile, I still had old scale model boxes from the 90s filled with parts and bits, including empty packages. The boxes were at full capacity and finding a diesel locomotive part required to go through about a hundred packages. Not very fun nor efficient. The solution was simple: clean up the parts organizer to use it exclusively for locomotive detail parts. Each drawers is now labelled according to its content, be it horns, bells, fan grills or rerail frogs. It was also a good occasion to throw away a bunch of useless stuff like plastic wheels, horn hook couplers, Atlas switch controls and other completely obsolete stuff.

Now, I still need to go through the decal collection, which is quite huge, the tools and paint, but the worst is now behind me and it is making my life much more easier. I'm glad I did it... I certainly don't understand how I could tolerate such a situation for two decades.

Monday, June 4, 2018

A New Life For Old Decals & Weathering Tricks

Right: Old weathering; Left: Weathering removed with Tamiya Airbrush Cleaner


I'm in the process of weathering a 20-plus grain hopper fleet circa 2008 for Jérôme's layout. While working on an Intermountain Superior Co-op Elevator hopper, I had to device a few trick to make the project move forward switftly. The first challenge was removing the old botched oil paint weathering and dullcote. This was achieved by cleaning the surface with a cotton swab loaded with Tamiya airbrush cleaner. This solvent is quite strong and remove the weathering in just a few seconds. However, one must stay alert to no overdo it since it could also erase the lettering, which isn't a wanted side effect.

Cleaning weathering can also be a good option to bring back some data obscured by dirt. In my case, it appears some warning lettering was wipe out at some point to make it readable again. Just like in real life, I weathered the car, then using isopropyl alcohol and a stiff brush, I removed the excess dirt. The result is far better than masking the lettering prior to weathering


Next, is how to create the various paint patches and conspicuous stripes typical on modern freight cars... It was just a matter of giving a new life to old stuff in my drawers.

We all have old decal sheets in our stash, most of them remnants from previous projects that we keep “just in case”. Maybe this bit of lettering will be useful, maybe a few numbers too or a symbol. However, many pieces of decal seem to no longer have a purpose and I’d like to discuss to reuse them in a creative way.

Old zebra stripes decal sheet

If you model Canadian National zebra stripes era motive power, you probably have many stripe remnants that seem useless. However, you can cut them into pieces to create paint patches on modern rolling stock. If the color isn’t right, just spray over with paint. Also, these stripes generally come printed on large expenses of decal film. Thus, even if the stripe are small, if you paint the overall area, you can create quite large chunk of colored patches.


Reflective stripes are common on modern railroad equipment, particularly since 2005. Many older models didn’t come with them. Once again, if you have decal sheets with yellow stripes, they can be repurposed into reflective stripes by cutting them to size. In my case, I reuse CN locomotive long yellow stripes usually applied on the running board sides. Any decals in the right color and size could do the job.

Finally, if you are like me, you can’t print white decals because you don’t have access to an ALPS printer.  Over the years I developed a technique inspired by image editing software Photoshop. If the background color is black, I create an artwork on which white lettering is superimposed over a black background. When printing, the white parts stay transparent.

Patch done with a black paint marker

Patches done with a white paint marker

A layer of white (or any other color) is then applied on the model where the lettering is supposed to be and the decal is set over the paint. To speed up the process, I experimented with oil-paint markers from the craft stores. Not only they are easy to use to apply a thin layer of paint, but they dry quickly and provide a gloss surface perfect for decaling. No need for long and complicated procedures. I’ll certainly continue to experiment with these paint markers since I can already see a good number of places where they can speed up the process, particularly when painting rails prior to final weathering.

Black decals over white patches and other patches
While I still need to add a last layer of weathering, the overall look is now closer to the modern prototype I'm basing my work on. And yes, Superior Co-op Elevator have a weird tendency to accumulate dirt and grime.


Thursday, March 1, 2018

Spraybooth & New Perspectives

Since around 2003, I've been contemplating acquiring an airbrush and a spraybooth. Back then, I was a student with little money to spare. By 2007, I acquired an old Badger 250 airbrush. Not a bad product, but the previous owner didn't care about his tool and whatever careful I was, nothing good came out of using that airbrush. At the point I thought I was talentless. Then, about 3-4 years ago, I finally invested in a better tool which brought far superior results. However, I didn't purchase a spraybooth. I was a little bit puzzled by the high prices requested for good ones. I continued airbrushing in the enclosed porch of my house, which was far to be the best option. By last December, I simply decided to no longer airbrush until I got a spraybooth...


Finally, the day has come and a new home build booth, following profesionnal instruction is now ready for use. A big thanks to Louis-Marie for building it on such a short notice of time. With the new booth, I'll be able to take care of my health... and my backlog!