Tuesday, July 27, 2021

The State of My Various 3D Print Projects

 As you know, I've been pursuing a few 3D printing projects including two CN woodchip cars, a CN 65ft gondola and a GTR Bombay-style cupola caboose conversion kit.


During the last few weeks, I was able to iron out most design flaws out of my initial 3D models and I'm getting prints of the level of quality I wanted, i.e, almost no sanding, fine details and ease of assembly. However, I'm not a master a this trade and the most tricky part in the process is adding 3D supports to your models so they print correctly. A mistake in that department and serious deformations can occur. Don't ask me why, just look at the failed shells in my garbage bin and you will understand.


In that regard, looking a various online 3D printing resources was useful, however, very little videos or tutorials are geared toward railway modellers. Most are in the wargaming hobby, meaning deformations are at least more tolerable because they work with organic shapes. Unfortunately for us, our prototypes are mainly boxes and if something isn't 100% square it shows off quite a bit and ruins the look whatever the quality of the print.


So I'm trying to figure out how to design the best supports for my prints. Until this serious (and last issue) is finally addressed, I hope to be able to move forward toward production or distributing STL files for those interested. At this point, the GTR caboose conversion kit is my priority because it is smaller and can serve as a good base to sort out printing issues.


While I don't hope to make a living out of these projects nor want to start a business at any cost (lack of time and interest), I wish these models can be available to other modellers as soon as I can.

Saturday, July 17, 2021

CN 65ft Gondola series 156000 - More Improvements

Design is an iterative process. I could have use the printed shells as is, but I prefer to refine the design a little bit so it can fit my needs and others much better.

The car ends were reworked a little bit to look better and be easier to produce. A few prototype pictures also shown I didn't use the right brakewheel housing, so this issue was addressed. I tried molding the brake rod directly on the model like an old blue box era car, but it didn't look great. It will be easier and more realistic to simply insert a small L-shaped wire.


The space between structural members was also a little bit too tight for a Kadee #242 coupler pocket and I adjusted it to fit perfectly. 3D print is great when you can keep preparation work at a minimum. I also alter the coupler height to conform to NMRA standards using a Kadee coupler gauge.


The next big change came later when I tried to fit weight on the underframe. My initial thought was to fill the space between the members with steel shots. However, after testing how much weight could be added, it was clear it was a far cry from basic NMRA recommended practices. The cars should at least weight 5.5 oz each once completed. Right now, the shell with trucks, couples and metal wheels is about 2.5 oz. I need 3 oz more and it was clear that could only be achieve with lead.

I have a box full of Select Xtras lead wheel weights part #FSL03 laying around. A quick test shown me they would fit perfectly between the main underframe members and be completely invisible... excepts for a caveat: the intermediate members would need to be removed. Given underframe details are less important in my eyes than a great looking gondola interior, it didn't take me long to remove the extra members from the 3D mode. It is certainly less accurate, but at least it doesn't impact the brake rigging, which is much more important because it can be  seen under certain circumstances. On the positive note, an entire wheel weight stripe can be used per car, adding exactly 3 oz as required.

Friday, July 16, 2021

CN 65ft Gondola series 156000 - Learning From Your Mistakes

Through my limited interaction with 3D printing over the last few years, I've come to realize this technology wasn't a panacea to all the ills of modelling, but rather a tool. And like any tool, it comes with a set of possibilities and another of limitation. It's all about mastering the skill if you want to succeed, and to be honest, I'm not there yet. However, I have started using a friend's 3D printer and having to set the printing parameters, model orientation and add supports is quite a steep learning. It's something I wanted to avoid at all cost, but at some point, you do it yourself or nothing will ever happen, just like kitbashing.

New large capacity printers can do 65ft cars easily


Another game changer is how printing volumes have increased with new generation printers like Elegoo Saturn and Anycubic Photon Mono S. We've reached the point it's possible to print very long freight cars without requiring to break them into small parts. In my eyes, this is a big improvement. As uou have probably read when I assembled the woodchip cars, using 3D printed panels wasn't great.


When I started modelling in 3D I did what most people do: I read the printing material limitation then foolishly tried to cram as much details I could, if possible using scale measurement, in a vain quest for ultimate prototypicalness. Unfortunately, I also hit a wall. Perfectly at scale details aren't always printing well, but worst, sometimes they print well but they cast so little shadow you barely see them. As crazy as it may sound, prototypical doesn't translate as realistic. Like art, you need to exaggerate a little bit some features to make them stand out and play their role. Knowing what must be "improved" isn't always easy, but at some point, after a few print, you start to understand that some hills aren't worth dying on. A good example are open cars like gondolas. You've got to choose what you can live with: a detailed undeframe or a permanent load because weight in resin models is a major issue.


On a positive note, I've found out I can now print excellent one-part models, including very fine and realistic ladders, brake chains, hooks and other intricate details. Funnily enough, it's like an Athearn blue box car with a few extra bits. And I won't fool you, it was my goal since these models are basically replacing Walthers 65ft gondola and will be used in operation. Nevertheless, they can be easily improved and detailed.

Print failure due to inadequate supports

Visible layers due to inadequate supports (vibration)

At this point, I'm experimenting with supports. A print need supports and they are key components for a quality and smooth print. However, they can leave pock marks and you want to reduce them or locate them where they won't be noticeable.

Lots on support marks on the floor isn't great


On my third gondola print, the supports were located inside the car as it was printed upside down. The reason is simple, the underframe details are supported by the floor as the car is printed. It ensures a very neat print, but I'm not a fan of patching support marks with putty on the car floor. I have a few options, use less supports, which would probably be advisable and maybe, try printing the car upside so the supports are on the underframe. It would make support removal easier and most pock marks wouldn't need to be repaired because they would be virtually invisible or buried under steel shots providing weight to the car.


A last mistake was the trucks. Taking inspiration from trucks made in Delrin by manufacturers, I designed my own Barber S-2 70-ton trucks. I then proceeded to print several pairs, which is much more economical than ordering them.


Unfortunately, while looking great, the bolsters were fragile and prone to snapping when installing wheels. A sturdier design with a solid bolster was implemented, making the resin strong enough to sustain normal abuse. It was a simple fix, but it proves your parts must survive the layout if you want the model to be a success and not a shelf queen.

Top: original bolster, bottom: improved design


Wednesday, July 7, 2021

Extreme Weathering - CN CCF Snow Plow - Part 5 (final)


The snow plow is now complete. I remember wanting to do that exact weathering back in 2014 but knowing I had not the skills required and feeling nobody really attempted it in the past. I was left on my own and if now for armour modellers like Night Shift (Martin Kovac), I'm not sure I would have been able to tackle such a complicated weathering project.


While many steps are well-known techniques, combining them in such a way and using crackle paint as a base was genuinely something I've never seen though I'm pretty sure many modellers have tried it before. Innovation paid off in this case and I'm glad to have reach a level I have enough skills to try my hands at such a project and not feel I'm improvising.If I learned something from Martin Kovac, it's that you don't have to apply an effect and wish it will work: you can work it around until it looks exactly like you want. I certainly hope my efforts will inspire other railway modellers to push the envelope and go see what other modelling communities are doing. You could be surprised how watching a few hours of YouTube videos can change completely decades of work.


Monday, July 5, 2021

Extreme Weathering - CN CCF Snow Plow - Part 4

With the crackle effects now in place, the basic coat of color and washes applied, it is time to go to the next level with this project, including a lot of distressing. Many other layers will be required to get the desired results.

This is how it should look...

The first step to finish the model is to apply decals. But with such an uneven surface, you can forget about a coat of gloss to take care of air bubble. Also, the surface is so rough you have very little leeway in moving around the decals because they can tore at every move. For this purpose, I'm using Highball Graphics decal set #F-377 which are a good match for my particular prototype. However, it became obvious the plow in Clermont has some different texts on it that weren't in the decals, so I had to fudge a little bit to make sure everything was there. It isn't a criticism of the set which covers most usual variation found on CN snow plow, but it shows us how CN shops would had different letterings after plow were refurbished. Variation is almost infinite.


To make the decal film sink into the crackled surface, a generous coat of Microscale Micro Sol was applied to set the decals in place. Then, more potent Walthers Solvaset was used. Removing air bubble was easier than I thought because air can't get trapped under the film as it moves along the crevices and get expelled as the decal set. Finally, a light dab of plastic solvent finished the job. Where I could still see some silvering, I used a metal point to burnish the film into place. This little trick often works wonders when decal solution can no longer help.


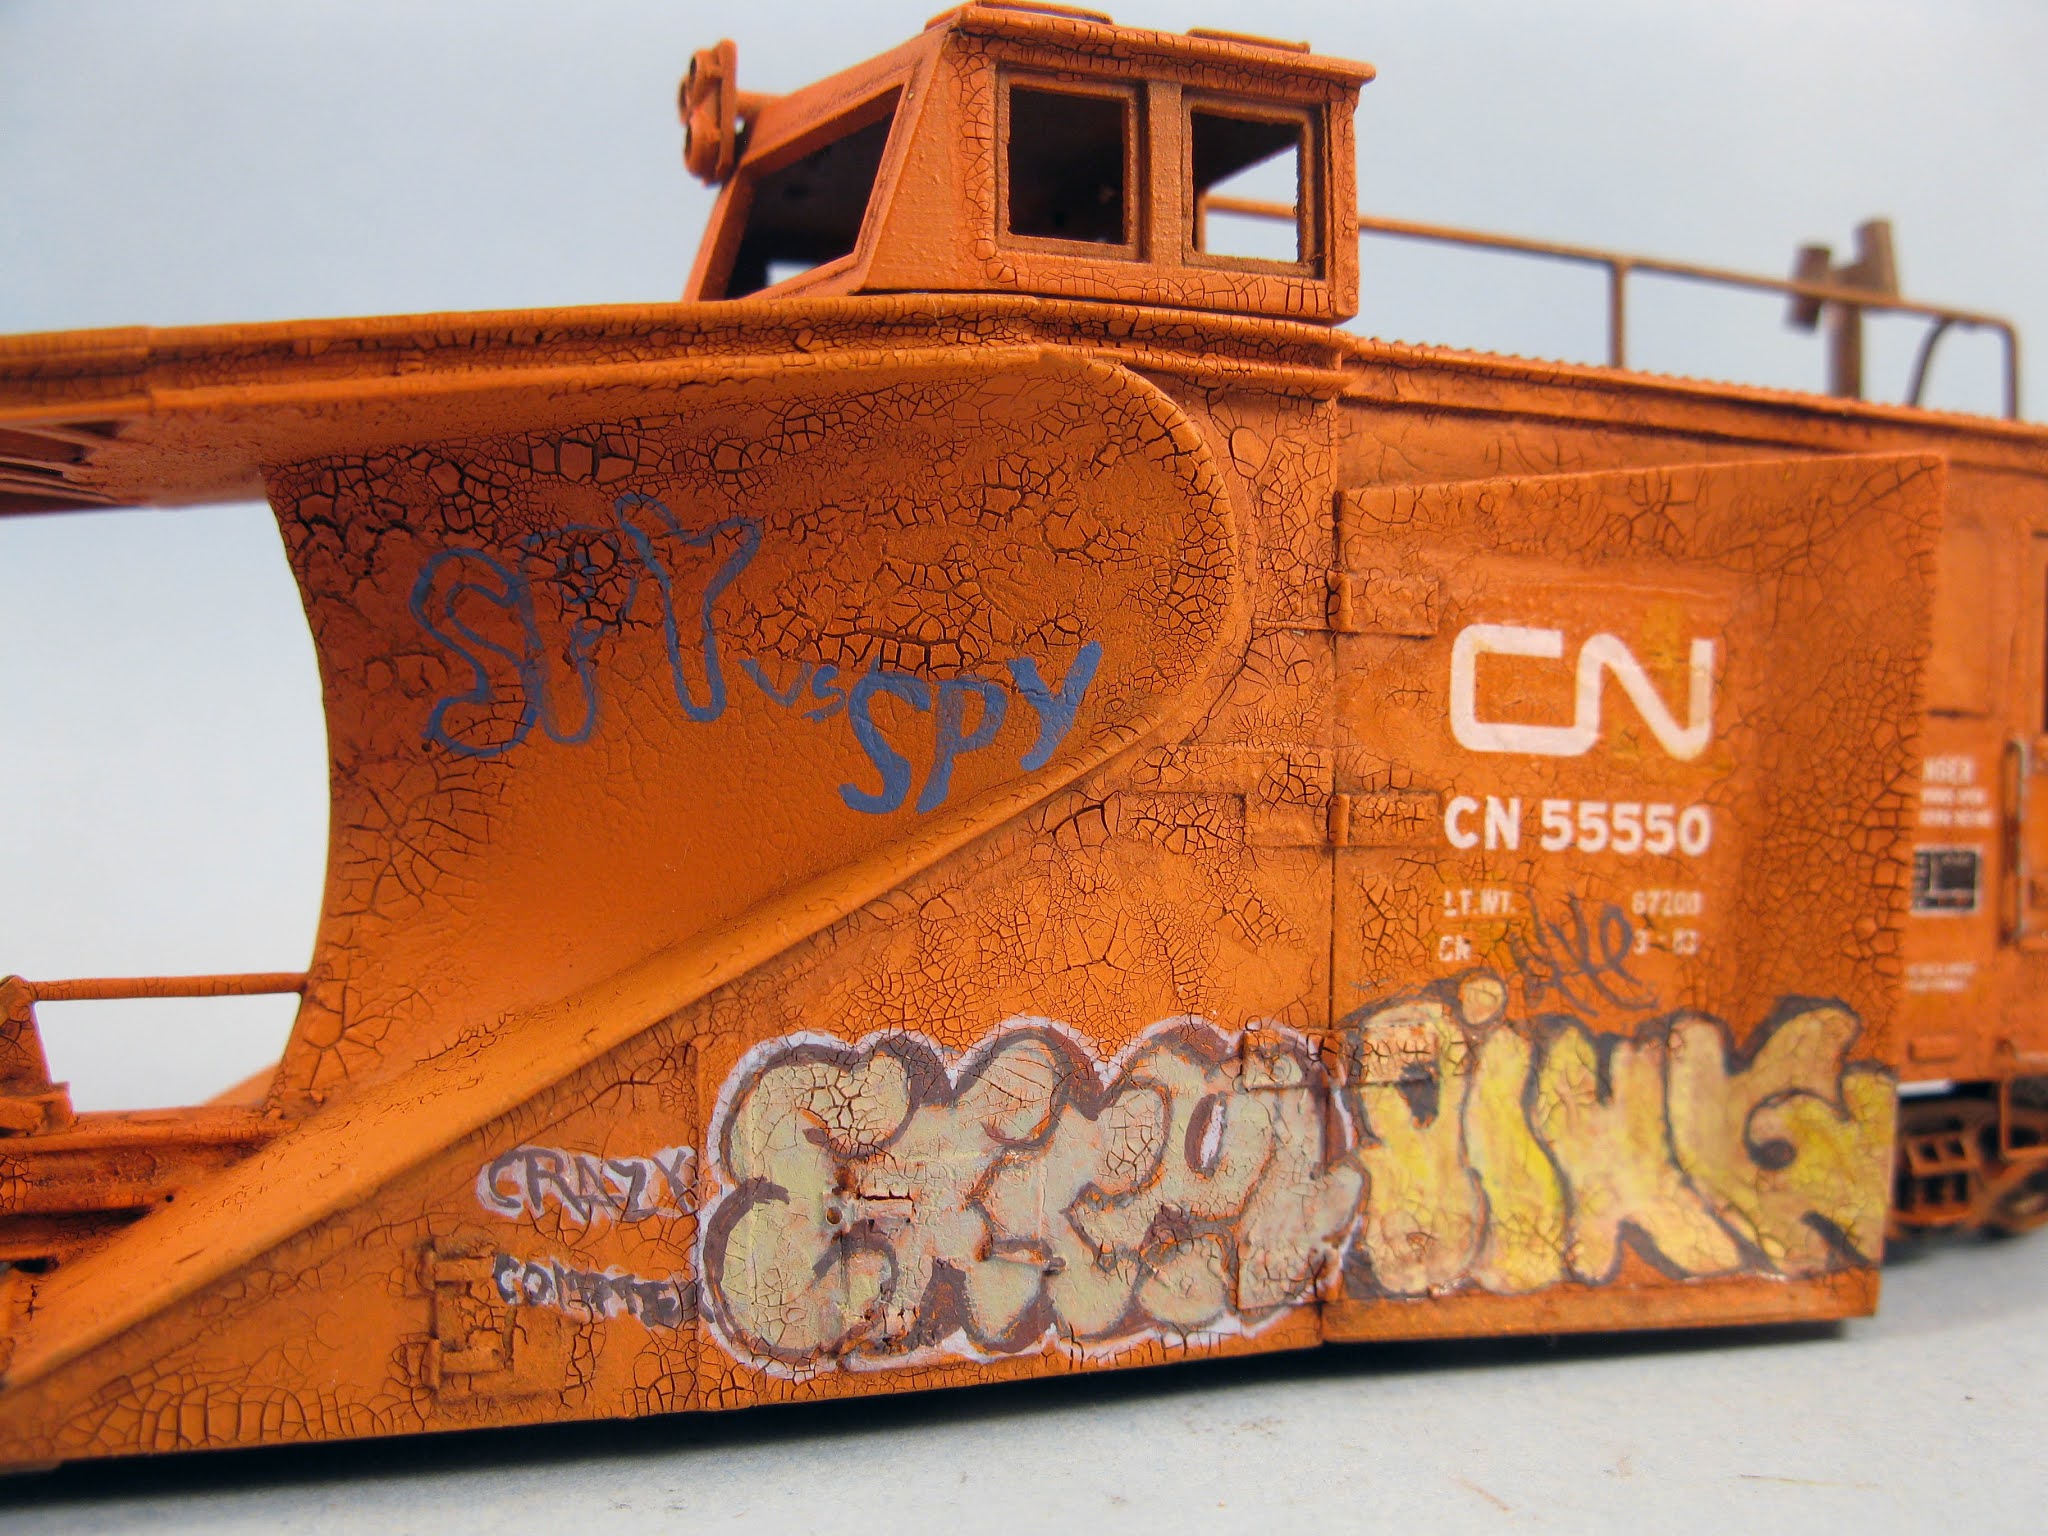
The next step is about painting the graffiti and you can't rely on commercial products for that. You need to replicate the real artwork. In the past, I often watched Dansrailroad2011's YouTube channel. Dan's is a young modeller with a lot of experience in modelling modern extreme weathering. Over the years, he has developed great skills and techniques in replicating real graffiti on freight cars. It's well worth looking at his most recent tutorial because he gives quite a few good advices that takes away the stress of ruining your work.


The best way to approach painting relatively complex graffiti is simply to draw them on a sheet of paper or styrene by hand. It gives you more control to draw it to scale and correct mistakes. When it's done, it only a matter of using a mechanical pencil to redraw it on the model. I carefully laid down the styrene draft on the model for direct reference, making sure my replica was as accurate as could be.


Then, came the painting. I first painted the light color outlines but not the black lines defining the letters contour because it is better to paint them at the end. I filled each letters with a thinned down color which was already weathered with white and some dirty brown. The reason is simple, you want a faded color to make sure the graffiti isn't garish and blends with the mode. Also, I didn't mix perfectly the colors together but used several variation of a same color to add some realism. Diluted paint is also great at keeping the paint semi-transparent which is useful to replicate the look of spray paint slowly eroding away under weathering agent in real life. It's why I hate graffiti decals; they are far too sharp and opaque.


Finally, I used a semi-dark dirty gray to add contour. As you can see, I never used pure colors like black or white. Even some black lines were done with dark brown, just like the prototype. The graffiti on the prototype plow are really old, at least 15 years now, so they have faded considerably. Other graffiti were added here and there according to prototype pictures.


After painting graffiti, it was time to chip the paint. At first, I thought about flaking the crackled paint effect but it didn't work as well as I thought, thus I came back to the basics and created a chipping effect with a very fine brush. Using pictures prototype picture, I tried to replicate almost all the paint chips that could be seen on the snow plow. It was long and tiring. I only painted a side at once to keep my mind sharp. If you get tired, you start to have a hard time to control your work and unwanted patterns start to develop. After several sessions during two days, the model was completely chipped, giving it a really worn out appearance.


On the plow itself, a sponge was used to add countless small rust spots which were later enhanced and made more realistic by stippling paint with an old paint brush. Several colors were used, starting with a light rust color then movie toward dark brown and dark gray. For exposed steel parts like the plow blades, I used a graphite pencil to create a semi-polished raw steel effect. While the plow has been rusting for years on its siding, some steel is still visible. Later, I would blend it this steel effect for better realism.


The doors were hand painted with acrylics and a fine brush. Using vertical motion, I started with the lighter greying tint, level some orange spot visible to create remnant of paint on hardware and some other wooden part. Then, I came back with medium gray, then darker gray. A dirty acrylic wash was finally applied to blend the effect together.


Next, the trucks were painted several shades of dark and medium brown, including washes of acrylic rust tones and PanPastel. Using a very fine brush, the plow roadnumber was hand painted in off white on the truck sideframes like the prototype, then blended with another rusty wash.

The roof was first hand painted in a faded boxcar red. On the prototype, the modern black paint has completely work off, revealing the original brown paint from the 1950s. To create the roof chipping effect, the well-known hair spray technique was used. Two light coats of hairspray were airbrushed on the roof parts. After 20 minutes, greyish-greenish acrylic coat was also airbrushed and let to dry for 1 hour. Then, with a stiff brush and water to reactive the hairspray, I started to chip the paint using prototype pictures to guide my work. When I was happy with the result, I let the paint dry overnight and applying a coat of Dullcote to seal my work.


While the hairspray chipping was quite neat, it didn't replicate exactly the fine chipping texture seen on the real plow. Using a sponge loaded with the same boxcar red of the roof, I refined the chipping aspect. This little step really increased the realism with no effort. Finally, an oil paint wash made of raw umber, white and some brown was applied over the roof to create rain streaks and dust depot as per prototype.


The chimney was next. Using several custom mix of acrylic paint, it was completely hand painted, including small effects. I basically painted it as if I was doing a landscape painting on a canvas, trying to modulate and blend colors together. I also added joint lines, scratches, rust and tar stains all over it.


At this point, oil washes were used to add realistic rust streaks from paint chips and rusted spots. This step must no be overdone, but it is crucial to blend together several rust effects. The wash was applied on the graffiti and snow blade among many other parts. A small electric cable made of fine copper wire was installed at the rear of the plow to complete detailing. It was time to apply the final coat of dullcote to seal everything once for all.


The very final step involved window glazing. Like any abandoned piece of rolling stock, the snow plow in Clermont has been vandalized over the years. People have visibly shot their gun on the windows several times. I first thought about using microscope cover slide to recreate that particular broken glass effect, however, I wasn't sure it would work well and I didn't want to waste a few days, if not weeks, waiting after a mail order. Instead, I used acetate and with a metal point, I scribed the broken glass pattern using prototype pictures again as a guide. When I was satisfied with the result, a white oil paint wash was applied over acetate, filling the cracks with a hazy white effect typical of broken glass. It was extremely realistic. Acetate is also easy to cut and I was able to remove parts of broken glass just like in real life.