Thursday, January 26, 2017

Custom-built Grade Crossing Signals


Among our many ongoing projects is the creation of a working and efficient system of grade crossing signals. This is no easy task and it required quite a deal of programming since out track arrangement doesn’t fit a typical situation. So far, all this behind the scene stuff including the sound is now almost done and we are working to build realistic grade crossing signals.

LED ends were flattened with a file.

Our first experiment earlier last year proved us building signals from from scratch using LED and brass tubing and wire was not as intimidating we once thought. Knowing this, Louis-Marie worked actively in developing a method of building them with template and jigs to speed up the process and control the quality. So far, his efforts yielded impressive results and if it weren’t for the LED size, they are quite close to prototype if not better than commercial products available.

The brass tubing visor fits perfectly over the LED.

However, the interesting aspect of this project isn’t exactly the physical product but rather the fact that Louis-Marie, like many other modellers, considered himself as unsuited to precise scale modelling. As you can see from the picture shared here, he certainly did develop impressive skill and found out he was proficient at something that supposedly was out of touch. Bear in mind these signals are his first attempts at scratchbuilding with brass! Another proof you can’t fear doing something until you try it once. Louis-Marie being extremely methodical compared to my messy approach to the hobby, helped him to produce state of the art models. And, for once, he was much more demanding than me about prototypicalness.

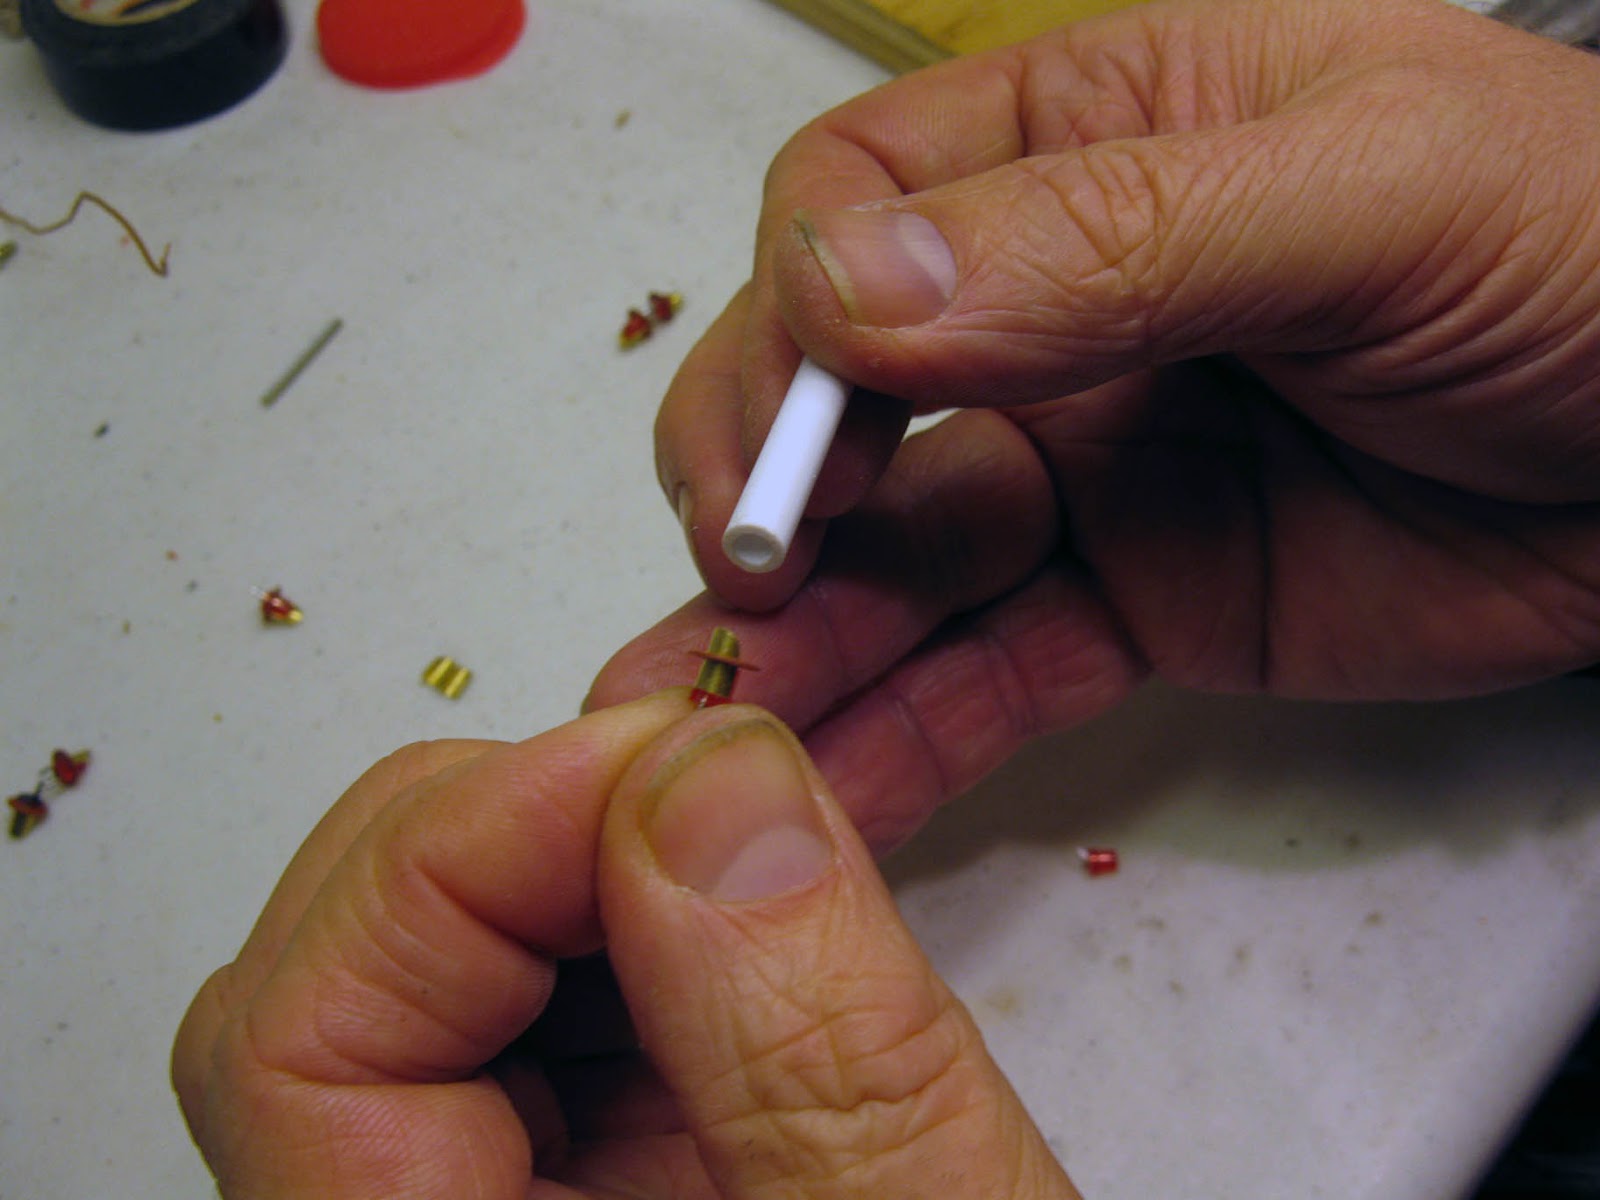
A plastic tube is used to press the Kadee washer in place over the visor.

I’d like to share a few techniques and tricks Louis-Marie used to make his signals:
All the LEDs were soldered using a special MDF template made to prototypical dimensions. Not only it speeds the process, but it ensures every pair of lights is correctly spaced. It was also useful in keeping front and rear pairs of LEDs very close.


Another interesting idea was how he made the signal targets. The target themselves are made out of HO scale Kadee truck washers. They have the correct outside diameter and their center hole fits perfectly common small LEDs. The LED base rim supports the washer. The visors are made of a brass tube cut in half. They are then cut to length and rounded with a Dremel tool. They are pre-colored and inserted on top of the LED. With a small plier, a light pressure makes sure they fit perfectly around the LED, keeping them in place when the washer is put in place.

LEDs are soldered back to back using a special jig.

When assembled, other small cosmetic details like bells, electric boxes, crossbucks and bases will be added. Some parts have been salvaged from old Bachmann signals and were filed down to make their dimension more prototypical.

LEDs are then mounted on a brass tubing.

And now I know I’ll have to start seriously building some roads!

Certain signals had particular geometry like this one at Rue du Sous-Bois.


Sunday, January 22, 2017

CN Chevrolet Suburban - Part 1

Yesterday, we discussed about the vehicles on our layout. While we don't want to crowd the place, we think a few cars and trucks defining the era are a good addition to any scene. Indeed, most people will easily find the era by the cars rather than the trains.


On the layout was a Trident Mass. Police Suburban. The paint was ugly, but the fact I had recently seen a picture of a CN Suburban painted orange was enough to start me working on that project.


The body carbody was painted CN Orange #11, the interior light grey and underframe a very dark brown. Details were painted according to prototype pictures, including chrome trims around windows. These little details really helped to bring life to a somewhat crude model.


But to be honest, Trident trucks aren't bad, they just got the most cheapest factory finish you can think of.


I've ordered CN MoW truck decals and will complete this project as soon as possible. I'm also thinking about repainting an Econoline in the same paint scheme. Now, if I could only find a decent pickup truck...

Rivière Malbaie Undergoing Dramatic Changes


Yesterday was the perfect occasion to start scenicking the Rivière Malbaie west embankment. A few years ago, I took extensive pictures of that particular area, knowing it would be handy when building the layout. I sure was glad to have them on hands!


One thing that struck my mind was that a bank of the embankment was starting to slide into the river. You could se the patch of grass detaching from the upper part. To replicate this nice effect, I used universal mud and made a kind of rigde that would be left partially exposed when applying grass.


About grass, I used a different method. After looking at the pictures, it became clear the grass was dead on the periphery but alive in the middle. Using straw colored static grass, I simply applied it by hand on the pre-glued landscape. It didn't sprinkle it, but rather took chunks and pressed them down in the glue with my finger. When satisfied, longer green static grass was applied in the middle using the same technique. I also took care of adding patches of dead leaves, scenic foam and other scatter material.


Since the embankment is prone to washout and small landslide, I left some brown scenic shell appear. On the prototype, you can see some exposed soil through the vegetation. I thought it would be neat to replicate.


Also, where the landslide is modelled, I placed fresh rip rap on the upper portion as if the railway had started to take measure to stabilized the roadbed. Bythe way, this is conveniently located in from of the turnout so no vegetation will be a hindrance when operating the switch.

 
I can't wait to see this scene completed with trees!


Friday, January 20, 2017

CN 40ft Grain Boxcars - Part 3

The original model


The grain boxcars saga ends today with the last of three cars. This one is an old Athearn Blue Bix kit I bought when I was in high school circa 1998.

The cleaned and modified model

Later, I tried to modernized it by removing the roofwalk and painting the roof aluminium color. It was an ugly job! Later, deeming the car esthetically unredeemable, I used it when I first started using artist oil pain for weathering. It was crude and the model was quickly shelved.


Since then, I discovered that 70% alcohol is good enough to remove bas weathering and Dullcote from models without attacking the factory paint if you do it carefully and quickly. I plan reusing that trick to salvage a few cars in the future.

Some paint will be removed from the wheels

Monday, January 16, 2017

CN 40ft Grain Boxcars - Part 2


Two MDC/Roundhouse Cn grain boxcars are now completed and waethered. A third and last one by Athearn is actually on the benchwork and should be done quickly. I can now affirm the boxcar fleet for the Murray Bay Subdivision is now completed. I'll now start to work improving and weathering the other boxcars. If I ever feel like build other boxcars, they will be Canadian Pacific prototypes to build up the fleet for a future CP Rail-themed layout.


Sunday, January 15, 2017

Temiscouata Railway Connors Branch - New Blog

I'm happy to report my new blog about my Temiscouata Railway Connors Branch is now online. For ease of navigation between my different blogs, a new set of tabs are now display under the header.


Named "Connors Branch - The Sportsman's Route in S scale", the new blog will report on the progress made about this project that started many years ago but reached fruition last summer during the Thinking Out Loud series. As a matter of fact, I moved this series over the new blog to for ease of reference.

While modelling the Temiscouata is no breaking news, doing it in S scale may sound a little bit weird at first. I think Trevor Marshall probably saw in my eyes that I was convinced it was the way to go if modelling a small steam era branchline.

I've acquired my share of small HO steamers over the years... 0-6-0, 2-6-0, 4-4-0 and 4-6-0. All of them cute but so underwhelming. It's like looking at a bug crawling on a countertop which is far to be my description for a steam locomotive. Even the small 19th century 4-4-0 had presence. Sure they were small by today's standards but if you visit any railway museum, you'll see they command respect. You can't get that feeling out of an HO scale 4-4-0. However, it's a different matter in S scale.

Finally, the proposed layout is small, most track work will required a certain amount of hand-built stuff, all locomotives will require a crazy amount of kitbashing and cars need to be virtually built from scratch or from craftman kits. At this point, there is no real advantage going HO... at least, S scale makes model building, detailing and fitting electronics much easier. An importantly, have far better performance.

So welcome to the new blog. I hope you will enjoy the new retro design inspired by the official 1912 Temiscouata Railway timetable. I also made sure the blog was more streamlined than Hedley-Junction too.

Enjoy!

The Revenge - Rebuilding an IHC 50ft Boxcar - Part 5


Another project comes to an end. The IHC 50ft combo door boxcar is now completed and weathered, bringing life to one of the worst toy in my collection. This car will now haul dimensional lumber between Québec City and Clermont. Enjoy.


The Reasons Behind a Hobby

Mike Cougill published a neat article last week about why he is doing railway modelling. He further developed his ideas but the first few paragraphs dealt about using his hobby as a tool for personal development and that strikes a cord with me.

Over the last few years, I often told my friends and family that I achieved more significant things in my hobby than at work. As much as my profession is about building, there is little incencitive to develop someones talent, skills and actually build something, often meaningless or outright embrassing. It's not my goal to talk bad about one of the great arts here on Earth, but when I come back home after a day of work, I rarely feel I can brag or talk highly of what I achieved during the day. Our society - whatever it says in media - doesn't want to put effort in construction. Low cost, cheap materials and half-baked design are the everyday lot.

I've often asked myself if modernism in architecture wasn't just a excuse to make acceptable cheap things. "Looks! It's minimalistic, that's the new trend!". Some young colleague recently commented he was tired of designing boxes, cubes, planes and other featureless shapes devoid of any sense, artistic value or challenge. Another one, older, told us he work all his life trying to figure out how to fake solid shapes with flimsy materials that aren't made for this. I'm not implying that minimalistic arts are crap, but unfortunately they offer a very nice ground for many to find a lucrative shortcut.

So no wonder - during the weekend or while in vacation - I start building models. I'm simply doing my own profession again and again, but with the possibility to get better at it and actually satisfy my need to build good things. I could use the hobby for the sake of escapisim, but it's more than than. I wouldn't get it from other kind of modelism because model railroading imply a large array of disciplines that range from topography to mechanics to architecture to transportation. Not only we work at the rivet level but we also manage many acres of real estate. And this is my own global approach to this hobby and probably why I'm always puzzled to see people able to build the most incredible models possible only to run them on the cheapest plank of plywood you can find.

As pointed in the comments to Mike's post, model railroading is a weird and large community in which very different and often contradictory pursuits are bundled together for the better and for the worst.

For me, model railroading enables me to practice my profession with the possibility to aim for excellence: architecture in a nutshell.

Saturday, January 14, 2017

Temiscouata Railway - Moving Forward

Hi folks! Many of you followed with interest last summer Thinking Out Loud series about layout design and modelling the pre-CNR era (before 1918 or even WW1). As we often do, I recently had a long chat with Jérôme about that project and the CP Rail-Quebec Central based home layout idea.

We both think the Temiscouata Railway is a tremendously fascinating prototype to model, particularly when done in it's heydays before National Transcontinental, Canadian National and Canadian Pacific threw several monkey wrenches into their plan and seized their turf.

However, there is very little reason at this point modelling a portion of Connors Branch. While visually beautiful, modelling a very long stretch of railway in the middle of fields for several feets and going to staging isn't exactly an interesting way to use space, ressources and time. We came to the conclusion this idea could only work if both end of the Connors Branch are modelled: Edmundston and Connors.

At this point, I have very little idea what was the track plan in Edmundston back then. Several pictures exist from the early 20th century and they give a good idea of how the station and freight shed were set into the landscape, however, you can't deduct any track arrangement and figure out if there was an engine house and turntable. But one thing is sure, Edmundston station can easily be modelled with success without using to much space.

I'm thus faced with some issues. I need to find a track plan of Temiscouata's Edmondston facilites. Fire insurance maps and railway archives would be great to find this out. However, my searches have been fruitless in that regard. Any information is crucial to make this possible and your help would really be appreciated.

This brings me to say I will only model Connors Station for the moment and using a modular approach so when information will be available, other modules will be added. Whatever happens, I'm pretty sure it will make an early 1910s layout very fun to operate. It would be about 13 feet long by about 18" large if I reuse module frames I've already built or 24" if I start from scratch. In a perfect world, I would probably build 3 sections of 4-5 feet and bolt them together. In that regard, I would probably follow a similar path to what the S Scale Workshop did with their modular layout I've witnessed at Exporail last summer. And then you can ask it I would dare to try this in S Scale as I hinted a few months ago? Maybe... because small steamers in HO have no presence at all on a layout and a 36ft boxcar is smaller than an HO 50ft one. Now, try to convince me!

By the way, such a layout could even be moved around to local exhibitions which would be coherent with my goal to interest Canadian modellers into their own history, particularly this very year in which we celebrate the Canadian Confederation 150th anniversary.

Now is the question to the readers. Do you prefer I make a separate blog for this project? I think it would be a good idea to manage the information. I'm not into mixing content. Hedley-Junction is about Canadian National diesel operation in Québec City and Charlevoix ares and Quebec South Shore Railway is about Canadian Pacific decaying rural branchlines. Since the Temiscouata layout would be about steam and pre-WW1 modelling, it shares nothing in common with my two other projects.

Until then, I'll try using my HO surplus material to build two mock up modules and test for real ideas about a Temiscouata railway layout.

Quebec Central Tring Subdivision


Jérôme was quite interested in that new layout project, if it ever comes to fruition. He particularly like the idea to make this layout built as a different game than Hedley-Junction which is about heavy industrial switching. Like me, he loves the current layout, but would like to have the opportunity to experiment with other types of operation. The Tring Subdivision is about running trains over a somewhat ingrate topography and planning meets. Switching isn't the main goal and will be achieved by very short local trains (3 to 6 cars maximum).

To make sure the layout is a real challenge to operate, I'm actually in the process of streamlining the track plan to reflect a decaying line, making the passing tracks longer, keeping only a handful of customers (à la Jim Mcnab's Grimes Industrial Line) and using #10 turnouts. Yes, it's not a typo: handlaid #10 Fast Track curvable turnouts. I've reach that point I'm no longer satisfied by commercial turnouts. They don't fit my needs anymore, at least for that kind of project.

I will also incorporate something I generally don't do on my "serious" layouts and add grades. With LokSound Full Throttle decoders and Scott Thornton's Proto Throttle in development, you really can simulate running a train. Tring Subdivision crossed a divide between several rivers before reaching Megantic. I did the maths and main line went down into the valley from Tring and started to climb up after St. Évariste when reaching an important mountain ridge there. In the valley, most grades were about 0.6% to 0.8% but near St. Sébastien, they reached about 1.8% in so areas.

When you think in term of simulating way freight trains, the combination of grades, curves and heavy freight cars (about 8 to 12 oz. each) can make this a very nice challenge and that's exactly what we are looking for. It certainly is not a coal hauling main line like Saluda in the USA, but it offer a decent challenge. Given your typical way freight train is about 10 cars and a caboose (about 6 lbs), it's not a walk in the park and it really makes your quality sound decoders interesting. You can even add some IR triggered train sounds under the layout in the sharp curves.

You remember I often say we can't have it all. I mean it and certainly separating clearly distinct objectives as distinct projects helps a little bit.


Wednesday, January 11, 2017

Tuesday, January 10, 2017

MLW RS18 Madness - Part 15


I've started weathering the new RS-18s, starting with a drastic fading paint effect often witnessed on CN MLW locomotives. According to Rob Arsenault on Canadian railway modellers groupe on Facebook, some shop employee told him they used to wash off oil using Varsol and caustic soda, which heavily eroded the paint as you can guess. Here's the prototype picture that inspired my work.

I started the weathering process by painting over the CN logo with oxyde red acrylic paint to imitate the primer underlaying the white paint. Then off white was used to represent the peeling paint on the hood. Some black was later added to subdue the effect according to prototype. The result was very stark and the locomotive was ready to get a light white acrylic wash to merge everything together and fade the paint.


After sealing, a light wash of black oil paint was used to bring back details over the long hood. However, I didn't use the wash over the orange paint or cab. Instead, a wash of alcohol and India ink was use to add a severe layer of dirt over the ends and sill. The sill got later streaks made out of diluted black oil paint and several layer of dirty acrylic washes. Then, the model was again sealed and it was time to dirty up the model with weathering powder on the sill, stairs, pilots and grilles. Another coat of dullcote followed and other layers of dirt were added. Finally, the transparent plastic cab deflectors were glued on using Future floor finish and headlight lenses formed with Micro Kristal Klear (which will need a second application).


I'm relatively satisfied with the result but there is a lot of room for improvement. I may redo the roof to blacken it more and make it oily as it should.


Sunday, January 8, 2017

Tring Subdivision - Research in Progress

Yesterday I vistied Groupe TRAQ in Charny, which can be described as the railway historical society for Eastern Québec. Louis-François Garceau kindly offered his help so I could find my way among the incredible archives of Quebec Central Railway going as far as 1870 when the company was founded. It seems the late Jean-Marc Giguère - the last owner of the line before it was officially dissolved - had the hindsight to salvaged every papers he could when he bought the company back from the Canadian Pacific in the late 1990s. He kindly donated the papers to Groupe TRAQ for preservation.

I only saw a very limited amount of QCR archives, but it was nevertheless impressive, including the original comptability books from the 19th century which are almost works of art in themselves.

During my visit, a member was going through all the track blueprints. He's actually trying to make a Quebec Central atlas that could be used for future reference. He was also interested in the Tring Subdivision and we discussed the many quarry sidings that existed near Megantic. Only a handful of plans exists and he's trying to locate more stuff. He also took a lot of picture of the small trestle bridge in Courcelles and we discussed how it was engineered. It was relatively similar to St. Victor bridge and feature extremely nice bridge abutments in local granite. This is definitely worth modelling.

I was extremely lucky to find dozen of track plans for each station on the line. Most covered the 1930s up to the 1970s. The most amazing find was about Tring-Jonction. The place was extremely large in the 1940s. The engine facilities didn't had a turntable as I thought, but were nevertheless extremely interesting. I don't have autorization to share publicly the documents, but I'll try to make a track plan when I'll have time. Two things I protofreelanced on my layout plan ended up being real! The Placo company was exactly rail-served in the same way I draw it on a sharp mainline curve. Also, a team track did exist in front of the station and served also a cattle pen. I also got confirmation the icehouse was indeed transformed into a feedmill. But better, a second adjacent icehouse did exist in the place of the grain elevator. I've got all the scale plans for the buildings! By the way, the Tring-Jonction's Coop name's was "L'Invicible" (The Invincible)! I think they thought highly of themselves!

Other locations were more diversified than I thought too and pictures from the 1970s and 1980s shown that most freight houses survived the great destruction of station in 1968. In fact, they were often leased to particulars or used as sheds for the railway. In St. Évariste, I was able to identify the customers I'd seen on Google Earth: it was a cardboard box manufacturer.

Among the documents were also the plans for power lines crossing the railway right of way in many place. Thus I now have all the information and dimension required to build them which was a modelling aspect I wanted to tackle.

Mr. Garceau also shown me many pictures taken in the area during the 1970s and 1980s. It gave me a good idea of the rolling stock and locomotives used. I'd say C424s, RS-10s and RS-18s were the main power in the area with a few MLW switchers. They came in Multimark and Gray and Maroon paint schemes. However, the most interesting thing was the rolling stock. Even in the 1980s, most cars were 40ft boxcars, most of them in Script Lettering and in 3-step Block Lettering, followed by a few Multimark ones. Most Multimark boxcars were double door boxcars painted in red. A few NSC 50ft green boxcar with QC reporting marks were also common, including CP Rail 50ft gondolas.

Finally, I also had the chance to talk with some old folks knowing well the area. According to them, back then almost every single village had a feedmill on the Quebec Central and no large ones yet existed. Most 40ft boxcars carried grain, bagged goods, lumber and, interestingly, a logs "pitoune" for sawmills and paper mills. Yes, it seems Quebec Central wasn't highly specialized in regard to cars.

They also identified heating oil and other petroleum products as common place. They memories seem to be right since most trains seen on pictures had a least two or three tanks. The blueprints also show a lot of pipelines connecting team tracks to small storage. From what I've seen Imperial Oil (Esso) had virtually a monopoly in most towns along the Tring Subdivision.

I'm glad to have visited Groupe TRAQ since it confirmed the Tring Subdivision was an interesting prototype even if the traffic almost dried up in the 1960s. Some modeller's license could bring back some life to later decade.

From there, I can already say the layout should be centered heavily on grain, cattle, lumber and oil traffic. Rather than having highly diversified locations, I think most town most have similar basic features. Most of them often condensed on a single track and handled by a sole customer (often the farmer's coop).  To enhance variety in operation, I'll make sure both towns on the peninsula can't be switched during the same trip. This is also a trick to make the main line looks longer when operating. To this, we can had a few different customers that bring some personality to each location (granite, veneer and cardboard boxes). Freight houses can also be impletemented, here and there, to give the railway some presence on the layout with dedicated albeit dilapidated structures.

I still have a lot of work to do on each town track plan, but I feel it is something that should be decided when building the layout and not before. I'm also starting to be convinced to replace Courcelles with St. Évariste since it had an oil dealer and a cardboard box manufacturer. This way, every modelled town on the layout, excepted Tring-Jonction will bear the name of a saint, which is extremely common in Québec and have a nice and sympathic vibe to my ears.

And now, I can already see that I'll will have to improve many old CP boxcars for future use. By the way, I'm on the hunt for cheap Atlas C424 locomotives in Multimark scheme and maybe Proto 1000 RS-18/RS-10 in Multimark and Gray and Maroon paint scheme. Yes, they have discrepancies, but it far to be as much as big problem most people think, particularly if you don't run them with Atlas locomotives.

MLW RS18 Madness - Part 14


I'm glad to report the three CN MLW RS-18 are now completely painted and ready to visit the weathering shop. My goal was to build and complete the engines by the end of my 2-week Christmas vacations and the deadline was met. The funny thing is that I worked probably more on this project than I would at my regular job! That's model railroading in a nutshell isn't it?


Among the invisible things I did was to swap one of the Kato drive for the other Atlas Classic drive I had. Certainly the Kato drive must be regarded as a marvel of ingenery for it's time, however, since the 3 locomotives will be often consisted together, I favorised a single drive model for all them all. The Kato drive will be used to power the fourth green & gold unit actually under construction. I found out the Mehano shell was easier to fit over that drive that the newer Atlas Classic one.


For the weathering, my intention is to have two locomotives with a moderate amount of weathering while the third one will be much more abused. Prototype pictures from the 1970s will be used as reference.

Friday, January 6, 2017

MLW RS18 Madness - Part 13


The RS-18 project is nearing completion. All decals are know done and paint is almost complete. After looking at many prototype pictures,  I decided to add ACI label on the sill.


I'm also trying t ofigure out how I will weather the units. I'm thinking about doing one engine with a badly discolored CN wet noodle and to keep the two others more toned down. I've never done that kind of weathering and I'm open to suggestion about technics to achieve that effect. Feel free to share ideas or tricks.


I'm not into harsh weathering because it sets the locomotives in a very specific time period. Keeping them more generic is better if you want to run them in different eras.