Thursday, December 30, 2021

Variations on British-American Oil Tank Cars - Part 2

A great thing about the B-A fleet was its great diversity in terms of car types but also of paint schemes. At least three major designs existed: the old plain one without logo, the bow tie logo (pre-1948) and the roundel logo (post-1948). But in reality, these paint schemes had many, many variations and tracking them down is quite a challenge. Fortunately, some websites such as Nakina.net helps a lot to track do the numerous B-A variations that existed.

What I believe to be the original B-A paint scheme was quite spartan. It consisted of a black car, with no logo and the company name spelled on the left side in gothic (block) lettering. Not a lot of picture of this scheme exist since it was phased out quite early and replaced by the bow tie logo. However, even the bow tie version kept the lettering in the same place, only adding the logo. The old time Roundhouse tank car is a good example of this early plain scheme.


The second paint scheme sported the "bow tie" logo which predated the introduction of the roundel back in 1948. Photos of these cars are rarer online and most show a certain level of weathering and paint peeling that leave us to believe they were already getting old by that time. The sheer number of roundel logo tank car pictures online leaves me to believe B-A was quite pro-active when they phased out that design. This Tichy 10,000 gallons tank car is a good representation of a typical bow tie paint scheme applied in the 1940s.


It's interesting to note that Black Cat Decals has a set for this particular paint scheme, but when you research the suggested car roadnumber, you find out it was a silver/aluminum tank with black lettering and not a black one with white lettering. Bachmann recently offered a somewhat passable HO rendition of that car. Wanting to model it, I decided to simply redraw the artwork by scanning the Black Cat decals to get a template. All lettering was redone from scratch in Photoshop and printed on decal paper. It was time consuming but quite rewarding in the end. To be noted, this car, like many B-A cars, didn't have any dome platform, ladder or grabiron.


Finally, the most popular paint scheme was the bicolor (black & green) roundel design often replicated by manufacturers on foobie cars. However, not all black & green cars were similar. Since very little color photographic evidence exist, you have to train you eye to see the faint tone demarcation on B&W photos which can be easily misinterpreted as railing shadows. The roundel paint scheme started in 1948 with full black cars with the new logo in place of the bow tie one. This Tichy 8,000 gallons tank car gives a good idea of a typical car in that scheme. The full B-A name was still painted on the left side.


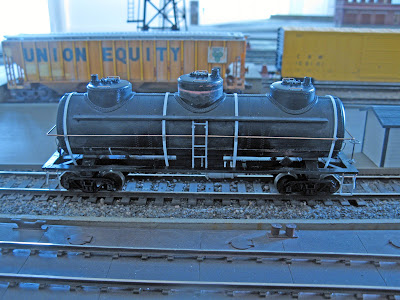
It seems not longer after this scheme was introduced, the full B-A name on the left side was dropped. This practice however doesn't seem consistent and the name could be seen later on black and green cars. That's the beauty of the B-A tank car fleet, it's subtle variations on a same theme. Here, a more streamlined roundel black paint scheme can be seen on the 3-dome tank car.


Later, probably in the very early 1950s, the roundel paint scheme evolved into the familiar and often copied bicolor black and green tank cars. The half bottom and ends of the tank car were black while the top and dome were green. It is very hard to figure out the exact shade of this green because most pictures are black and white. Even on old color pictures, the green sometimes look black due to color shifting. If you look carefully at old pictures however, it is evident the shade of green was different than the bright green used on the roundel logo. My best guess is that the dark olive color seen on many RT models isn't too far from reality. After a while, I settled down on Tamiya XF-5 flat green. It's color complement perfectly the logo colors while not looking to olive drab. As an educated guess, I consider it to deliver visually pleasing results. This Tichy 10,000 tank car show the scheme in all its glory.


Then, the last iteration of the classic B-A paint scheme occurred in the early 1950s when a silver/aluminium stripe was applied on the tank between the black bottom and green top. From that time on, the roadnumber and reporting marks were painted on the silver band in black paint. My not-educated guess is the new scheme was developed when B-A received their new modern welded large capacity tank cars from ACF in 1952. This is my own working hypothesis that should be researched and substantiated by dated photo evidence and other sources, but it would make sense since that type of stripes is easier to apply to welded tank which didn't have as much rivets and steel straps as the older ones. Nevertheless, it is a very attractive paint scheme and by 1961, when the B-A fleet was dissolved, it had been applied to many car types. Here, you can see it on a classic Tichy 10,000 gallon tank car.


And finally on a more modern Athearn 12,500 gallons tank car on which we can better appreciate this clever and slick paint scheme design. You will remark the stripes are cream on that car which was painted a few years ago. The reason is because back then, very little information was available and most people, including myself and Al Ferguson from Black Cat Publishing, took their cue from a heavily color shifted color slide which fooled us to believe the stripe was cream and not silver. Only later, new pictures surfaced and older railfans pointed out the mistake. Since then, Black Cat as revised their decals and provide the correct set of silver stripes.


Edit: As I became aware of new photos this morning from the T. A. Watson collection, it seems B-A repainted its fleet on a regular basis. Many pictures show the same cars within a few years intervals and it's easy to see that when the corporate image changed it quickly reflected on the tank cars. Moreover, cars with relatively "recent" paint schemes are updated rather quickly as one can see the full B-A name disappearing in favor of the more modern silver stripes version, even on very old cars.


Wednesday, December 29, 2021

Variations on British-American Oil Tank Cars - Part 1

This series of articles will be divided in two parts. First, about how to model various B-A tank cars from readily available cheap models, and second, about replicating the numerous variation of their attractive paint schemes.

Holidays are a perfect time to work on long neglected projects. Many years ago, when I comtemplated the idea of building Avenue Industrielle layout, I acquired a few decals and tank cars in hope of creating a British-American Oil tank car fleet to serve their local distributor in downtown Quebec City. The plan never came to fruition and the models stayed in my drawers for years.

Having recently built six old Proto 2000 Canadian Petroleum Tank Line cars, I thought it would be a logical step to completed the old B-A project. To do so, I had one Intermountain 8,000 gallons car kit, four Tichy 10,000 gals. kits, an derelict Roundhouse Old Time 6,000 gallons car and several old Athearn single and triple dome cars in various fantasy paint schemes.

A quick search on nakina.net database showed me the old Roundhouse kit could replicate a very old 6,000 gallons car still in service in the 1950s. I initially planned on using this kit and 3D printed parts from Shapeways to make a prototypical UTLX car, however, the 3D parts were so warped and brittle, I decided against it and move forward with the B-A idea. A heavily shortened and narrowed Athearn tank underframe was used to complete the project, with various Tichy spare parts.


As for the infamous Athearn 3-dome tank car, I discovered it could be shortened to a 10,000 capacity to fit a class of tank cars used by B-A. Interestingly enough, the B-A car had a taller center dome, which was done by grafting a second dome on it following Tony Thompson's method explain on his blog. Once again, several spare Tichy parts completed the cars. You will immediately discover I ditched the ubiquitous Athearn's railing, metal ladders and stirrup steps in favour of more prototypical versions.

Shortening a model with a razor saw is never an easy task when it's shape is both cylindrical and have no flat surface to square it against the miter box. However, by gluing stripes of styrene where you want your cut, you can make perfectly square cuts. Both easy, cheap and efficient. Very minimal sanding was required to splice parts together and no putty was necessary to hide the joint as melted styrene oozed out the joints.


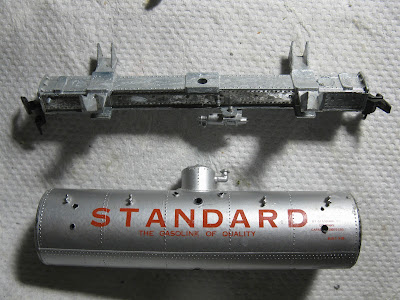
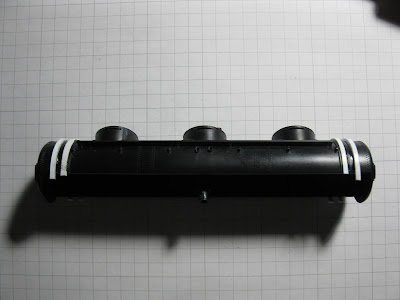
Top car: shortened, bellow: stock Athearn shell

Central dome made higher.

With separate details applied.

The Tichy kits were built as intended by the manufacturer, but with some hindsight, I should have followed prototype pictures of B-A cars to be closer to their appearance. It means some platforms would have been removed, steel bands located elsewhere, rows of rivet sanded down, etc. This is unfortunately the kind of details you often discover later during the painting process. Live and learn!


Possible future projects

I don't know if I will ever build more B-A tank cars, but during my researches, I found out the notorious Athearn chemical tank car, which is well known to be extremely flawed could be used to replicate B-A series 976-995 12,500 gallons tank cars built new by ACF the early 1950s. Keep in mind the old Athearn tank cars are all based on an ACF-built SP 12,500 gallons car. The biggest modification would be to replace the small chemical dome with a larger one (Tichy or Athearn or anything else to that matter).

The old Athearn chemical tank car could also be used for the CC&F-built series 701-765 cars that had also a 12,500-ish gallons capacity. Once again, the dome should be replaced with a Tichy one and the underframe substantially altered to replicate typical details found on CC&F cars.

Another project would be to try to replicate a bow tie scheme 6,000 imperial gallons (about 7,200 US gallons) 3-dome tank car using a WalthersMainline 36' 3-dome tank car. Walthers don't mention a specific prototype for this car, but it has typical ACF underframe construction details and the tank seems to have a 8,000 US gallons capacity. Given empty space exist between compartments, I suspect the real capacity is quite close to the B-A car capacity. This car would require improved details to look good, but it's quite doable.

A crazy idea would be to salvage IHC old time tank and mount them on more modern frame. It would be quite involved, but could produce a range of fascinating and very old B-A tank cars. Series 210-222 comes to mind with their small 5,2000 gallons capacity and high dome. Interestingly enough, these cars were later repainted in the most modern paint scheme with the silver stripes and roundels.

Finally, in the more expensive range of cars, several Tangent tank cars car be used to further the possibilities. Their 8,000 and 10,000 gallons 1917 radial course tank cars would be an excellent base for many older B-A tank cars while their 3-dome General American car would provide a neat alternative to bashing a crude WalthersMainline model.

I don't know if I'll will ever proceed to build these cars, but the prospect of doing so is exciting and fascinating. It's extremely satisfying to bring to life such an old fleet of Canadian cars in model form! Here is a more comprehensive list of what could be done:

British-American Oil Tank Cars

Series 701-765 (12,500 gals, Insulated)

  •  Athearn 40ft Chemical Tank Car
  • Tichy Dome
  • Tichy Tank Car Details
  • Tichy AB Brake
  •  Black Cat Decals: BAOX#833-H British American Tank Car Roundel 1947-1967

Or Series 701-765 (12,500 gals, Insulated)

  • Kadee AFC 11,000 Gallon Insulated Tank Car
  • Black Cat Decals: BAOX#833-H British American Tank Car Roundel 1947-1967

Series 976-995 (12,500 gals, Insulated)

  • Athearn 40ft Chemical Tank Car
  • Athearn 3-dome Dome
  • Tichy Tank Car Details
  • Tichy AB Brake
  • Black Cat Decals: BAOX#833-H British American Tank Car Roundel 1947-1967

Series 500-549 (7,200 gals, 3-dome)

  • Walthers 36ft 3-Dome Tank Car
  • Tichy Tank Car Details
  • Tichy K-Brake
  • Black Cat Decals: BAOX#358-H British American tank car Bow Tie 1927-1947

Or Series 500-549 (7,200 gals, 3-dome)

  • Tangent General American 6,000 gals 3-Dome Tank Car K Brake version
  • Black Cat Decals: BAOX#358-H British American tank car Bow Tie 1927-1947

Series 447-456 (8,000 gals)

  • Tangent 8,000 Gallons 1917 Radial Course Tank Car K Brake version
  • Black Cat Decals: BAOX#833-H British American Tank Car Roundel 1947-1967

Series 181-196 (10,000 gals)

  • Tangent 10,000 Gallons 1917 Radial Course Tank Car K Brake version
  • Black Cat Decals: BAOX#833-H British American Tank Car Roundel 1947-1967

Series 457-461 (10,000 gals, insulated)

  • Tangent 8,000 Gallons 1917 Insulated Tank Car K Brake version
  • Black Cat Decals: BAOX#833-H British American Tank Car Roundel 1947-1967 

Wednesday, December 8, 2021

CN Monk Subdivision - The Last Detail

 As I move forward to build the layout (a water pipe must be rerouted this weekend before construction begins), a last scenic issue as to be addressed. You probably recall I removed the tentative lower line a few weeks ago. However, I didn't address what would happen with this layout area.


The first option was to extend the scenery East of Monk a few feet. It would represent the first few hundred feet of Glendyne Subdivision toward Edmundston. I envisioned either a wooden area or a marsh like Lac-Therrien. However, I didn't feel it was right at all. A question was raised: what's more important?

Trying to answer that question left me to analyse the small mock-up once again. One thing got on my nerve and it was how sudden the transition from staging to Ste-Euphémie was short and sudden. I feel it's better when a scene has buffer scenic zones on each side so you can prepare yourself when your train is arriving. I do recall Lance Mindheim suggesting to keep at least 2/3 of the layout for what he called scenery zone only areas. Also, a long scenic curve on a grade before reaching the town would be a great way to display locomotives working hard to reach their destination.


On the other hand, I felt adding track East of Monk added nothing to the game... a simple mainline disappearing behind a tree line would be more than required. So I decided to make the connection to the staging visible which added about 6 feet of mainline West of Ste-Euphémie. I still had in the back of my head this idea to replicate a classic NTR steel viaduct on the layout and that area would be perfect to frame it. After careful measurement, I found out I could replicate an almost full scale rendition of Rivière des Abénakis bridge on a 52" radius scenic curve. The bridge itself would be made of three deck girder spans for a total length of 27". We are talking about something substantial here.


What I also liked about this bridge was the large yet shallow valley is crossed, enhancing the horizontality and making the scene appear longer. While the bridge is quite long (about 230 feet), it spans a very small river, which also helps to blend it into the layout without overwhelming other scenes. The valley was also full of trees in later years, which made the bridge harder to see through the vegetation. That game of visual hide-and-seek is attractive to me because you hear the train, see it a little bit, but it's never in plain sight. Generally on layouts, we like to make the bridges highly visible, but in this case half hiding it is the goal, to enhance that feeling of distance and remoteness.


With this small scenic issue out of the way, I'm ready to cut some wood!


Saturday, December 4, 2021

CN Monk Subdivision - "Final" Track Plan

Having wrapped the general overview about the Monk Subdivision layout, it's time to start the project for real. Many questions are still to be answered, but in most of the cases, I feel I have a good grasp about the project and can move forward. I already purchased lumber to built the benchwork and shall soon start construction when the hobby room will be cleaned and ready in a few days.


Using architectural software Revit, I was able to understand the complex shapes of the various grades. 3D modelling was useful to understand how the benchwork would interact with the roadbed. At the end of the day I wish to keep is quite simple. I'm also planning to use MDF splines for mainline curves to shape better easements.


Here are the updated plans. You will see a serious simplification of the staging area. I felt it was better to keep thing as simple as possible. Having more track capacity in one spot is much more practical than spreading it all over the layout and link them with hidden track. The foreground staging track would be used as a fiddle yard to build and break way freight trains that must be altered between each session.


Also, as a matter of fact, I'm seriously thinking about publishing future articles about Monk Subdivision to my Quebec South Shore Railway blog which is better suited to document this particular project. Indeed, this layout is nothing more than the natural extension of various ideas I explored in the past about railways in Quebec's Appalachian area.


Wednesday, December 1, 2021

CN Monk Subdivision - Staging the Trains

Designing a layout oriented toward train operations like Monk Subdivision requires at first knowing the nature of movements on the line. Not only the type of trains, but also where they perform their key actions before and after entering staging. In that regard, this is not something I’ve done a lot in the past with previous layouts. I once recall making grand schemes of operation for the first iteration of CN Murray Bay Subdivision in the 1950s, but it never was applied and it would be hard to say I had any substantial grasp of what I was trying to achieve back then... Let's just say that I tried.

Running adequately Monk Subdivision comes with a big technical issue that must be answered: staging. At first, it’s all about Where, then it evolves toward How much until finally reaching the fundamental question of Why? Why do we need staging, what do we expect from it? Simple storage? A place to fiddle with trains? A mean to orchestrate train movements? It’s all that, and it needs to be balanced.

First question is to determine how many trains and what types of trains are required. I looked at a few timetables from the 1950s concerning Armagh and Glendyne subdivisions (later, in 1963 they were merged and renamed Monk subdivision). On each subdivision, about 14 trains per day were scheduled, not including extras and other unscheduled movements. This is quite substantial. For the layout purpose, let say all these trains moves between Joffre Yard – Monk Yard – Edmundston Yard. Joffre and Edmundston being staged and Monk being modelled.

Of these 14 trains, two were passenger trains (1 per day), one way freight, four 4th class freights and eight manifest trains. Let’s break them down and please bear in mind I’m simplifying and dumbing it down for a small layout. In no way it is my intention to replicate real train movements with a dispatcher. I'm only trying to get a grasp of what happened there in the 1950s.

For this exercise, I'll reuse some concept implemented in softwares such as RocRail and JMRI Operations. Mainly, you start by creating a track plan (which is already done), then add trains and later attribute them certain routes and schedules.

Trains


I compiled a simple table with all the type of trains I could identify in old timetables, including their type, quantity, length and type of staging (more about that later).

Track

Length (in)

Length (ft)

Capacity (40’ car)

Trains

Hidden 1

200”

16.7’

33

700 + 400 (Edmundston)

Hidden 2

186”

15.5’

31

700 + 400 (Joffre)

Hidden 3

182”

15’

30

51-54 + 67-70 (Edmundston)

Hidden 4

182”

15’

30

51-54 + 67-70 (Joffre)

Fiddle 1

60”

5’

10

Way Freight (Edmunston)

Fiddle 2

60”

5’

10

Wat Freight (Joffre)

Fiddle 3

60”

5’

10

Switcher Joffre

Fiddle 4

60”

5’

10

QCR 160-161

Fiddle 5

60”

5’

10

QCR Way Freight


Passenger trains

Trains 67-70 were a pooled service between Montréal, Quebec City and Edmundston. One day, it ran eastward during the night to Edmundston and the next day, it would go back to Montréal. It had 5 passenger cars including a coach, two buffet parlours and two sleepers. We have no indication about the head-end equipment, but we can safely assume a RPO, a baggage and an express reefer would have been plausible. In HO, such a consist would be about almost 8ft long. To be noted, the train would usually stop for almost an hour in Monk, indicating a crew and locomotive change occurred. I would employ large IHC/Mehano passenger steam locomotive such as 4-6-4 and 4-8-2 and my TLT 4-8-4 to pull theses heavy trains.

Trains 51-54 were passenger trains operating on days when 67-70 weren’t running. Between Québec City and Edmundston, starting in the mid-1950s, it was a railiner (Budd RDC) service while between Edmundston and Moncton, it was a train made of a few coaches only. Given I’m interested in modelling these trains in the early 1950s when they were pulled by steam, such a typical consist would be about 1 coach and 1 combine. My deduction is based on the fact two RDCs used to be coupled together to offer the same service. In HO, this would translate as roughly 3 feet long. A change of locomotive and crew probably occurred in Monk before the train travelled toward its final destination as a 1 hour stop was also mandatory. Smaller steamers such as my Bachmann 2-6-0 and 4-6-0 would probably haul these trains.

 
Freights trains

4th Class trains (Joffre-Monk:  710-726-730 & Edmundston-Monl: 720-732-748-756. I have very little indications about these freight trains, but CNR train symbols give us a hint. Being in the 700-799 series, they were “unit trains other than grain”. This gives us a hint they hauled specific cargo and weren’t altered en route. Interestingly enough, Monk isn’t a destination or a network hub. It it a division point between two hubs (Joffre/Québec City and Edmundston/Moncton). It gives us a hint that these trains would have been unlikely to be reorganized in Monk and only a crew, locomotive and train symbol change occurred there after a few hours rest in the yard. These trains were scheduled and relatively fast. They could have been coal trains from Nova Scotia, reefer or automobile boxcar freight. Length could have been variable, but let’s pretend they are our longest and fastest freights on the line. For this reasons, we assume these consists are pulled by modern diesel locomotive (let’s say a A+B+A set of FA-2, F-units or C-liners) and haul about an average of sixteen 40ft cars. In HO, that would translate as 10 feet long, maybe more…

Manifest trains 404-406-440-441-442-443 (and probably others) were scheduled trains running between Edmundston and Monk daily. CN 400-499 series was reserved for short haul manifest trains and OCS trains, often running for less than 200 miles (i.e. the distance between two typical division points). These trains didn’t perform duties en route. According to a Glendyne 1953 employee timetable, they were daily scheduled trains. 406 was a turn as it would arrive in Monk, then depart later back to Edmundston. For the layout purpose, let’s assume all these trains move once per day between two division points and return the next day under a different train symbol. Being short haul, we will also consider them to be shorter than their 700s brethren, with a maximum length of ten 40ft cars on average. They are pulled by mid-sized steamers like 2-8-2 and 2-10-2, which gives us a total length in HO of about 6 feet.

Way freight trains didn’t have specific numbers on timetable, but were still mentioned and had a scheduled departure time (but no time of arrival since it depended on the switching work to do). Basically, they would depart from Joffre and Edmundston, working the line up to Monk. Then, the crews stayed overnight and came back to their origin on the next day.  These trains weren’t probably very long and given the layout small customer base, I would say that 6 cars and a caboose would be more than enough on most case. These trains would be pulled by smaller and more versatile steamers such as 2-8-0 and 2-6-0. In HO, this would translate as 4½ feet long.

A few other trains are known to have graced the rails of Monk subdivision for a short distance and were mentioned on the timetable. It was passenger and freight trains from Quebec Central Railway. Two passenger trains were scheduled, 159-160 and 161-162. One probably linked Lévis and the Chaudière Subdivision while the other one would connect Palace Station in downtown Quebec City to Sherbrooke. These trains were pulled by 4-6-0 and 4-6-2 and were generally comprised of 3 to 5 cars, including head-end equipment. In HO scale, this is about 4 to 5 ft long. QCR freight trains would have been quite varied at this point, but let’s assume they are somewhere between 4½ft and 6ft long. Some could set out and pick up cars at the QCR/CNR interchange at Diamond. As I'm in the process of scrapping the lower line from the layout design, these trains would be unlikely to be staged.

Finally, the last trains would be switchers. In Monk, a 0-8-0 could perform yard duty and switch the fueling facilities and roundhouse. Another switcher, probably an Alco S2 could also perform some switching at Diamond interchange for John Breakey. Speaking of John Breakey a.k.a. Chaudiere Valley Railway, a small and old steam locomotive would switch the mill and work the interchange. It could be a venerable 4-4-0 and sometimes a small 0-6-0T.


Train Routes

When trains are built and known, it’s time to create routes for them. We now know enough to bring this collection of consists into a coherent operation scheme.

Passenger trains are easy. Once per session, in alternance, a fast 67-70 train leave staging, arrive in Monk, change crew and locomotive and move forward into staging once again. However,

The only place where we have to alter the consist is in plain sight in Monk since the cars are always the same. This train can thus be recycled two days later without being reversed. For the next day, a similar passenger train performs similar action but in the other direction. With this knowledge, it is then obvious we need two trains in staging, running opposite and which can be recycled endlessly. A train entering Joffre staging will emerge as a train departing Edmundston without having nothing to do. In terms of staging space, we will need 2 x 8ft = 16 feet of track. As for locomotives, three dedicated engines are required; one pulling each train and one at Monk roundhouse to change crews.

Passenger trains 51-54 follow a similar operation plan than the previous trains. Routing is similar and engine swapping too. It would require 2 consists running in opposite direction and 3 locomotives, which translate to 2 x 3ft = 6 feet of track.

4th Class trains series 700 are simple to stage. You only require two trains, one in each direction and they are recycled on and on from session to session. Since they are pulled by diesels, they don’t require crew changes. Only two would be required, which means 2 x 10ft = 20 feet of staging.

Manifest trains series 400 operates not very differently from passenger trains. They are recycled and the last train bound to Joffre becomes the next train departing from Edmundston. They move between both subdivisions on both directions. Since they are unit trains, they aren’t really broken in Monk yard and only require a change of crews and locomotive. Two consists and three locomotives would be required. In HO, it means 2 x 6 feet = 12 feet.

Locals always use the same locomotive and are short trains. They leave staging, set out and pick up cars until reaching Monk where the locomotive is sent to the roundhouse. On the next day, the locomotive is reversed and goes back to its origin in a point-to-point fashion. Only two locomotives are needed, which means we need 2 x 4½ft = 9 feet of track. Different from other trains, this set of consists needs to be modified (car swapped and locomotive turned) when entering and leaving staging. Basically, this is a fiddle yard that needs to be accessible and near rolling stock storage drawers.

Monk switcher doesn’t need to be staged since it’s based at the roundhouse. However, if a Joffre switcher is implemented, a locomotive will be needed. Staging capacity should be about 4 feet long. Like local trains, the switcher will have to be staged in a fiddle yard.

Staging Needs


Track

Length (in)

Length (ft)

Capacity (40’ car)

Trains

Hidden 1

200”

16.7’

33

700 + 400 (Edmundston)

Hidden 2

186”

15.5’

31

700 + 400 (Joffre)

Hidden 3

182”

15’

30

51-54 + 67-70 (Edmundston)

Hidden 4

182”

15’

30

51-54 + 67-70 (Joffre)

Fiddle 1

60”

5’

10

Way Freight (Edmunston)

Fiddle 2

60”

5’

10

Wat Freight (Joffre)

Fiddle 3

60”

5’

10

Switcher Joffre

Fiddle 4

60”

5’

10

QCR 160-161

Fiddle 5

60”

5’

10

QCR Way Freight

Staging means a lot of thing, but basically, it’s a place to set trains before they make their entrance on the layout. It is also a destination. In that sense, staging is an on-line storage that represents the outside world. In UK, staging yards are often referred to as fiddle yards. These words are interchangeable. However, I would like to make a useful distinction on my own which is also shared by Craig Bisgeier on his Housatonic Railroad website (well worth reading!). In my eyes, a staging yard is a place where trains are stored and don’t need to be modified by hand. On the other hand, a fiddle yard implies you are tampering with the trains, breaking and building them right there and they must be accessible. As I said, this isn’t an official definition, but only a ploy I use to make a distinction between two very similar yet different concepts.


Staging track plan


As routing as shown us, most trains are block trains. Once built and put in staging, they won’t be altered for a long time because they don’t need to be switched or broken down in yards. Basically, their cars aren't used for switching at industries. They always look the same and run in the same direction, being recycled again and again. All modifications happens on the visible layout (i.e. Monk) during crew changes. Thus, we need regular staging for them. I also added two additional staging tracks for extra trains just in case.

On the other hand, we have other trains that are constantly modified during an operating session. It applies to way freights and switchers which have to be modified even when staged because each time you see them, they are different due to car movements. These trains need a fiddle yard.

Such a fiddle yard must be accessible to build up and break down trains that enter or leave the stage. In this case, the best location is under Ste. Euphémie where there is plenty of space and where you can find rolling stock storage drawers in IKEA cabinets.

This fiddle yard is used for all way freight trains and can also be used to build new trains on the layout or alter them between session. For this reason, it would be handy if this staging was two ended so trains from both direction could travel there and be replaced or built before being sent into regular staging.

In that regard, it is interesting to note that the staging would be nothing more than a large continuous loop feeding a staging yard and a fiddle yard.


Locomotive Staging

The last staging require to run such a layout would be to provide a place where locomotives are waiting between assignments. In this case, Monk roundhouse itself would act as a staging in plain sight.

Indeed, at any time, locomotives are needed in Monk to perform crew change. According to the trains we have already catalogued, here are the basic needs:

  •           Trains 67-70 require one large steam locomotive (1 stall);
  •           Trains 51-54 require one small steam locomotive (1 stall);
  •           Trains series 700 don’t require crew change (0 stall);
  •           Trains series 400s require one medium steam locomotive (1 stall);
  •           Way freights require two medium steam locomotives (2 stall);
  •           Switcher requires one small steam locomotive (1 stall);

Thus, we need at least a 6-stall roundhouse to store all required locomotives in Monk. However, it must be noted not all these engines won't be there at the same exact moment, which means 6 stalls or even 5 should be enough. Also, if a ready track at the roundhouse is provided, it would also ensure it’s never at full capacity. More about that in a future blog we will explore the yard design.