Showing posts with label Canadian Heritage Steam Locomotives. Show all posts

Monday, April 26, 2021

Kitbashing a Better Tender for President's Choice Hudson

 Like many people, I acquired at discount more than a decade ago a President's Choice CNR Hudson trainset with the intended goal to improve it later. And like many of them, I never committed to start this project, having shifted focus on a much more modern era. However, after kitbashing the tender trucks, I had no longer any reason to delay this funny project.


To be honest, I'm not sure I can even consider this project to be prototype modelling nor pure fantasy. It falls in this uncomfortable grey zone where you seek realism while knowing perfectly it isn't the real thing. Lots of compromises have to be done and at the end of the day, it will still be a cheap stand in for real CNR Hudson 5703. However, if the vibe of the prototype do materialize, I'll consider it a success.

***

The original Mehano tender is a toy at best

The first step consist in kitbashing the horrible Pemko vanderbilt tender. That large coal bunker was oversized because it originally housed a motor. When IHC took over the molds, they didn't care about retooling that unrealistic feature even if they completely changed and improved the drive.


The tank without the unsightly coal bunker

I recently acquired a used President's Choice Bullet Betty CNR 6060 which provided me with another useless tender. Fortunately, the general shape of the real 5703 tender is quite similar to the profile of the old Pemko tooling. It is, however, not long enough. Thus came the idea to remove the coal bunker from both shells and splice them together. A few quick sketches based on CNR drawings and pictures from a Van Hobbies brass locomotive provided a key measurements to make the project a success.


I first started by removing all the extra details on the shell that aren't required, including rivets, walkways, hatches, steps and molded grabirons. Only the basic tank shape will be kept and later, redetailed. At that point, I spliced both shells and let them dry a few days. The tank was then cut to lenght with a jeweler saw. A lot of care was required to make sure every cut was square. Then, I carefully plugged most holes on the top and sanded them flush. In hindsight, I guess I could have kept the original stanchions holes as they where since they fit the prototype location.

Plugging the many holes with styrene rods

The next big step was modifying the tender frame. I quickly found out the rear bolster was in the correct location and kept it as is. A few unwanted details were removed and sanded down. The front bolster and the adjacent frame were cut from the second tender and spliced with the rest of the assembly. I took great care to make sure the original IHC/Mehano screws still aligned so I would get a strong shell assembly than can be disassembled to had a sound decoder later.


Tuesday, April 6, 2021

Better Commonwealth Trucks for Your President's Choice Steamer

Back in late 2006, like many Canadians, I acquired for $50 a President's Choice Mehano trainset that was released the before in Loblaws and Provigo groceries around the country. On the advice of a local hobby shop owner who demonstrated the mechanical virtues of the locomotive, I went to the supermarket and picked up a set for half its original price with the intent to once kitbash it into a more realistic version of locomotive CNR 5703.

Left: modified truck, right: original truck


While the model was crude, it wasn't bad and Mehano had a decent reputation for good drives at a fraction of the price. We ran the locomotive until it no longer fitted our era of interest then back on the shelf it went.  Regularly, I would look at pictures and drawings of a real CNR Hudson. The biggest issues were the wrong cab and the Vanderbilt tender. This one was particularly unrealistic as it was based on an old Pemko design which had the motor into the tender. Due to that poor design choice, the coal bunker was large and clunky. Many decided to simply swap the Mehano tender with a Bachmann Spectrum Hicken one, however, this line of tenders has been discontinued long ago and they are now sold at ludicrous price. I thought it wouldn't make any sense to pay so much for another stand in, albeit a better one.


After taking some measurement, I came to the realization I could splice two kitbashed Mehano tenders together and make a much more prototypical CNR Vanderbilt tender. However, the big challenge was the trucks. While fairly accurate, they were much longer than the trucks used under CNR tenders. I had two options againt: source new prototypical trucks or bash the Mehano ones... Only recently, Rapido started to produce good Commonwealth tender trucks and I purchased a pair. But I still wanted to try the kitbashing route because it could be useful in the future and I thought the Mehano trucks were well designed and would be easier to attach back to the underframe.

Top: original Mehano truck, Bottom: modified truck

So yesterday evening, I disassembled a Mehano tender to harvest a pair of trucks. Before any work started, I tested how the plastic reacted to solvent cement. If it was Delrin, the project would stop right there, but if it was styrene or a similar plastic, I could proceed. I knew IHC heavyweight passengers cars - which were also Mehano products - had styrene trucks that could be glued together. So my guess was they used the same plastic. Imagine how happy I was when the plastic started to melt!


The first step was to use a jeweler saw and remove the sideframes from the truck assembly. It was done quickly. Then, I removed the brake shoes and kept them for further use. The big challenge with the sideframes was to harvest the parts with holes in the casting, remove extra material to shorten the lenght and glue everything back together. It went surprisingly well and using a paper jig with key measurements, I was able to make sur everything would fit the prototype dimensions. On my first trucks, I unfortunately glued the holes to close together and they don't look that great. But on the second one, the spacing is much better. I also added a 0.5mm thick styrene strip behind the sideframe to reinforce the assembly.


Next step was to remove the lugs on the truck wheel cover and shorten it to the right length while keeping the screw mounting holes intact. I also did the same with the truck wheel housing, using styrene stripes to reinforce all the spliced joints.


With that step done, I cut new square styrene mounting blocks and glued them on the wheel housing. Mehano sideframes were attached to the wheel cover, but I felt I would get a much stronger assembly by gluing the new "pins" on the wheel housing. It was also a good way to clear space to the brake shoes. Each block was cemented with the metal wheels in place to make sure everything could run without friction.


Finally, I modified the brake shoes. Since the trucks were shortened, the brake shoes where closer. I cut the excess material, spliced them together, remove extra material and added a small mounting block in styrene behind the shoes to provide a larger surface for a stronger bond. They were then cemented under the square mounting blocks holding the sideframes.


After a few hours, the kitbashed trucks were completed and surprisingly sturdy even after all the splicing required to get there. They roll perfectly free on a piece of track. The next step will be to hide the seams with some putty and sanding, then modify the copper electrical pickups that are housed within the trucks. I also started to add brake cylinders from my spare box following the prototype.


I still consider the Rapido trucks to be much better detailed. However, the way the wiring is done, I feel my modified Mehano Commonwealth trucks will be easier to attached to the modified tender. I'll keep the Rapido trucks for another project where they will be more useful. Now, it's time to think about bashing the tender for 5703. As for my new Mehano CNR 6060, I'll probably modify its tender truck too, but scratchbuild its tender from a PVC pipe. I almost purchase a Van Hobbies brass tender for it, but felt it was overkill for a cheap and unprototypical locomotive! Building stuff is much more fun!


Saturday, July 1, 2017

Ad Mare Usque Ad Mare

Canada is 150 years of today, or rather should we say the Confederation - a political body - is now celebrating its 150th anniversary. As with everything happening in our peaceful and monotonous country, the celebration are low key for the most and quite cheesy. Don't expect fanfare, military parade or anything else... business as usual.

CPR No. 374. 23 May 1887 (Library and Archives Canada, MIKAN No. 3191726)

Most Canadians (I hope!) knows the country as we knows it it far older than that in a similar fashion than United States were officially proclaimed in 1776 but their real foundation goes back 400 hundred years ago, just like Canada.

I generally try to keep myself away from politics when blogging, but that political anniversary can't be understood outside the realm of railways. Without trains, which were a condition for many provinces to join the Confederation or to be created, the creation of a unified federal administration would have been almost impossible. In 1867, most of the population centers and activities took place along the St. Lawrence River and Gulf and the Great Lakes, exactly the same areas explored and envisioned a future prosperous country by Samuel de Champlain in the early 17th century. By the First World War, the geographical expansion of the country was achieved. Imagine, in about 40 years, more territories were developed than before in three centuries. The same happened in the USA at a similar rate and often, by the same companies, railway tycoons and engineers. Sure, a lot of odious acts occurred during that era of transformation and I certainly won't gloss over it.

The funny thing is that Canada is now completely forgetting the force that gave it a coherent shape. Talk to anybody under 30 years and they are oblivious to trains. As if it never existed. However, they travel a lot in foreign country, discovering the advantages of railways and when you tell them we had it all less than 50 years ago, they ask what happened to reach such a pitiful state.

As far as I can recall, I've heard about fast trains linking Quebec City to Windsor via Montreal, Ottawa and Toronto. How many fruitless studies were made? It took more decades to write these useless shenanigans than to link British Columbia through wilderness with the rest of the country. Can you believe they built several thousands of track using man power and early industrial machine on hostile terrain while just putting a passenger train on existing rail seems to be an impossible task. This is fascinating and at the same time, the most horrific truth about Canada: nothing ever gets done... and unfortunately, not by lack of talent or resources, but by some psychological blocage. I can't help but think about the Arrow plane which was cancelled and almost completely erased from the records, the same happened with the Turbo train and many other breakthroughs.

If I could only wish something for our country before the 200th anniversary would be that citizens rediscover the railway's fascinating history shaping the landscape and lives of millions... in the past and in the future.

With that said, Happy Canada Day from Coast to Coast!!!!

Thursday, July 28, 2016

Kitbashing Grand Trunk 719 - Part 7

While the progress on boiler modification is moving at a fast pace, I sprayed the model with black primer to see if there was any obvious defects on the shell. So far, it is better than I thought and touch up will be minimal.

My next challenge was installing inspection and clean out plugs. I had two choices: buy expensive brass parts that don't look like the prototype and are oversized or make them myself. I went with the Red Green's second option as you can guess.

I made the plugs with a combination of holes and 0.040" styrene rod. I first drilled a small pilot hole in the shell of same diameter as the rod.


Then, using a 5/64" drill bit, I enlarged the hole surperficially to create a small recess in the boiler jacket.


Finally, a piece of styrene rod was glued into the small hole. The rod was extending from the surface and was later cut flush with the boiler using a X-Acto blade.


Sure, it lacks the typical rim around the plug, but on many older pictures, it is almost undiscernable. If one would want to make more detailed plugs, I would advise to make the parts independantly, then drill the boiler and insert the plugs. The plugs could be made out of a sprue or a styrene rod with a diameter slightly larger than the largest drilling bit used to shape the plug. Follow my original instruction and you will soon have cheap and easy to install inspection plugs.


To be noted, I also drilled the stanchions mounting holes according to the prototype and enlarged the cab windows. There are still a few holes to drill and running boards to mount.

Wednesday, July 27, 2016

Kitbashing Grand Trunk 719 - Part 6

The biggest problem you will encounter while kitbashing a Bachmann 2-8-0 is related to the running board height. If they are mounted lowe, i.e. flush with the cab bottom, there will be lower than the boiler shell.


This is a double issue. First, the Bachmann boiler is made a a plastic shell and a pair metal weights. You'll will see the seam between both part and slots for mounting screws. Also, the weights are undetailed (no boiler straps, etc.).


The second problem is related to mounting the running boards. You need them to be sturdy enough to survive normal handling conditions and to be locatedd in a such fashion they won't be nuisance when dismantling the locomotive for maintenance. This means you have to mount the running boards on an incomplete shell and this is the big challenge.

The milling in progress. The smokebox will need to be thinned down too.


After discussing the problem with Doctorwayne, we came up sith a set of different solutions. I decided to use one of them and will explain how it works. I suspect this is a solution similar to the one Marty McGuirk and Iain Rice came up in a 1999 MR article which unfortunately I couldn't locate at the local model railway association library.


The basic idea is to simply extend the plastic shell as low as the running boards will be mounted. It means adding extra styrene sheet at the bottom of the shell. However, this simplistic solution require you to mill the metal weights to remove a equivalent amount of metal. In my case, 2 mm thick of styrene must be added to the boiler. This is exactly the thicknees of the metal weights walls encasing the motor.


Milling the frame took about 90 minutes using unspecialized tools like a tool grinder, a Dremel sanding drum and a large flat file to finish the work.


When done, styrene sheets were laminated against the boiler and left to dry overnight. At this point, the metal weights slide easily inside the shell as it should be. It must be noted you must mill the weights on all their height to make sure it will be possible to insert it. You also need to mill it up to the fron too.


To attach the running boards, small brackets will be pinned and cemented into the new shell extentions. Brass wire, music wire or phosphore bronze wire can be used: choose a material that will be strong enough to keep its shape under normal handling conditions. The new running boards will be them glued on the brackets, exactly just like the real prototypes. If wanted, the running board could be made out of brass and soldered on the bracket to make a single and sturdy assembly.


Sure, there is more than a way to tackle this problem, but I feel this option is manageable even for a not-so-skilled kitbasher.

Monday, July 25, 2016

Kitbashing Grand Trunk 719 - Part 5

Kitbashing isn't an easy process. There's to approach: the casual one when somebody loosely follow a prototype to make something similar and prototypical one when you try your best to reproduce exactly the real thing. None of them are superior because they serve different purposes and both require the same skills. The first one is pragmatic, the second one exacting. And both find their way on real railroads: at some point the railway decides to do what it can with a limited budget, on other moments it needs to respect standards and established practices: just like building a locomotive.

In my case, the GTR project is in the second category. My big problem is that I have very little understanding of what I'm doing (early 19th century compound locomotive) and have limited access to information. To be honest, I started the project without thinking too much, knowing I would find my away around arising issues. Worst, while the Bachmann locomotive is indeed a good starting point, the way it is built isn't compatible with a prototype with low running boards. This is going to be the most challenging part, even if almost invisible.

Today, it came to my attention I goofed on two key parts. I first used wrong measurements to make the cab window. All week long I found them very weird and badly proportionated. This evening, I opened my CAD drawing with 719 pictures and verified the results against my HO scale version. I was 2 mm off! Not wide enough and not by a small margin. So I'll have to enlarge the windows and make new parts. Well, it's not a bad thing since my window frame were oversized and badly attached to the cab walls.

The second problem is more important. Wayne pointed out my cylinders weren't correct. In fact, he was polite because they are total bogus. He kindly sent me good reference pictures and the conlusion was easy to reach: a GTR compound had two cylinders on the fireman's side and a single large cylinder on the engineer's side (with a flat top). It was also a good occasion to find out my running boards were also wrong.

I'll have to start again on these 3 elements. It could be disappointing, but in fact, it is motivating. Sure, it's a "waste" of time, but I had fun making the wrong parts and it was about doing what I had never done before.

There's no shame in going wrong when working on a project, except for abandoning. Except for brass locomotives, I've rarely seen people modelling compound cylinders. I knew when I started the project that kitbashing a "correct" Grand Trunk compound Consolidation as built by Schenectady wouldn't be a walk in the part. At some point, I could have abandonned the idea of making a Russian iron version in favour of building a later rebuilt with normal cylinders and black paint scheme. But I feel it wouldn't have been beside the point of modelling something unique: big early Canadian steam in Russian iron.

By the way, I got my hand on a stash of old CDS dry transfer including Grand Trunk, Intercolonial, Canadian Northern, Canadian Pacific and Temiscouata. All are for freight cars. I'm not sure if they are in good shape, but I thought an alternative could be to scan the lettering and make custom decals out of it.

Old Time Decals


As you know, I made HO Grand Trunk locomotive artwork. I also intend to make a set for Canadian Northern.

I also redrawn the Central Vermont pre-wafer sans serif lettering artwork. However, most CV locomotives used the serif lettering. Using commercial fonts is a no go and I prefer to redraw each letter from actual pictures to be prototypically correct. If some of you are interested (and I know some are), high resolution pictures of CV locomotives (preferably side views with minimal distortion) would be very useful. The biggest challenge is to have enough photos to have an example of every numbers from 0 to 9. It is interesting to note some CV locomotives kept the old GT-inspired paint scheme until the late 1930s.

Kitbashing Grand Trunk 719 - Part 4

The GTR 719 is progressing little by little. Recent work includes modifying the cylinders, sculpting and detailing the turret and adding cab roof hatches.


GTR 719 was built as a compound locomotive. I was required to remove the steam pipes out of the cylinder and replace them by square boxes made out of laminated styrene filed to size. Small steps with rounded corners were added on top of the boxes just like the prototype. Before gluing the boxes, I filed the cylinder tops flat. This way, I didn't have to adapt the boxe profile to the cylinder radius, which could have been tricky and not easy to glue. Archer anti-skid thread pattern decals will be added later on top of the steps and lubricator pipes too.


The steam turret is made of a Roundhouse sand dome from a 0-6-0T shell. I extended it with Magic Sculpt putty filed to size then glued with putty onto the boiler. When everything was dried, I drilled a small pilot hole on top and carefully using a larger drill bit by hand, I hollowed the interior.


A flat floor for the turret inside was made out of 0.5 mm styrene. Safety valves taken from a Bachmann 4-4-0 shell and one salvaged from the 2-8-0 shell where glued following the prototype.


The new cab roof got a putty job to smooth rough parts. New roof hatches are being build from styrene sheet. The hatches aren't yet glued, what you see are the side extensions that will be later filed down a little bit to the correct height.


Completing the running boards and drilling mounting holes in the boiler are among my next challenges. A tedious sand job to smooth out the surfaces before painting will be also required.


I'm really pleased to see the Bachmann stock model morphing into something completely different.

Friday, July 22, 2016

Kitbashing Grand Trunk 719 - Part 3

The work continue on GTR 719.

Among many things, the firebox was slighlty enlarged with putty to make it sloped just like the prototype. A new ashpan was build from styrene sheet to conform to the real prototype. I still need to file the plastic shell that exceed the ashpan.


Magic Sculpt putty was used to fill boiler slots. Since the running board will be lowered, I need the boiler to be extended down. I used paper strips to keep putty in place until it dried hard. If the loco was painted black, that shouldn't be a big problem, but a Russian iron boiler won't forget such details.

The domes were reattached to the body using screws. Since the domes are black and the boiler in Russian iron, I prefer to paint them separatly and attach them later.

The only exception was the steam turret which is permanently attached to the boiler.

Correct cab windows were also added. I feel the frame are a little bit large even if I carefully measured them on scaled pictures. I'm afraid one painted bright read, they will look odd. Maybe redoing it could be a very good idea.


You will see I cut then reattached the cab roof overhang. At some point, I got sidetracked while measuring the cab for modification. I was convinced I had to lower the roof and proceeded to remove it... until I found out the Bachmann cab, while not a 100% perfect match, was far better than I thought... Fortunately, I didn't butcher the overhang... unfortunately, I made my life harder and the roof is now much more brittle than anticipated. I'll cover it with a .25mm styrene sheet, hoping it it be enough to hide the problem and strenghten the parts together.

There's still a lot of prep work to do, but just adding the boiler straps is a good indication I'm in the more rewarding part of the work.

By the way, I've redrawn Grand Trunk lettering in AutoCAD using several pictures. The process was tedious as I had to draw each letter and each number individually to make sure they matched the prototype. Each character was reverse engineered to fit out the geometric rules used by the typograph to make them.

I was just not interested in using an "almost similar" commercial font, I want the real thing. While doing this, I found out GT had at least two variations on this classic paint scheme: one with bold numbers and stripes and one, more common, with regular numbers and thin stripes. I've drawn both.

Now I'm looking forward to recreate at least two CNoR paint scheme commonly seen in the early 20th century.

It should be noted I discovered Grand Trunk, Intercolonial and Canadian Northern shared the same number font on several locomotives. Also, the regular cab font was also the same for the three railroad. Temiscouata seems also to have used a  variation of the same font and I have photographic evidence QRL&PCo jumped in the bandwagon too. Well, it seems Canadian railways lacked imagination or hired the same designers or just copied available fonts from graphic standard books. The good thing is that reproducing many paint scheme shouldn't be too hard.

Thursday, July 21, 2016

Kitbashing Grand Trunk 719 - Part 2

I need some help to get the piping right on 719. As built, the loco wasn't superheated and was a compound with Stephenson valve gear. It was later modernized, but I'm doing the as built version. The piping is quite simple but I'm more comfortable doing later steam locomotives with feedwater and other such appliances.


Be aware that Grand Trunk used jacket over the boiler and smokebox, means some pipes are hidden under the lagging.


I want to make a locomotive with all the piping, not just a botched approximation.

Thanks for your help!

Canadian National Original Paint Scheme: More Than Meets The Eye

EDIT: After writing this article, I've been shown photographic evidence of Canadian National Consolidation #2648, freshly painted in the 1920s and featuring a gray boilet jacket and gray cylinders. That's starting to be extremely interesting. The photo can be seen in Donald R. McQueen "Canadian National Steam! Volume 5: Consolidations".

Library and Archives Canada are full of good stuff isn't it. While scrolling again Canadian National locomotives I found out something disturbing. I didn't read a lot of books about Canadian railways in my life, but I'm still surprised to find stuff that should be more mainstream.

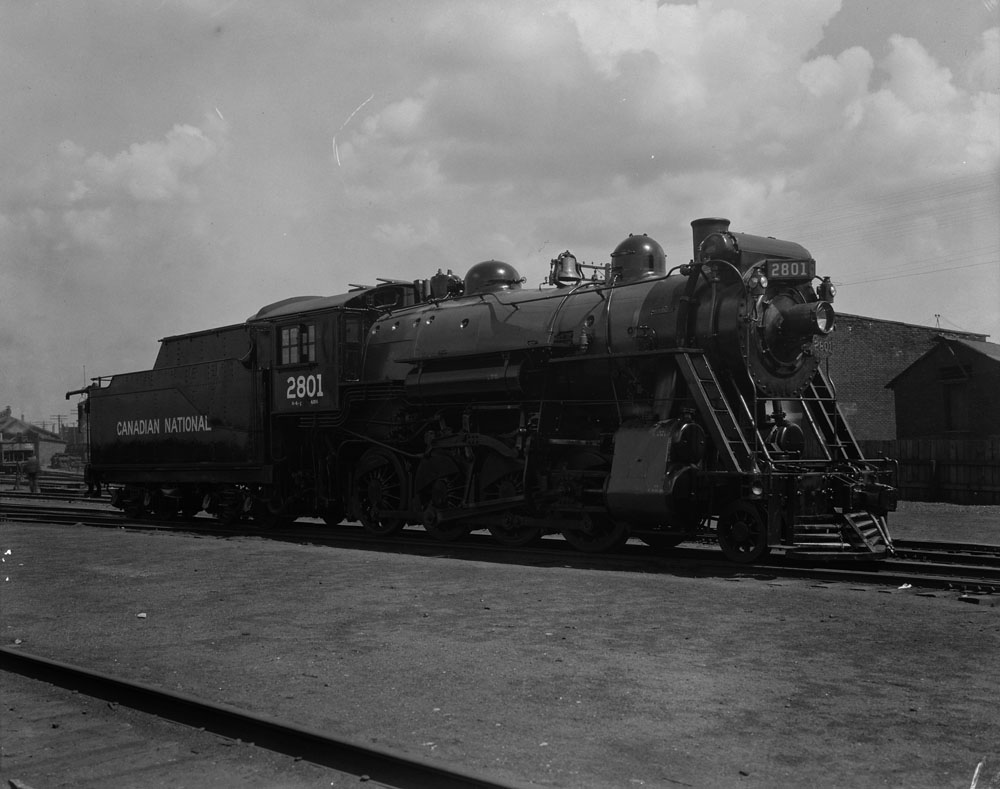
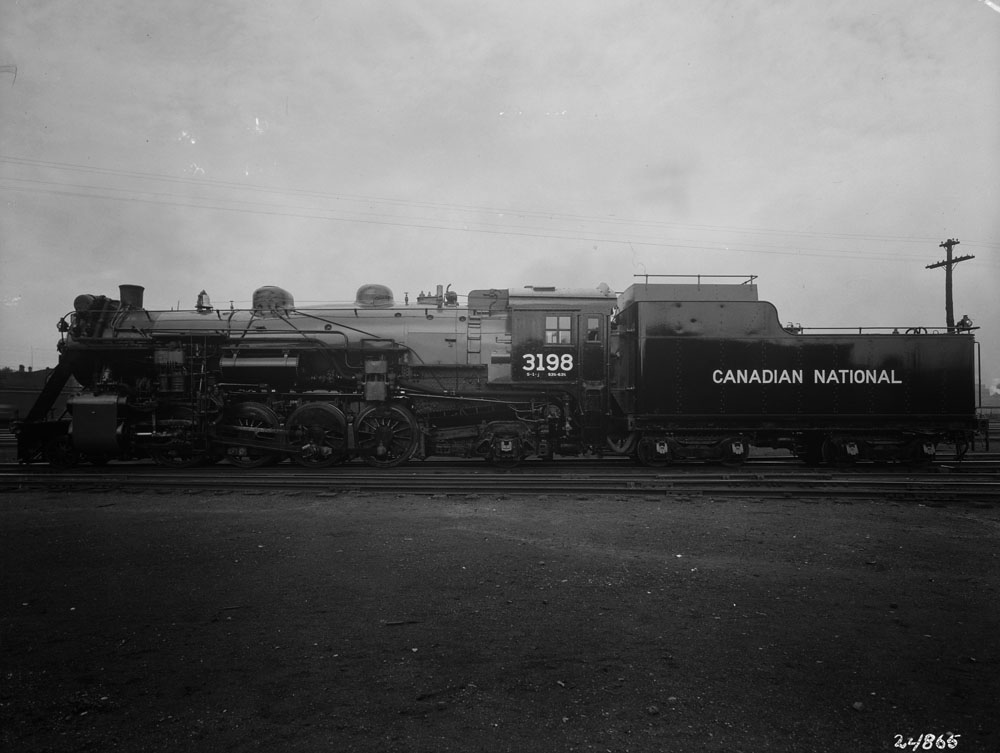
A series of photos taken in 1926 should freshly painted locomotives posing for posterity. At first, they look plain with their spartan à la CNoR lettering, but when you start to look in detail you find out the boiler jacket is sometimes painted in gray on passenger locomotives (at least from 1936 until WW2). I suspect the 2800 series (freight) is all black but the difference in lighting and finish (smoke box) induces a visual hallucination (I'd love to believe it's gray, but there's several shots of both locomotives taken the same day from different angles). Look for yourself, and if I'm wrong... well, let it be!

CNR 2801 (1926)

CNR 3198 (1926)

This is a case of a black boiler:


CNR 2800 (1926)

In 1934, the old CNoR paint scheme is still in use. In 1936, the tilted wafer is seen on many locomotives, but the grey boiler is there.

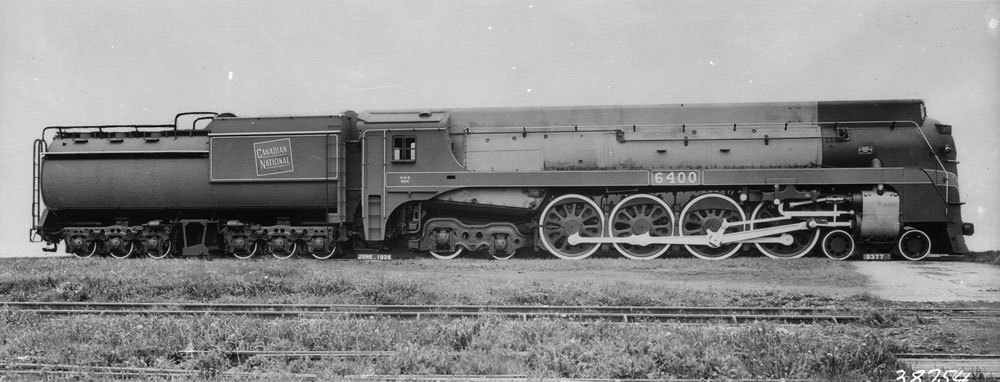
Move to 1936 and the streamlined 4-8-4 are also sporting the grey boiler. Fortunately, that fact is well known and a few brass models are indeed painted in that original scheme. The 5700 series also originally had a grey boiler and firebox.

CNR 6400 (1936)


Once again, maybe I'm just a poor uneducated soul, but I find it quite disturbing to rarely see this paint schem. Particularly the passenger one with gray boiler. I'm curious to learn when the practice started (back in 1936 or before?).

It has often been said that CNR, strapped by cash and the war, took the easy way out and reused CNoR paint scheme as an expedient in its formative years.

Looking at these pictures show us this postulate, while true to some extent, is in fact biased. It has been argued Canadian National strong corporate identity only formed after the introduction of the tilted wafer, maple leaf and green color. I agree it was the first time CNR developped its own image and design since it formation. But it is doing a dissservice to say the previous paint scheme was a make shift, hardly attractive and spartan while photographic evidence show extremely neat locomotives with bold and modern sans serif police in white, high gloss paint and, sometimes, gray/metallic boiler jackets.

In fact, Canadian National during the 1920s had a fashionable look that was similar to other first class railroads in North American. The sleak paint scheme - which I would described as an elegant merger of CNoR modern design, GTR attractive painting practices (high gloss) and CNR home-brewn distinctive details - was far to be pitied and fitted perfectly that era of after war opulence.

I've used to believe CPR was glamour and CNR pragmatic before the introduction of the green color. Books told me so and I never questioned what I was being told. Seeing the photographic evidence, I can no longer subscribe to such a partial and deformed vision of a past era.

I'm more and more convinced the mainstream Canadian modellers are forgetting a marvelous era that existed between 1900 and the Second World War. Our judgement has been clouded for too long, thinking is was an era of failure when it layed the foundation of our modern world.

I remember an architecture teacher with whom I made many historic reasearch telling me many things that happened in the 50s and 60s were in fact planned in the late 1920s and 1930s but were postponed by global conflicts. I feel the same when I see the original Canadian National paint scheme. Black, white, pure fonts and a slight touch of red on the front plate... Doesn't it sound like a description of the celebrated CN wet noodle concept?

If I had to build a CNR steam fleet, I would seriously give a thought about the 1920s...

Wednesday, July 20, 2016

Kitbashing Grand Trunk 719 - Part 1

Change of plan, I'm now modelling a 1907 Schenectady-nuilt Grand Trunk engine. The lure of Russian iron won me over this idea.

Ask Canadians about iconic steam locomotives of yesteryears and they will invariably list the Royal Hudson, CNR streamlined "Confederation", CNR #6060, CPR Jubilee and many other Canadian Pacific locomotives in tuscan red livery with a stainless boiler jacket.

You end up getting the feeling Canadian locomotives began to look great in the 30s, which is plainly wrong. In fact, we underestimate how much reshopping can change a Belle into a Beast.

Such is the tale of Grand Trunk #719 who started life with pure lines, high gloss paint and a planished iron boiler jacket... and ended up as a hardworking powerhouse with a gritty and industrial look thanks to a wealth of appliances.

I took the liberty to merge together two pictures gleaned from "Canadian National Steam!" volume about Consolidations. Since it is for educational purpose only, don't expect better quality pictures by respect toward the author. The books are well worth their price for the consciencious modeller.


Credit: Donald R. McQueen, "Canadian National Steam! Volume 5: Consolidation Types", DC Books, 2014

Kitbashing


While I tried to keep a maximum of details from the original shell, it was evident stripping them all and start all over would be less frustrating and not that much more complex. You will also see the nice Walschaert valve gear is now gone. It took some courage to dismantle it, but I had no choice if I wanted to go the prototypical route.


Domes were trimmed to be the right size, in particular the original sand dome which was cut in to halves to remove excess material and glue back together to make a correct-shaped steam dome.


As the evening progressed, my interventions on the locomotive were more bold. The cab was seriously modified to fit the builder photo and CN diagram. Yes, the cab window now looks large, but that's how things were in the good old days.


The cab roof overhang will be reattached later when it will have been lengthened and modified. There's still a lot of puttying to be done, but I'll be soon able to add details.

The big challenge of this locomotive will be the painting process. It will be a real challenge because Testor Buffable Gunmetal Metallizer must be buffed to get the correct shine. It means I'll have to pre-drill the boiler and apply many details like piping and handrails later on, which isn't exactly my definition of fun. But it's for the sake of doing something unusual. Unfortunately, I can't provide the prototype builder picture, but I can assure you it will be classy.

Talking about unusual, a reader kindly provided a NMRA Achievement Program link exhibiting some work of Clare Gilbert (owner of Sylvan Scale Models) who built many nice early Grand Trunk engines.Unfortunately, the pictures are not high resolution, but nevertheless, they are enough to show the amazing level of craftmanship employed to make sure the models were prototypical.


Monday, July 18, 2016

Canadian Northern Logo Color(s)

While looking at this picture, I quickly discovered the Canadian Northern logo on the cab wasn't monochrome. If you look carefully, you'll see it is darker than the cab.

Library and Archives Canada/PA-188842 (MIKAN no. 3516147)

In the past, when I modelled British-American Oil tank car, the color difference between black, dark green and red was very similar.


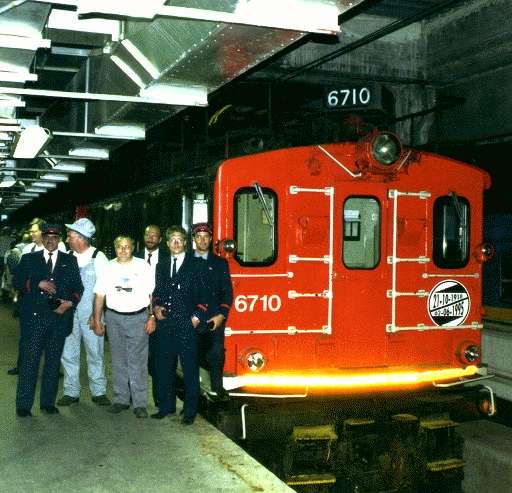
Generally speaking, the Canadian Northern was Black/White/Red. Montrealers remember seeing an updated version of this logo on the Deux-Montagnes original electric boxcab locomotives to celebrate their retirement in 1995. I'm pretty sure the shady CDPQ's REM electric train won't have the sturdinesss of CNoR rolling stock!


However, a green version also existed.


If you have any hints about what was standard practice at CNoR, let me know. Meanwhile, I contacted Canadian Northern Society, a historical association located in Alberta and dedicated to preserve CNoR heritage in the Prairies.


By the way, any information about fonts and font sized used by CNoR to letter the engine would be welcomed. Also, it's quite hard to figure out what was written under the engne number on the cab. Probably the locomotive class and rating.