Sunday, December 18, 2022

Canadian Northern Refrigerator Car

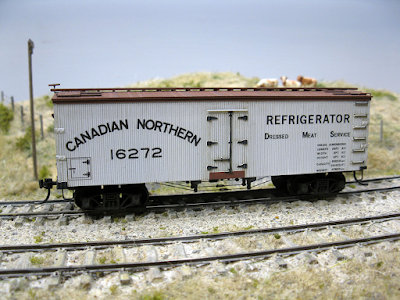
 A few weeks ago, I completely redrawn artwork from CDS in Adobe Illustrator to transform them in good quality decals. It took a lot of time, but was well worth the effort. One of the first car I decided to build was the Canadian Northern refrigerator car. It had a simple paint scheme and, according to pictures, was very, very close to a Roundhouse 36ft reefer.


It was a fun build and I improved the model a little bit by addind new metal stirrups, roof grabirons, brackets and fishing line truss rods with Tichy turnbuckle. Brake details are Tichy too. In hindsight, I should have taken a hour to remove the molded grabirons, but I was too lazy for that. My mistake. The car is currently riding on old Roundhouse archbar trucks, but I'm planning to swap them later with Tahoe or Bowser ones when I'll purchase some.


Painting was straighforward, but I made sure to bleach the roof as much as possible in previsioon for weathering. On the roof, many boards were repainted individually in slightly different shades of brown. If you look at old pictures, wooden roofs are always a patchwork of colors because wooden planks were heavy maintenance and required replacement and paint touch up frequently.


When done with the coloration, I applying AK Interactive Streaking Grime wash over the model and removed the excess with odourless thinner. The goal was to make the plank texture pop up a little bit so the car would look more realistic. All that was done prior to decalling because I've learned from experience that your should always pre-shade your models. Also, sometimes washes on light colored cars pick up the decal edges, creating horrible weathering patterns.
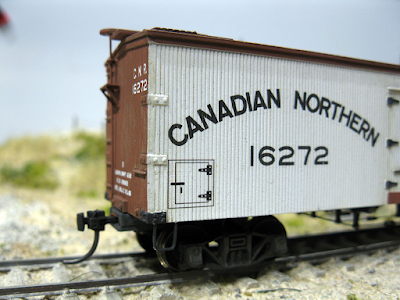
In Canada, reefers were used also as insulated cars. The trap was for a charcoal heater.

When everything was completely, I sealed the model with a coat of gloss coat, then with a layer of dullcote to kill the shine. As Hunter Hughson likes to remind us, dullcote is basically a solution made of talc and a carrier. It can't act as a durable protective coat. That's why I've been gloss coating all my models since a few months to improve durability. The dullcote is just there for the look.

The prototype


At this point, I consider the model ready for the layout, but it hasn't been weathered yet. Road grimes will have to be added and some shadows added around the molded grabirons to make them look better. Overall, I'm quite glad with this model and my only real criticism is the decal. When applying them, it became evident the old CDS artwork was derived from a picture I found online. It's highly skewed. I used Photoshop to rectify the picture and superimposed it over the artwork. Found out the lettering is far too wide compared to the prototype and dimensional data is too tall. Given the limitations when this artwork was drawn in the 1970s and 1980s, it's excellent. But honestly, I'll need to redraw it using the rectify picture to correct the many discrepancies. That said, I guess most people won't notice!


Next time? More Canadian Northern rolling stock and many other surprises.

Thursday, December 15, 2022

Stanstead - Painting GTR Passenger Cars

This project is moving alone nicely even though I was naive enough to believe it would take 2 evenings to complete! It's nice to be optimistic.


Underframes and roofs have been painted dark grey instead of black. I even did some post-shading with the airbrush. I'm looking forward to weather the hell out of these roofs so they show their age. At this point in their life, they have been downgraded to branchline service and GTR is starting to be strapped for cash.


Trucks have also been painted dark grey and heavily weathered. I drybrushed highlights on them to add more relief to MDC trucks. Some washes and powders will complete the job.


As for car shells, they have been painted in a faded shade of Pullman Green. When looking at picture of wooden clerestory cars, they are heavily varnished, but after a while they fade and varnish starts to peel off. They aren't dilapidated, but simply not pristine. Sure, a 1910s car would have been kept in great condition, but under layout lighting, it looks fake. It lacks relief. For this reason, I drybrushed completely the details on the car with a lighter shade of Pullman Green. It brings the details forward by adding highlights, but also, it replicate some wear and tear of the varnish. That said, it's artistic license and I won't argue about that. But at least, it doesn't look like a toy.


Finally, I applied Black Cat GTR passenger car decals... It's a mixed bag. The instruction mentions decals that aren't included in the set (data, etc.), and the film was so brittle every Grand Trunk name on the letterboard cracked into multiple pieces. I don't know if it's a defect. It's the first time I have that problem with their decals. Weirdly enough, my sets have been acquired from different vendors, so I can't blame storage for the degradation. At least, they are salvagable.


With that said, I still have a lot of work to do on these cars. Final weathering, clear coat, windows, couplers, etc. But at least, they have reach a decent level of completion and I'm looking forward to put them in action soon.


I have a lot of rolling stock and motive power to complete on the benchwork, but I'll try to spend the last few days before Christmas on completing the layout itself as work will soon resume on Monk.

Wednesday, December 7, 2022

Stanstead - Kitbashing Grand Trunk Passenger Cars

I recently started to kitbash a few Roundhouse Overland 50ft passenger cars. My rationale was that they were quite close and it would take about 1 weekend to improve them... Fast forward two weeks later... I'm still deep into the proverbial rabbit hole!


At some point, I wanted GTR old time cars for the layout and thought about repainting and decaling a few Roundhouse 50ft Overland cars I had on hand that were leftovers from an abandoned QRL&PCo project.


In my mind, it would be easy: install better platform railings, redo the truss rods rigging and paint it. You know, the proverbial one weekend project. Unfortunately, it didn’t take long before the “fast and easy” task became an adventure on itself and down the rabbit hole I went.


The first thing that bothered me was that Roundhouse coaches are in fact patterned on Pullman sleepers. They are fairly accurate models if you want a coach, but all that fancy side panelling looks out of place on a mundane branchline train. I thus decided to cut the lower parts of each side and replace them with tongue and groove siding to get a more generic look.


It was quite fast and gave a more familiar look to the car. Two were converted in that way and I kept one sleeper intact just in case. Then, I moved my attention to the future baggage car I wanted to model. At first, I decided to use a stock Roundhouse Overland baggage but I had a hard time finding one. They were to pricey due to shipping cost and I didn’t want to use a brand new RTR version. Fortunately, Chris Mears came to my rescue and provide a second combine car which provided me with enough material to think about something much more ambitious and prototypical.


2 combines + 1 Overton baggage = 1 combine + 1 baggage

As you know, the passenger compartment on the Roundhouse Overland combine is laughly small. Only 4 windows. On GTR (and most other roads), the passenger compartment was generally twice that size. I started to wonder if I could splice two combine shells together to get a more accurate car. Unfortunately, doing so meant that I would have not enough material to build a 2 door GTR baggage car with the remnants of the combines.

That’s when an old Roundhouse 36ft Overton baggage car from a 3-n-1 MoW set came to my rescue (again!). I would splice two combine passenger sections together and use the 36ft baggage car for the baggage compartment. I would then have two nice baggage compartments that could be spliced together to create a relatively accurate GTR baggage car. Nothing lost in the process, it would be a 100% win-win.


These car ends are accurate for GTR cars

However, the car ends were completely wrong on the baggage car because it doesn’t have end platforms. The style of door and the two windows didn’t match my reference pictures (generally of poor quality). It was time to fire up SketchUp and model a correct car end including the brake apparatus. At this point, it was evident the coach and combine ends were also wrong, so I simply made new ends for these cars too. About 2 hours later, the 3D printer had provided me with correct parts. I also printed correct arched windows for the baggage car and new chimneys for all roofs. 


When came time to tackle the platform railings, I first thought about making mines out of brass. But after a while, I decided to simply 3D print them. It was both faster and more consistent. It could be argued I printed them a little bit on the thick side, but sturdiness does matters, and I don’t want these to break easily. Also, since they are painted in black, they should blend well with the rest of the model. To make printing and gluing easier, I create new platform beams and cut the plastic one from the Roundhouse underframe.


Also, I replaced the stock Roundhouse thread truss rods with 8 lbs monofilament fishing line and added Tichy turnbuckles. The underframe brake system is the stock Roundhouse stuff. I didn’t bother improving it that much. Underframes in the K-brake era of earlier 20th century weren’t that complicated when you look at technical drawings of that time.

Finally, I installed new Kadee coupler draft boxes to replace the truck mounted ones. At first, I installed them flush with the platform end beam but car spacing was too wide and looked silly. After looking at prototype pictures, it became evident couplers on old cars were located under the platform, with only the knuckle protruding from the beam. I thus glued the draft boxes about 1.5mm from the beam face. All in all, it reduced the car spacing by 4mm, which is more than a scale foot in real life.


At this point, the cars were ready for priming and painting. According to my less than stellar research, it seems GTR cars were painted in Pullman Green, or more accurately Vallejo 71.019. As you know, on scale models, colors tend to look darker than in real life, under the sun. For this reason, I mix a lighter shade of green with a ratio of 15:1 Pullman Green to White. Even that is a little bit dark to be honest. In my mind, the cars must blend with their surrounding, i.e., the layout. I want a color palette that is shared on all elements. So, I will probably exaggerate a little bit the color variations on cars to make them pop. The same can be said of structures, which right now are looking quite dark. If this layout had taught me a lesson, I would say it’s that I paint and weather everything too dark and I don’t fade my paint enough. We, railway modellers, tend to believe that if we use the prototype color, it will look prototypical. But in truth, when modelling rolling stock in service or buildings that have been under the sun for more than 2 years, it’s all but a pernicious fallacy.


Tuesday, December 6, 2022

Finally, A New Backdrop for Wieland

A long overdue task on the layout was completing the photo backdrop installation in Wieland. For years, it was a blank slate of light blue paint that couldn’t provide any sense of place. The photo was printed years ago, but we kind of forgot about installing it. The sky was cut off with a hobby knife to only keep the scenery part of the photo. It was fastened in place using double-faced tape.


I won’t say it’s amazing at this point because a lot of vegetation will have to be added to improve the blending between the 3D elements and the flat 3D picture. However, it certainly adds depth and context to what was basically a shelf with model trains.

In particular, the General Cable short siding now makes much more sense. You can imagine the siding curving into the woods to reach the aluminium electric cable plant.

The same can be said of the transloading area which now has greatly improved. The backdrop is full of vehicles and structures that would be hard to translate in model form without looking clumsy.


Finally, the Route 138 also doesn’t look half bad from certain angles. Sure, the pavement color is wrong, but this isn’t a scene that is visible under normal circumstances since it’s deep in the alcove. It could be improved though. In my mind the most interesting feature is the dark trees are the same height as the tunnel opening. Having these trees on each side will help to hide that black hole punching through the wall.

The backdrop isn’t fully glued to the wall yet due to running out of double-faced tape. Also, I’ll need to print a small section of backdrop to complete the scene behind the locomotive shop.