Saturday, December 26, 2020
A Merry Kitbashing Chrismas!
Tuesday, December 22, 2020
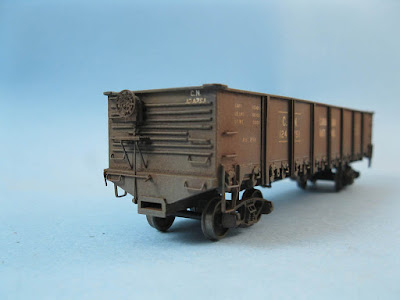
Kitbashed CNR Drop Bottom GS Gondola - Part 2
A project finally completed before the end of year. After decaling, I let it sit on my shelves for quite a while. Why? Because I tried to pre-weather the model before applying the decals and messed up a little bit. The model turned out to be far too dark instead of being bleached. Not a big issue, but still a little bit frustrating. I've yet to experiment more with altering the shade of paint before applying decals. I think I'm not bold enough and when the dark washes are applied, it nullifies the bleaching.
Another question was to determine if this car would join my early 1980s fleet or my late 1950s one. The difference would have been the addition of an ACI label and a yellow dot for wheel inspection. I finally decided this car should be weathered for the 1950s.
Finally, I tried my best to weather the car interior... which is quite underwhelming. I've yet to master that too. Weathering open car interior is always a big challenge due to the availability of prototype pictures. I'll probably revisit this gondola some day and add some debris inside it. But for now, it's ready to move along the rails, or more realistically, to go back in its storage box for an undetermined period of time!
Thursday, December 3, 2020
Applying Dry Transfers... With a Q-Tips
I didn't post a lot recently not by lack of modelling to show off or ideas to share, but due to a severe case of workload. The kind that leaves your mind numbing and unable to write anything. However, I did work on a few Bachmann diesel kitbashes (mainly my Central Vermont and Maine Central locomotives), a caboose, several kitbashed CP 50ft double door boxcars and a bunch of cheap Accurail and Atlas Trainman hoppers.
I've also built a module for my basement layout... which proved to be a huge mistake. Too large, too overwhelming and not very useful. I'm glad to have tried it because I now know better how the room can be used and I'll revert back to my original idea under the IKEA cabinets. More on that on a next post.
Modelling kept soothed my mind and I thought it was about time to finish my 50ft CP boxcar project started 4 years ago when I entertained modelling CP Tring Subdivision. Let's just say I'm still debating what and which era I'll model but the Quebec South Shore theme is strong, mainly the early 1980s, but also the colorful late MMA-CMQ era.
Most of these cars are decorated with old CDS Lettering dry transfer. To be honest, I hate dry transfer as much as the next guy, but truth to be told, CDS did an amazing job providing so many design back in the days. Dry transfers are a pain to apply, but they cut on a lot of steps and you don't get silvering. The big issue though is making sure you rub them correctly in the exact position. The later point can be dealt without too much problem using Scotch Tape, the former is a little bit tricky. In the following picture, misses are underlined in yellow. From a certain distance, they are hard to notice, but even with a decade of experience, I still have a hard time to get perfect results with most recommended tools.
 |
| Dry transfers applied with a dulled pencil (about 4 to 5 passes) |
 |
| Dry transfers applied with a cotton sawb (about 2 passes) |
Over the years, I've tried mechanical pencils, worn pencils, ball-pens, metal point, plastic scraps, blending stumps, burnishers, etc... and always got less than perfect results, particularly when dealing with smaller lettering. Whatever you do, it seems you always miss bits here and there. Worst, after rubbing the transfer a few times, it often no longer want to stick to the surface. Over rivets and irregular surfaces, forget it, pencils are too hard to follow the complex pattern.
Then, it occurred to me a paper shaft from a cotton swab could do the job. It is relatively smooth yet sturdy, has a larger burnishing area, can conform itself to many intricate surfaces and can be reshaped easily. It worked wonders! It is faster, requires less passes, you can easily see where transfers are applied and where they aren't yet, and better, they do a great job with small lettering!
Basically, I cut the cotton buds at one end and then I use a hobby knife to shape the end in a roundish-pointy end and voilà! Now, I have a second life for my cotton swabs I use for weathering effects.
Wednesday, December 2, 2020
Hindsight 20/20 5.0 – Virtual Railway Prototype Modellers Meet
Hindsight 20/20 Virtual RPM is back on schedule again. On Saturday, December 5th. As always, it is an interesting event to participate and a great source of motivation and inspiration.
I'll by back as a clinician to cover the second and last part dedicated to Modelling with Paper. Subjects covered will include asbestos shingles and corrugated sheets, heavy duty hybrid building cores and rolling stock.
Don't forget to register in advance at speedwitchmedia.com. As always, the event is free but donations are accepted to help it to grow.


