Monday, October 13, 2014

Upgrading Bachmann GP9 - Completed Project

Completing a project is always fun and satisfying. I'm probably not the only one who have more fun when he runs models he upgraded, bashed and tweaked.

Bachmann GP9 is a nice model for the price. The only problem is that running qualities can vary from a model to another. Same can be said about motor noise (be aware their RS3 is far better than the GP9 which is still quite very good). Except that, this particular Bachmann's offering lend itself naturally to super detailing.


I already said I wasn't trying to get a 100% prototypical model out of this engine. Getting a general CN look with the right details in the right place was the main goal. Louvers and handrails aren't correct, I know it, I can live with it. If you don't plan to install sound in them, the bill for parts would be about 25$ per units + decals and paint.

Both locomotives are equipped with Tsunami Soundtraxx decoder. Jeff Boudreau from Modèle BT did the installation and adjustments. I'm really satisfied with his work, it really brought these engine to life.

No, this isn't a GMD1!!!
I consider they are complete, meaning all paint and details are done. However, they will need a coat of dullcote and some heavy weathering to look like real CN locomotives from the 80s. Those who survived in the wet noodle paint scheme were dirty as can be.


My only regret is that is you sum up all the expenses to get a "decent" stand in, it is almost the same as the new announced prototypically accurate canadian Athearn GP9. That's really frustrating, but it is always like that. You work hard to get something not on the market and it pop up just after you complete yours.

 
Anyway, I'm still liking the job I did. I practiced airbushing seriously, messed up the thinning and got coarse finish. Learn and live they say! Also, I took more care when installing details, taking them to tune them up and pin them to get a better bond with the model.


That said, I think this model would fare nicely on any canadian layout if you're not too much into rivet counting! If I'll get an Athearn GP9 in zebra stripes? Well... that could happen...

Sunday, October 12, 2014

Weathering True Line CN Caboose


True Line CN wood caboose is a nice model out of the box, but a little bit shiny. Feels like a cheap plastic model in term of paint finish. Thus, it needs a little bit of weathering to look decent on any layout.

First, looking at picture of the actual prototype, it became quickly evident most had their steps painted in CN Orange and not black as the model. I decided to rectify this and used True Line paint to touch up the steps. The color match was perfect! I also had to paint in white a few railings.


Model was then dullcoted before applying any weathering effect. This time, I decided to use Citadel Paints washes. They call them "shade". I'm not the kind of guy to buy readymade stuff, but a friend of mine, Charles Bédard, introduced me to these shade earlier this summer when we painted an entire army of Warhammer 40 000 figures. I was particularly impressed how the shade would creeps in all the crannies and nooks without effort. The stuff is a little bit strong and should be applied lightly in several coats.

When weathering, I always like to work from a prototype picture to inspire myself. Caboose CN 79021 - mine is 79026 - shown a very nice weathering pattern that made the wood siding really stand out. The caboose itself isn't in a rotten state, but you can feel it has lots of miles under the wheels. I think it fits well a wood caboose during the mid-80s and nearing its demise.


First step, I used a very light oil paint wash of titanium white and raw sienna all over the model to fade down the color. I found this particular mix is very effective to fade down colors without having to fire up the airbrush. When done and dry, I dullcoted the model again.


I choosed a wash called Agrax Earthshade. It is a dirty brownish dark color that fits vehicles really well. Two coats were needed to get the desired effect. I accelerated the drying time with my trusty hairdrier.

The stack was painted a dirty aluminium color then shaded using Agrax Earthshade. Citadel Null Oil is also a good choice when you want to bring life to metallic color having seen a lot of stress. Splash of black were added at the stacks protuding ends to simulate sooth.

Finally, pastel chalk was used to add dirt along the frame and the steps. I used black pastel. Trucks were painted a warm dark grey and weathered with pastel. Wheels received a brownish coat of paint and rust colored pastel.


I didn't feel I needed to seal the chalk because it always kills the realistic dusty effect of pastel chalk powder. I try to keep things as they are at this point. I'll see under operation if I need to dullcote the model but won't do it until I have stong evidence the weathering is getting away.

The entire project took about an afternoon. I just need to add the marker lamps and the ACI label and I'm in business.

This caboose is gonna see a lot of action before I get my hand on PSC cabooses... We will see if True Line will deliver in time their new stuff.

Thursday, October 9, 2014

Clermont: A Case Study of Urban Planning

Well, call it professional deformation, I'm an architect and can't stop trying to make sense out of any scenery I see.

Putting roads and houses through scenery is a strange process hard to describe with recipes.

Many of you experimented it first hand. You draw the scenery, put nice buildings here and there, a road and then, mock up it for real... just to find it looks like nothing you wanted.

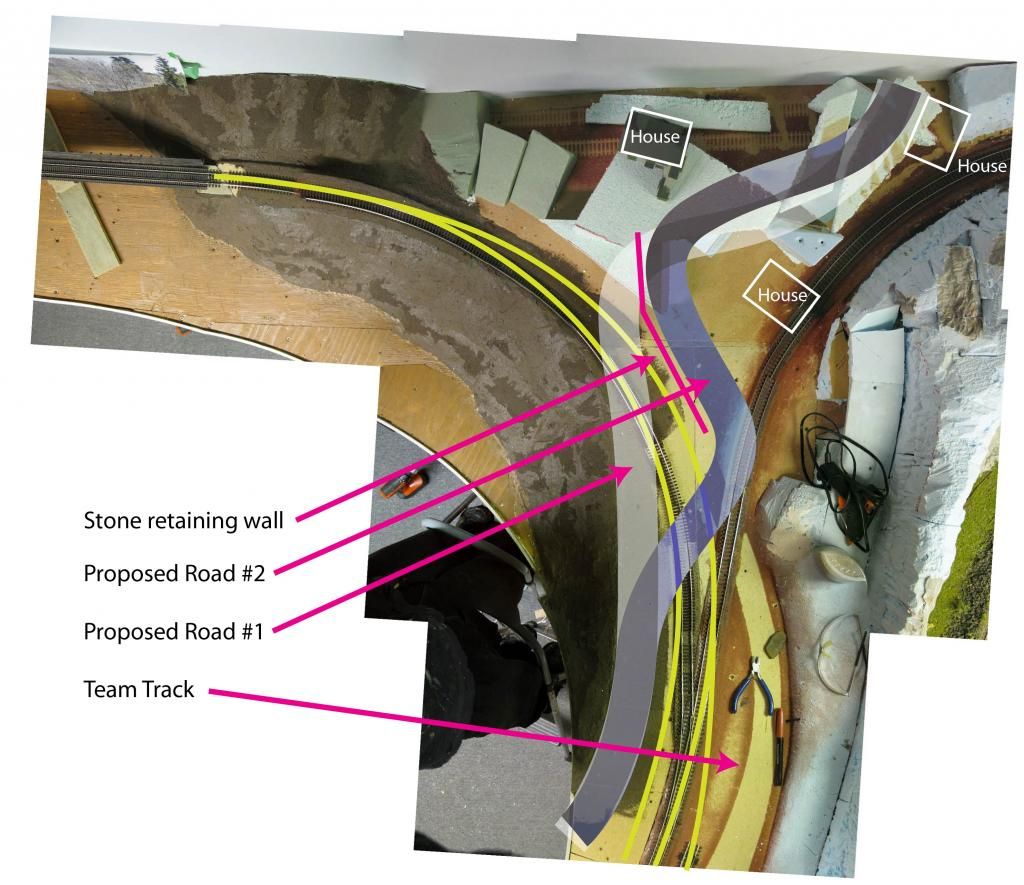
That's what is happening with Clermont. The real scene is made out of two slopes with stone retaining walls bordering the track. Looks great in real but reproducing it on a layout isn't that easy when you had to took some liberties with the prototype.

I've tried to plan the scene for a few months. The only thing I'm sure is that the house on the hill is gonna stay there. From every angle, she dominates the scene and give it some personality.

However, most of the previous urban plans fell short when I did the mock up. Remember that long winding lane on the right side with many working class houses? Well, I real it doesn't make sense. Looks bad, looks staged. Plus, I need more land there for the team track. So, I scrapped this idea. Yep, there's always lots on place on a drawing, not in real. I think you can cut about half the planned building and you won't be too far from reality.

The second challenge is locating the main road crossing the tracks. First, the slope toward Clermont should be REALISTIC. I've seen too many layout where roads climbing hills look like roller coaster.

For this reason, I took a Google Earth satellite view of the layout and tried to determine the best location for the road.


Proposed Road 1 follows the river, crosses the track near the turnout and gently climb the hill with a long curve.

Advantages: siding isn't obstructed by a road crossing, slope is gentle, realistic topography is possible, the road along the track is a nice addition and prototypical to some extent.
Disadvantages: access road to team track must crosses the siding in the middle, track hidden behind vegetation is only on a very short distance before the bridge.

Proposed Road 2 quickly leaves the river shore and crosses the tracks, then is turn left and right while climbing the road.

Advantages: the retaining wall is needed, the winding road makes the perspective more interesting, access road to team track is direct without needing to cross the siding, the track lost in the wood scene before the bridge is longer.

Disadvantages: the road crossing cuts the siding in 1/3-2/3, that means a cut of cars could obstruct the road for a long time, the slope could look toyish because of the many curves it could be hard to make the topography realistic.

At this point, both ideas have to be tried on the layout. I can't hardly say one is better than the other. Netherless, I think Proposed Road 2 is a strong contender. I'm eager to see how it will turn out in 3D. Anyway, I think this scene can hardly support more than 3 houses before looking cluttered.

*****


By the way, I was really disappointed this week to find out The Whistle Post vanished from the web. It was there we could admire the wonderful work of fellow australian modeller Mike Cawdrey. His artistic approach to New England in winter scenery is among the most inspiring out there. We can still see his work on the web, the lost of these archives and WIP explanations is not something you can replicate. Anyway, I'm still happy to have followed this thread over a few year. Mike is probably the guy that made me realize there was no shame in modelling a "modern" (eh, 80s were yesterday!) railroad. His creative approach to this hobby is another way to do model railroading.

Tuesday, October 7, 2014

Cheap Way To Gain Weight

I'm actually in the process of adding weight to my freight cars. Many use lead to add weight. I was particularly interested by auto adhesive wheel weights as described by Mike Confalone. However, lead weights are getting hard to find. Every auto parts shop I went turned me down, telling me to ask a repair man in a garage changing tires. I also found them on the Internet, but shipping dead weight is prohibitive, almost as costly as the item itself.

Thus, last Friday, I went with Louis-Marie to the local home improvement center to find the cheapest way to add weight to a car.

First, nuts and bolts. Costly, very costly, and most are from a cheap alloy that doesn't weight that much: chromed zinc.

Second, we checked steel rod. Less costly but not very fun to work with. Cutting the rod is labor intensive and leaves very little place to customization.

Third, steel pipes and accessories. Cheaper, but still costly, not very practical.

At this point, we were a little bit disappointed. Each car would cost at least 2 to 3$ to add sufficient weight. Then, Louis suggested we take a detour and check up tiles and grout...


BIG DEAL! Cheap glass mosaics were selling for $4.95 each. It weighted a lot and was customizable: you just cut the number of tiles you need with an X-Acto. Better, they stay together because of the supporting mesh. Let's do some maths!

 
A 12 inches x 12 inches mosaic tile cost 4.95$ and weight 52 onces. A tiles is made of 144 small 1" square tiles. Each little tile weight 0.36 oz and cost 3.4 cents.

Just for fun, I tried to weight up a Walthers FGE 50ft boxcar to reach about 11.1 oz just like Mike Confalone does (yep, that's a lot of weight, maybe too much, anyway I tried it on a few cars and it makes switching more realistic and less prone to derailment, not sure if I'll upgrade all the fleet). It took me 3 rows of 6 tiles and thus cost me 60 cents! Most people will strike to get the NMRA recommended weight. You only need one row of 6 tiles in most cases, costing you 20 cents. Now, try to beat this. And I guess you can find them at cheaper price if you find a dealer discounting tiles!


I recommend gluing the weight with hot glue. Strong enough but removeable if needed and glue instantly.

Glass mosaic tiles are cheap, readily available to most people, easy to work with, quite heavy and non toxic. They may not suit every type of cars, but for boxcars, reefers and many other enclosed cars, they should do the job. I had good results filling some cars with Plasteline or sand. Plasteline is particularly useful for hoppers as you can fill discharge bays.

Still, I need lead for my locomotives!


First Operation Session

First "official" train spotted in Les Caps since last spring.

 Last Friday was our first "official" operation session on the layout. Jérôme hastly rebuilt the reversing loop to give us some mainline to move the trains since the layout is far to be completed. In fact, only Donohue is in its definitive shape.

Train 523 shoving cars over Malbaie Rive bridge

Donohue's was switched twice and we started to get an idea how to efficiently operate this rather intricate industrial trackage. I was seriously afraid it would turn into an artificially complex switching puzzle, but in fact it was not.

So from a operation standpoint, the new track plan was a success and we got the approval of our real-life railroader Jérôme.

A freshly painted CN woodchip car (this is only a prototype)
However, it became clear we will have to give some instruction on how to switch this industry and to indicate clearly the car spots.

From now, If I find some time, I'd like to print the photo backdrop as soon as possible to continue working on the scenery.

A weird chemical car spotted at Donohue.

I also ordered some corrugated plastic sheet for the warehouse. It will be probably the next building to be scratchbuilt.