Saturday, June 20, 2015

IHC GTW 50' Boxcar - Part 2

Some progress today as I restored the blue paint layer.

The first time was masking alll the white lettering on the car to preserve it. I tried, as much as possible, to keep the masking real close to the lettering to minimize the ghosting effect.


Next step was priming the model with white to make sure paint would adhere correctly. In retrospect, I feel I should have skipped that step for this particular model.


The issue with white primer is the paint build up against the masking tape. I was perfectly aware it would happen but not that much. Worst, the white layer is visible on the demarcation line.


Well, let's see what it looks like when seen closely. Not great isn't it? That will need some touch up.


After touching up the demarcations lines, the result was far better, but still, the paint build up make it looks like a bad decal job. Under normal condtion, it should be acceptable.


Well, when the touch up was done, I misted a white wash to fade and lighten the blue color. The result is far to be perfect since the blue ain't GTW blue, but I think it should be OK when completely weathered.


I will probably lighten up the color a little bit with oil paint during weathering. Also, I decided to paint the roof aluminium. Since the car isn't very prototypical, I feel having another color will help to give more credibility to the model. Also, the pale colors make object looks bigger. This particular boxcar is so small I'll do everything I can to hide its inherent defects. I'm using this particular car as source of inspiration.

Last detail. Wheels and trucks were painted with a random dark brown mix and then received a coat of weathering powder.

Friday, June 19, 2015

Restoring an IHC GTW 50ft Double Door Boxcar

It is well known, I'm not the kind of guy to throw away anything I ever acquired. I never sold anything I ever bought and sometimes, I end up with pile of derelict stuff full of memories...

This afternoon, while I was looking for my Intermountain custom-painted CN 40ft boxcars for a weathering session. I stumbled upon an old IHC 50ft double door boxcar in GTW scheme. I used to see a lot of them as a kid and imagine my excitation when at age 8 or 9, I found one at my local hobby shop... Unfortunately, I discovered quickly that IHC was on par with Model Power, i.e. crap. I put the car back on its box never to run again until we started our club layout a few years ago.

At that time, Jérôme was on a spree to put Kadee on every car I ever own, including garbage like this 50ft car. Believe it or not, it even get a nice pair of Atlas trucks!

Crappy car with crappy weathering


The thing is this car is among the most unprototypical piece of rolling stock I have. The car is basically to short! I mean, it lacks at least 1 scale feet and looks like an extended CPR minibox car! Since I got recently a nice pair of Atlas NSC boxcars, I felt I would never run this car ever, but the call of mermaids was stronger.

As you can see, since I had no use for this boxcar, it was the first I ever used to practice oil paint weathering according to Mike Rose's method. Not my best, mainly because the original paint job is too dark and my dullcote fading was ridiculously overdone. Before I tried to hack and saw this boxcar, I used mineral spirit and wet sanded the most tenacious rust patches over the white lettering. Since I want to ket the lettering intact, I need to make it as white as possible. If you are careful enough, I must admit wet sanding oil paint weathering is almost a piece of cake.

Difference in height is striking!

So, I decided to splice the car and add some height here and there. Basically, a Frankenstein. No harm intended, if the car looks decent in the end, let's use it on the layout even if it is a foobie. But if it looks really bad, I just get more practice!

The first step was to cut the roof and add a 1mm thci styrene strip to give so height here. Habitually, you can see a small step on boxcar between walls and roof. IHC didn't bother doing it.

The next step was to add a 3mm styrene strips under the sides. Most old boxcars have some steel under the bottom rivet row. This one didn't had this feature at all. So now, the car is 1 scale feet higher and looks a little bit better compared to other boxcars. Sure, the doors are too short and lettering is oddly located, but I'm ready to let it be.

Bad details and weird roof

It may not be prototypical, but I'm still working from GTW pictures. This is why I cement spare Intermountain ladders.

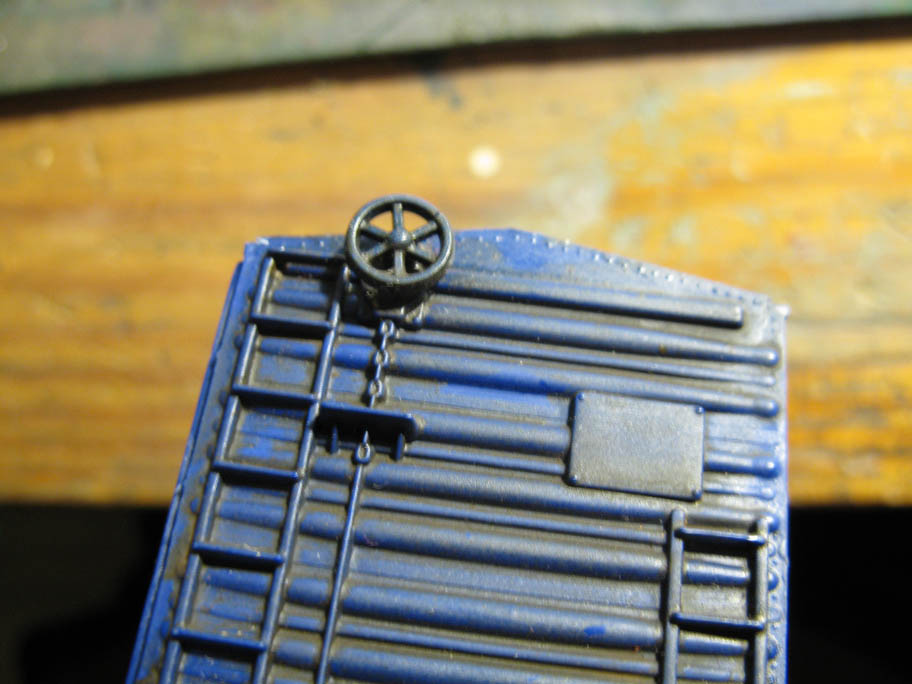
Next step is to file down the sprue plugs in roof holes and add stirrups, brake wheel and grabirons. I'm quite lucky that Tamiya XF-8 blue is a perfect match to IHC color. When the car is repainted, the weathering process is gonna be quite a challenge to bring this blue to a faded baby blue.

Oh, and I still have two other 50ft boxcars to repaint and detail: a Bachmann and a Roundhouse. My goal is to model insulated CN boxcars. Those were in cement service in Villeneuve according to a few pictures. On again, not price winning cars, I feel they can be improved.

Still some weathering to be cleaned, but much better.

We can say what we want, but I kind of like those upgraded toyish cars. I feel more sympathy toward them than my most pricey RTR stuff. It's probably why I prefer to use locomotives and cars I weathered, kitbashed or scratchbuilt. At some point, they have a history of their own. They have a service life and were shopped in the true sense of the word.

Tuesday, June 16, 2015

Always Look On The Bright Side Of...

Jérôme finally tackled his long dreamed project of doing some improvement to his Proto 1000 Budd RDC. With Rapido working on a canadian and accurate version of this emblematic passenger equipment, we thought it would be not advisable to put lots of details and sound in this unit. But it doesn't prevent us to make it more fun to run.


The Budd car is now equipped with a pair of red marker lights on each end. In fact, it is optical fibers from a cheap Christmas ornament that carry the light from red LEDs installed in the car roof bulge. A very simplistic but efficient use of diodes makes the light reversible, which is a great feature for this car.


We were afraid the very small optical fibers would be too small to be realistic, but the results far exceeded our intitial expectations. It would be quite great to add this feature to caboose too.

Next step will be to add new couplers and probably some kind of screen to minimize light in the cab. Some faint lighting could also be installed in the passenger compartment to bring some life to the model... and add passengers too.

Monday, June 15, 2015

Rust and Ballast


We did some very minimal work on the layout recently. I was particularly busy working on a submission for an international meeting held in Quebec City this weekend to commemorate the 400th anniversary of Recollet Friars arrival in New France. It was a great weekend and a wonderful occasion to share historical knowledge among many searchers, students and historians from France, Ireland and Canada.

That said, we still found some little time to check up how the ballast turn out since it was glued in place. In general, the result is quite realistic. But some aspect could be improved, particularly the amount of ballast. I tried to keep ballast very low to make ties pop up, but it was a mistake since the tabs under the rails are now quite visible. I should have known better!


Also, the ballast mixed with white tile grout ended up not as great as other. Lots of white deposits here and there and the ballast was so impermeable that glue formed a thin shiny crust where it could pool. Lesson learned: don't use white grout and use it with parcimony.

Foreground ballast mix with too much white tile grout.

The best ballast job was done with my personnal mix of very powdery ballast. This is a mix of crushed stone power and very fine rock particles. I get this mix by sifting regular gravel until it is finer than HO scale fine ballast. Once glued, it really gives the look of older and packed ballast you can find on branchlines and spurs. It also accepts glue well and is very easy to put in place using a large soft brush.

Background track done with my powdery custom ballast mix

The only "real" thing I did yesterday was to weather rail sides with weathering powder. Until now, I used pastel chalk, but wouldn't be advisable for this use. I recently bought a set of A.I.M. powder. I knew the stuff was potent, but never imagined it would be so much!

Rails were weathered using the dark dirt pigment. This particular color is quite realistic to represent rust dust that gather on rails. Using weathering powered also have the superior advantage to color realistically the spikes and plates details. I remember doing this with paint a few years ago and it always looked clumsy. Using powder is truly the way to go for this particular job. I feel I should have invested in weathering powders years ago!

Ballast lacking between ties

I only have one complain. I found out AIM pigments aren't homogeneous. From time to time, patch of orange or yellow appeared in the mix. Unfortunately, you only find out when the powder is applyied on the model and since these pigments are tenacious, getting rid of the wrong color is not an easy task.


Anyway, that means I have now completely ballasted and weathered a stretch of track. Sure there's a lot of things to add here and there, but the basic stuff is done. In retrospect, I consider I found my personal formula to do efficient and realistic track work that I could sum up into a few basic steps that required no particular skill or artistic intuition:

  1. Spray paint track with Camouflage Brown (Krylon, Rustoleum, etc.) and make sure you clean the rail heads before paint dry.
  2. Using various shade of tan, greyish brown and other toned down colors, apply an irregular wash over ties to give them a weathered look. No need to be fancy.
  3. Apply you ballast with a small plastic container (pills container, film container, etc.) and brush the excess with a large soft brush used for home improvement.
  4. Soak the ballast with a mix of wet water (70% isopropyl alcohol and water) applied with a spray bottle (an old Windex bottle does wonder). Use a bottle that can produce a fine and regular mist to make sure it won't displace the ballast.
  5. Apply a mix of diluted white glue (50% glue / 50% water) to the ballast using a standard glue bottle with a nozzle.
  6. Use dirt brown weathering powder to rust the rail sides. Don't be shy and let the powder works its way on the spikes and plate details.
  7. Et voilà.
Each steps only takes a few minutes and allow you to paint and ballast long stretches of track painlessly and efficiently. Later, you'll be able to weather the ballast using powders and washes to give hints of oil spills. A few weeds here and there will complete the scene.

I didn't created any of these technics, but it took me years to finally apply them correctly. I can testify I wasted hours dropping alcohol and glue with an eye dropper, scrapping dried paint on rail, fighting my way spreading Woodland Scenics synthetic ballast with my fingers or with small hobby brushes and losing my temper when cheap ballast started to float around.


Sunday, June 7, 2015

Atlas (1) / Athearn (0)

No need to speak ill of Athearn, which isn't my goal here, but I finally made up my mind. After speaking with Jérôme, doing some searches and getting feedback here on the blog, I came to the conclusion it was much wiser to keep the Atlas locos and upgrade them.

As stated, we do a lot of slow operation. So far, Atlas GP40-2W performed beautifully. I'm not eager to trade that given fact for better details. At some point, you have to draw the line somewhere and I know a poorly performing loco is worth nothing even if it is the most amazing piece of art. It will end up on a shelf and I'm not a train collector. I can live with Atlas so-so details. In fact, this particular model have quite many qualities.

Yesterday, I had the occasion to get a Tsunami AT-1000 sound decoder suited for this particular model. When I get speakers, I'll perform the decoder installation with Louis. If I'm satisfied, the other loco will be upgraded and both will receive their coat of long due weathering...

Thanks again to John and Greg for their precious input.