Wednesday, January 1, 2025

2024 in Hindsight

2024 has been a weird year, sometimes being absolutely wonderful and other times, less than stellar. Health issues, excruciating projects at work and several other sad things made it quite desperate at times, but there is also the nice events that made that year still a fascinating time to be alive whatever the hurdles. Speaking of which, there should be seen as motivational because they are an invitation to lift up to the occasions, be better and often, to discover we can do a lot of unexpected things.

In terms of model railroading, I did very little with the Murray Bay Subdivision, being merely a custodian of something bigger than I. For a year, we struggled to find the motivation to work on the cement plant and I must admit I've reached that point where I'm disgusted at the thought of creating a photo backdrop... Yes, such a small hurdle, yet one that I haven't found the courage to jump over.

Meanwhile, I built a small switching layout for my office space which is just another variation of the QSSR theme. I really like it and while I haven't switched it for a while, it is the backdrop I use daily to stage my rolling stock and do photoshoots. I will probably improve the scenery soon as a way to experiment what I want to do with Monk Subdivision.

As for Monk Subdivision, it has been a hell of a roller coaster ride! I built the staging room and benchwork for two staging levels, then demolished the original road bed to rebuild it according to plans... only to get rid of it all by the end of the year. A drain pipe replacement forced me to demolished a lot of benchwork and forced me to rethink my plans. To reach my goals, I simply eliminated the two levels and went back to my original Armagh and Langlois vision. As they say, God in His Heaven, All is Right with the World... let's hope it's alright!

Joke aside, these hurdles made me strive for something more coherent, more simpler and the streamlined project is much more interesting to work on. So much so that I was able to finish the drawings for the station, the feed mill and the large enclosed water tank, which will probably be build this year.

With my motivation back, I also embarked on a program to build and complete the Monk fleet, in particular the 1960s-1970s one. New higher quality models were acquired and after a while, I decided to subcontract the decoder installation to my friend David Mira-Landry who is better than me at that and which does very professional work. Meanwhile, many new locomotives were added, including several big MLWs from Bowser, a few Rapido MLWs, Budd and many others. I'm really glad that the classic fleet is almost done and now I'm starting to add better 1950s models too.

In December, I also decided to start working seriously on my freight cars. I had dozens of boxes and unfinished projects laying around and several drawers of decals. I told myself, enough is enough and built, kitbashed and painted about 20 cars over the last few weeks, many of which have been documented on this blog. Several others are on my workbench right now and my goal is to continue assembling and painting cars on a regular basis. Currently, I've done all my flat cars and gondolas, one stock cars and I'm currently working on a Russell snow plow and the big step in preparation is completing one for all my comprehensive reefer fleet which is quite huge. Several are already on my workbench and I'm developing decals for most of them. More on that later in this article. Suffice to say, I found my groove and when I see a project in my drawers that can be done swiftly, I sure do it!

Another nice part of the year was the continuous conversation with Chris Mears, which helped us to explore ideas, concepts and many whimsical train distractions. One among them was that idea to build a 1870s layout with classic retooled Bachmann 4-4-0s... I'm seriously tempted to do it and once Monk has reached a certain level of functionality, I could easily see myself trying that out.

Other achievements included being published in the excellent Model Railway Companion book published by Wild Swan in the UK and compiled by the always inspiring James Hilton. A big thanks to him for inviting me to contribute as I didn't expect to be featured on the cover!

Scott Thornton was also another key player in this modelling year by inviting me to the St. Louis RPM this summer. It was my first time participating in such an event. I've done it with other hobbies, but it was the first time for model trains. As always, I'm not a dealers' room guy, but rather one that enjoy clinics and giving them. I'll have to figure out new subjects! Scott and Lonnie were wonderful hosts and I still extent my thanks to them! As for Clark Propst, he brightened the day with is whimsical and colorful thoughts! It was a pleasure to meet him in the fresh with other talented modellers!

Finally, I've always given some thought about what I would like to do with Ste. Anne's Car Shops. I didn't commit that much to it and I clearly see that 3D printed steam parts aren't that much in demand except for a few parts. Also, I'm not big on printing at home for obvious reasons linked to health hazard and handling chemicals when cleaning after the process. However, I have drawn dozens of decal artwork ranging from modern CN to old time cars and American reefers. I wonder if I won't try my hand at it and publish them on my own. I'm confident enough in the quality of my work and Bill Brillinger does a wonderful job at printing them. So if I have some free time, I could see myself making this a dream come true.


Almost done with the plow!

And to clear the way to the new year, I close the circle by kitbashing and weathering another Walthers CN Russell snow plow! Have a great modelling year and don't shy away from building something, even if you have to start again... 90% of the fun is doing it! Enjoy, take care and may health be with you to go forward with your dreams!


Tuesday, December 31, 2024

Kitbashing a NYC 40ft Stock Car

When I was modelling the Erie Harlem Station, I acquired an old Roco/AHM Great Northern stock car after reading a kitbashing article online mentioning it was based on a New York Central prototype. RMC ran an article in March 1997 about the modifications required to bring this model on par with its real life counterpart... However, I've always been too lazy to track down the article and to be honest, I didn't care about it being 100% prototypical. I just wanted it to look "right".

My weathered old Roco stock car in Great Northern scheme

That brings us to the big reason why this car doesn't look right out of the box. When Roco tooled the car, they decided to reuse their 40ft steel boxcar underframe. The only issue was that the stock being an old single sheathed boxcar from the 1920s, it was much narrower than more modern steel boxcars from the 1940s. This manufacturing compromise made the model look a little bit massive and weird.

Another mistake was the floor moving mechanism that can be see under the sills. It should only appear on one side, but Roco made both side identical, probably to reduce the tooling efforts. There were also some discrepancies on the chain locations. This mechanism was required because these cars had two levels. This is, I think, an interesting and distinctive feature of this car and to be honest, compared to other stock car toolings of the era, this Roco car was high quality, fine and prototypical. When you think about the ubiquitous Bachmann and Varney/Life-Like ones, you want to cringe. As for the Athearn one, if was only useful to a few roads.

Gluing a styrene blade guide

From what I understand, a full kitbash would require to narrow the car, remove the mechanism on one side and greatly improve it on the other side by using metal chains and rods. All fine if you model NYC, but I asked myself if it was necessary when the goal was just to have a decent car painted and lettered according to the real thing. Thus, I decided to keep both mechanism as is, reduce the width, replace the grabirons with metal ones and use a Tichy wooden roof walk. I felt the biggest offenders were indeed the clunky ladders and details.

Nice vertical and near perfect cuts!

To narrow the car body, I looked at prototype drawings online and determine I had to remove a full scale feet in the middle. To ensure a perfect cut, I glued a 3mm wide strip of styrene right in the center on the car ends and on the roof. It would serve as a convenient blade guide during the cutting process.


When done, the car was reglued together and I improved the detailing. The old lettering was sanded down with fine sand paper as I didn't thought it required a full paint striping. I also replace the brake wheel with a nice Kadee Ajax one.

Improved B end with puttied joint

Car was primed with grey Tamiya primer and a coat of faded Vallejo Terracotta paint applied. This color is my go-to all purpose Mineral Brown/Oxyde Red paint. Using the same paint but faded with more white, I dry brushed all the details to bring them to life. I also like to lightly drybrush the wooden plank along the grain to create some visual texture and mimic paint that starts to fail on wood. No need to exaggerate the effect since just a little bit is enough to add some depth to an old car.

The primed car brings everything together

Decals were from Westerfield and barely usable since they were made for another class of NYC stock car. I had to supplement the missing data with various Microscale alphabets and car data sheets, which was a little bit disappointing. Westerfield decals quality is also quite subpar for a company that used to boast about fine modelling. The printing is extremely fuzzy and the thickness is medium. It's not as bad as Tichy, but it certainly do not compare with Highball Graphics, Black Cat and even Microscale. I wish the printing quality was higher because most of the smaller text is ineligible. That said, there was light at the end of the tunnel and I managed to piece together something quite close to the prototype.

Not to bad and weathering should make it looks even better

While I could have gone crazy with this model, I think it looks great even with only a few modifications. Sure, I may be tempted some day to replace the thick rod at the bottom with phosphore-bronze wire, but that's not a priority!

Monday, December 30, 2024

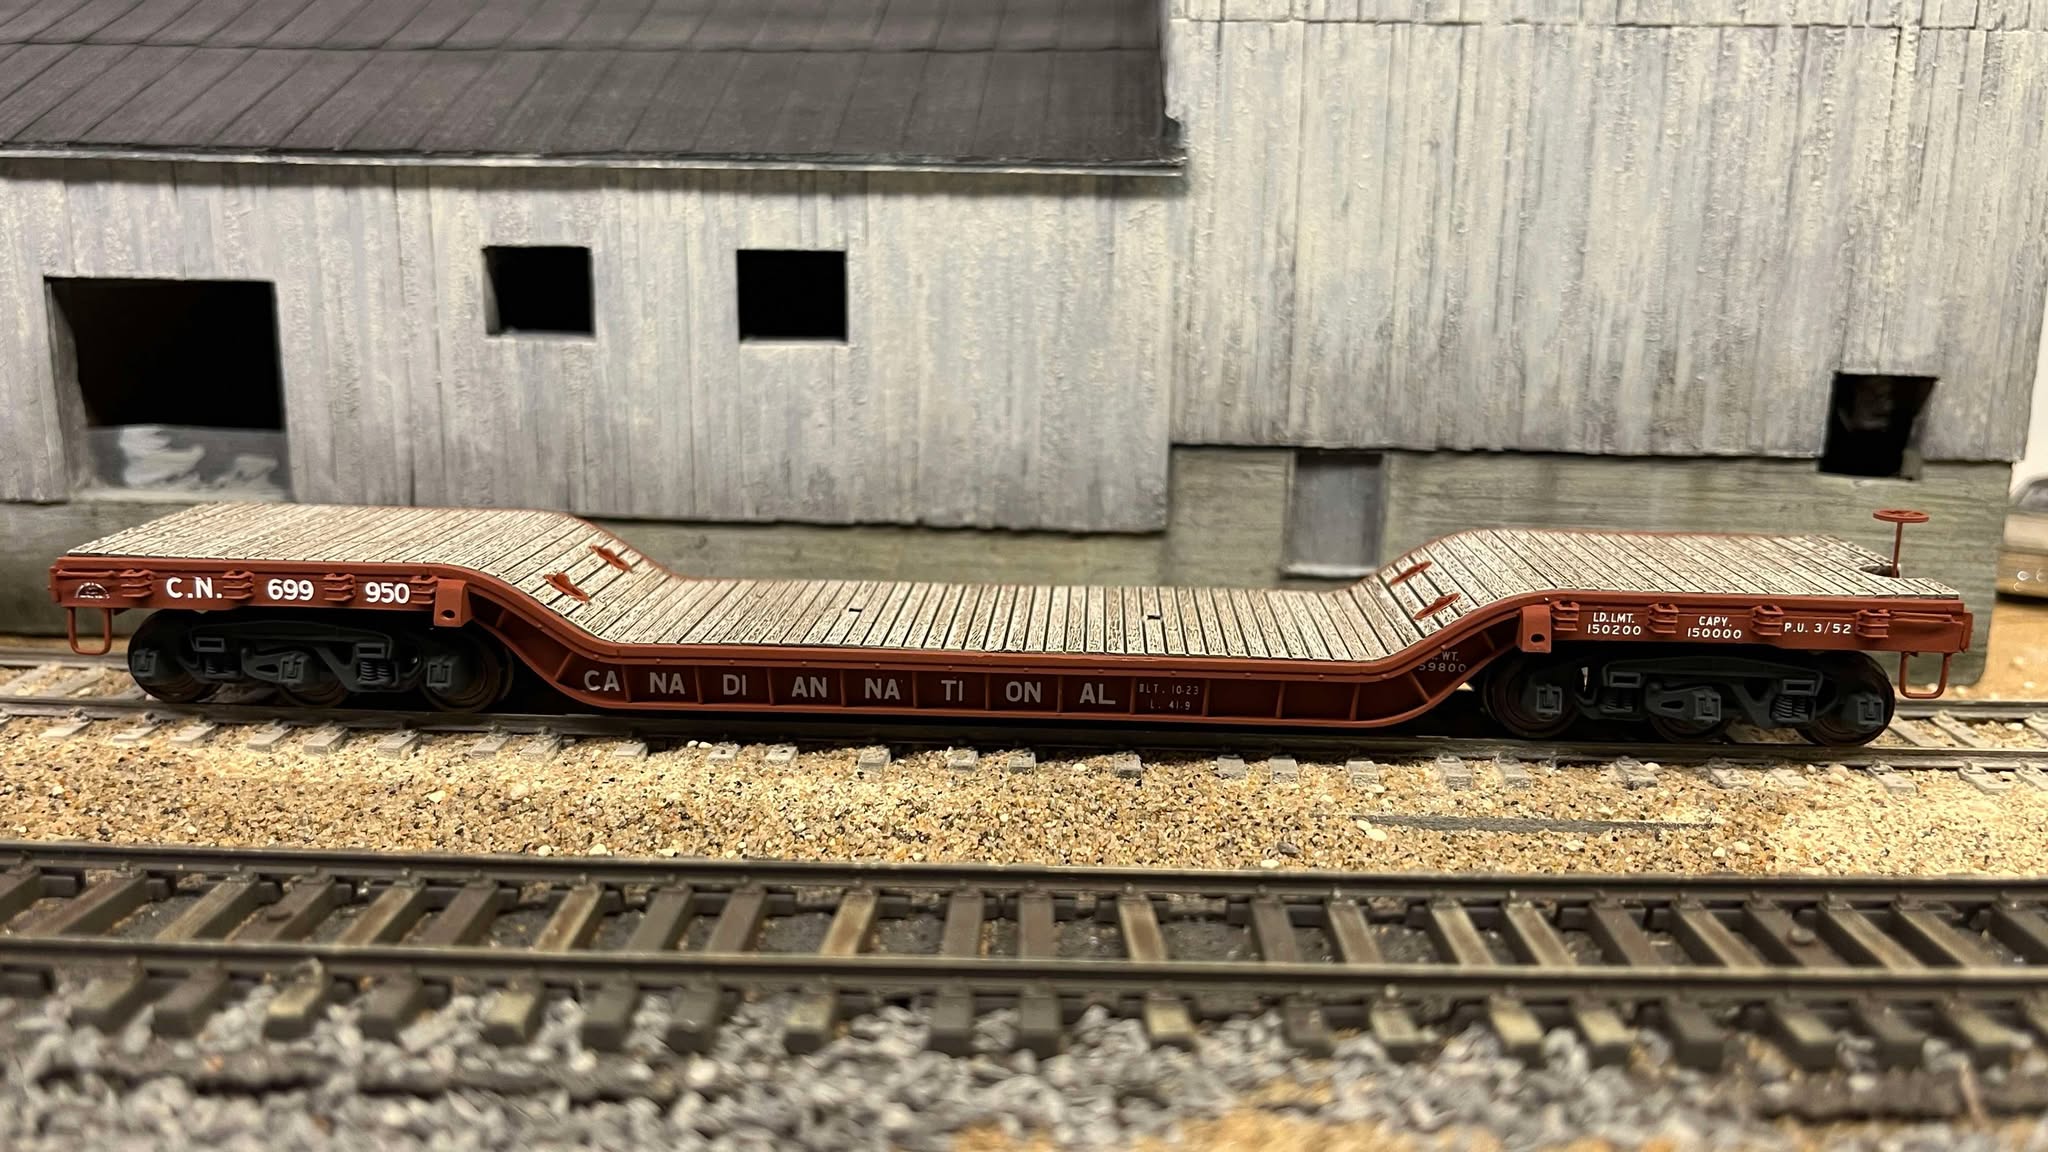
Today's project is improving/kitbashing an old Roco depressed center flat car. I acquired that car a few years ago but I no remember where. It wasn't a top priority in my project stash, but when I stumbled upon a set of Black Cat decals for CN depressed cars, I knew it was time to do it. Anyway, I was in that spree of flat cars and gondoals building, so why not continue the trend.

A kitbashed Roco depressed center flatcar


First of all, a bit of caution here. The Roco car, while looking quite similar to CN depressed center flat cars from the 1950s is too short. The 699900 series cars built by CCF in 1950 and 1953 where all 59'-9'' long while the Roco car is about 50ft long. That's quite a noticeable discrepancies and they also rode on different and longer 3-axle trucks very similar to what GSC did use back then. The Roco 3-axle trucks are much shorter, with wheels too small (Roco cars always had these weird 28" wheels instead of 33" ones) and follow a Bettendorf type.

Original car out of the box

Knowing that, I had to draw a line somewhere. I could do a heavy kitbash, which I wasn't that much motivated to endeavor since at that point, a full scratchbuild would have made more sense. Another option was to track down the Roco prototype and repaint it in a correct paint scheme (non-CN)... or simply be reasonable and find a middle ground. That's what I did and here's my reasoning.

While shorter, the Roco car really capture well the general appearance and type of construction found on CN CCF-built cars. The proportions look alright, thus, it's acceptable. Another thing is the truck. I could swap the trucks with GSC ones, but they would be too large for the car. And having smaller trucks makes the car looks longer, which is my goal. So I kept the truck. However, the car ends were very different, with CN ones having flat steel plates there with stake pockets and imposing jack pads. I thought if I had something to improve and that would make a huge visual difference, it was rebuilding the ends. So I did.

Slow chiseling work to thin the wooden deck

The first big step was to spend a lot of time making the fake wooden deck thinner and removing all kind of pesky plastic knobs and bumps inside the car to make room for lead. I haven't glued the weight yet, but I did some test and I can reach the NMRA prescribed weight, which is fantastic for a flat car.

This car won't derail!

The ends were built using styrene scraps and the jack pads were crafted using thick styrene. Yes, I sculpted them individually the old school way! A new brake wheel was added and Tichy stake pockets were glued on. Sure, there number is smaller than on the prototype to take into account the shorter car. However, it was a matter of balancing the number and how the decals would be placed.

Rebuild end

Painting was really straightforward and the wooden deck received my typical mix of light buff paint and AK Wood Wash over it. Decals were also easy to fit because I did take some measures when building the car. This is a rare case where I was thinking of lettering placement before even committing to modify the car.

Car ready for final paint and decals

All in all, it now looks like a decent CN depressed center flat car even if one could argue it's a total foobie. It will rejoin the Monk fleet where it will likely haul transformers for the paper mill in Edmunston or the hydro power plant at Armagh.

Sunday, December 29, 2024

Improving a Bachmann Quad Hopper

Back when I started this blog, I posted several articles about repurposing and repainted cheap train set cars to fill the fleet. That was before I embraced more prototypically oriented modelling. However, I always kept these older cars with me and even got donation from friends. After few year, I ended up with a considerable fleet of useless hoppers... or so I thought. Then, many years ago, when I modelled the Harlem Station in Bronx, it came to me to upgrade these old ARA quad hoppers with better details and correct decals.

B&M ARA hopper in 1929 (credit: movingthefreight.com)

Some shell were striped from paint, others got their clunky ladders removed and I even purchased several sets of decals for B&M, C&O, ERIE and other roads that did own that peculiar prototype so loved by manufacturers back in the days, but barely useful to most modellers.


Recent Bachmann tooling on top, older one at the bottom

Last week, I thought it was time to try to make a better model out of these shells. I started with a Lionel/Bachmann tooling which, like the old IHC one, have crisper details and better molding that later Bachmann cars which were made with a different tooling.


It takes a lot of patience, but well worth a try

I removed all the grabirons, ladders and small details and replaced them with Tichy wire ones. Unfortunately, the batch of Tichy drop grabirons I purchased are slightly crooked, which was annoying to rectify. A great detail was Tichy delrin stirrups. They are easy to work with and gorgeous.

I didn't bother improving the brake gear, but had to rebuild the sill ends to install Kadee coupler pockets at the right height. Some diagonal braces were added too. To be honest, this part was harder than I previously thought and I gave up adding the slope sheet bracing. That would be another detail I would add if I ever kitbash another one. I also discovered the Bachmann shell wasn't correct to place the left side grabirons. On the prototype, the configuration is similar to a small ladder. I should have known better.

In "photographic" grey primer

Then, once the sill was done, the doors were improved by adding a small angle iron connecting each pair and also, crafting door latches out of styrene strips. This detail would end up really improving the overall appearance of the cars.

Faded black and joining another B&M brother on the siding

The car received a coat of great primer and once I deemed it OK, a faded black paint was applied. I never use plain black, but rather a bluish/grayish base color for hoppers. I didn't go crazy with the weathering effects because I wanted a relatively pristine cars.

Completed model!

Decals are by K4 models which has an extensive line of nice decals generally not available from other sources. However, the decal film they use is much thicker than many other manufacturer and I had to fight with Microsol and a blade to make the decals snug around the thick rivets. Not to bad, but next time, I will do it with Solvaset, which is much stronger.

Almost ready to roll, if not for the missing coupler!

Overall, it was a fascinating kitbash that took almost a decade to finish. I'm glad to have soldiered on because this car look stunning! Will I ever try to model a few other ones in the future? Maybe, be cause I have plenty of shells and decals, but I have much more interesting projects on my plate and can hardly see with I would flood my fleet with a prototype that was indeed numerous, but not ubiquitous.


Friday, December 27, 2024

Modernizing a CN Accurail Wood Reefer

The Accurail wood reefer based on a FGE prototype from the mid-1920s according to Eric Hansmann is a versatile model generic enough to be a convincing stand in for many other reefers that graced the rails. With most details are molded on, they are crisp enough to be kept. These cars themselves are easy to upgrade, bash or superdetail to fit better what you are modelling. While not in the same category as a higher quality kits, they render excellent services to the thrifty or crafty modeller.


A few years ago, Accurail offered an early paint scheme Canadian Pacific reefer which I purchased and redetailled by adding wooden platforms around the ice hatches. Carefully weathered, it was the crown jewel of my old time fleet until I discovered the prototype picture and found out it was a foobie. The lettering was pitch perfect... but it should have been a 36ft reefer and not a 40ft one! So, now aware of the mistake, I stopped using the car, wondering what I would do with it.


Fast forward a year ago wen I was designing decal artwork for a modernized CN wood reefer in the wet noodle scheme of 1961. I always loved these clumsy applications of the new CN corporate image on cars that weren't made to wear them in the first place. When my craze of building reefers feathered out, I forgot about the project until I needed to fill a decal sheets two weeks ago and felt it would be useful to print the artwork.


The thing is I didn't have an available undecorated Accurail shell. Looking online in Canadian model shops all around the country, I couldn't locate a single car for sale. But that CP foobie was still in my collection and in need of an upgrade! It had already the wooden platforms added, so it was quite close to prototype and it would only be a matter of spraying the sides in oxyde red brown and start over again.

My old CP foobie weathered with love and care

I didn't want to remove the nice weathering on the roof, so I elected to sand down the Accurail pad printed lettering with fine sand paper. That way, there wouldn't be annoying ghost lettering showing under the new coat of paint. An aged and faded mineral red paint (modified Vallejo Terracotta) was airbrushed, weathered with pencils, details were drybrushed with a lighther shade to make them pop and oil paint washes were used to blend everything together. When dry, a coat of gloss varnish was applied, ready for decalling.


After a short while, I decalled the car, fought with air bubble because decals on wood sheathing is always a nightmare and dullcoted the model. Further weathering would be required later, but it will be for the future since I'm not currently in a weathering mood.

Repainted and with new custom decals

But the story doesn't finish here because while looking at a prototype picture, it became clear these reefers had been updated with Ajax brake apparatus. Fortunately, I always keep these parts around just in case. I lowered the brake platform, cut down the vertical staff and installed a Proto 2000 Ajax brake. The old Accurail brake wheel went on another old CN reefer which was missing his own wheel due to poor handling. That car was also finished with some custom decals.

Ready for final weathering

All in all, I'm really happy with this modernized car. An underslung charcoal heater will need to be added later on (I will probably 3D print such parts because I need a ton and I already designed it). Just a few details make it a distinctive model and when I was looking at Richard Manicom's 1963 pictures yesterday, I discovered the local trains had one of these modernized reefer in tow, just before the combine!

Look at what's hiding behind the combine! (credit: Richard Manicom / CN Lines)