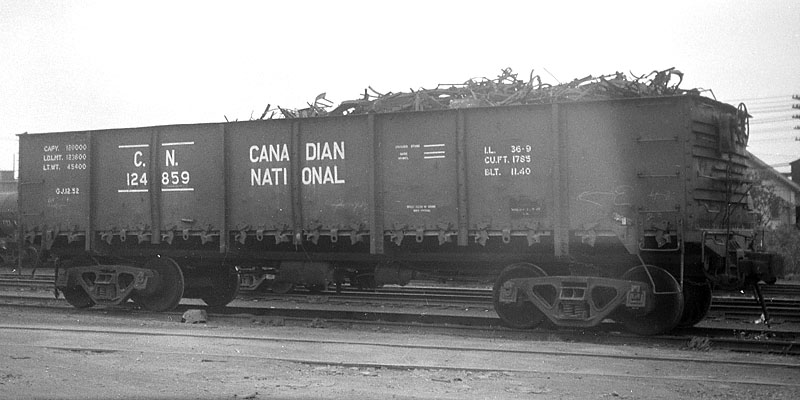
Looking at foreign manufacturers to model a particular local prototype isn't generally the first thing I do, but years ago, I discovered a drop bottom gondola made by Brazilian model-maker Frateschi was strangely similar to a Canadian National car.
 |
| The original Frateschi shell |
After comparing a few pictures, I was convinced I could do a decent kitbashed and decided to hunt down some Frateschi gondola on Ebay. It wasn't cheap for what I would call a glorified train set quality gondola, but that was fine by me to recreate an iconic piece of rolling stock. Unfortunately, many other projects came along and this model stayed on my shelves for years until last week when I thought the time had come to tackle the challenge.
 |
| Cut down shell on the table saw |
While the Frateschi car had a similar look to my prototype, it became obvious it was at least 6 foot longer than the CN prototype, maybe a little bit more. However, I wanted to salvage the intricate door opening system since it would be quite hard to replicate. So after a few tries with a jeweler saw, I glued the shell top down on a piece of MDF and sliced it on my table saw, carefully removing the ribs. With an average cut of 1/8" for each of the seven ribs, I got the correct length.
 |
| Small strips of styrene to make sure everything is square |
Each end drop bottom door latches then had to be cut and relocated as per prototype. The voids were then filled back with styrene to recreate the door profile. It went much easier than I first thought.
 |
| Moving the latches need precise surgery |
Now, it was time to glue back together the parts. As expected, the table saw cuts weren't perfect. A lot of piece of styrene were glued to the parts and an intensive session of shaving and sanding took place to make sure everything was square and sufficiently smooth. I was too worried about the joints because the new ribs would cover the scars.
The new ribs were made of several styrene strips following a method presented by Ryan Mendell a few months ago at Hindsight 20/20 RPM meet. It seriously works well.
 |
| Starting to glue new Z-bar ribs. |
The next step was to glue back the steel weight which was in all honesty, extremely light, even for a train set car. Fortunately, the was enough space between the weight and the underframe to cement enough steel shots to add a few ounces.
 |
| Steel shots glued in place using isopropyl alcohol and Future |
The underframe itself was also reduced in length following the same method as the shell. It was cemented back together and I added a few styrene strips to add strength to the joints. The empty space was then filled again with steel shots, which gave the car a quite decent weight for good tracking. In the past, I discovered it was better to glue steel shots with acrylics rather than PVA. With PVA, some che
 |
| New ribs on car end |
Car ends had to be completely remodelled. The original ribs were all removed and sanded down and new ones from square styrene strips were glued. When dry, I used a folder sandpaper to round them and get the correct stamped profile as seen on pictures.
 |
| New floor structure made of paper |
 |
| New floor made of paper glued on styrene |
Then, it was time to create a new floor since the original one was completely messed by the cutting process. Using pictures of drop bottom gondolas, I used paper and punched rivet lines with an awl until I got a decent steel frame. It was then glued to 0.5mm thick styrene sheet with solvent. The paper absorb the melted styrene by capillarity, which create a surprisingly secure bond.


Finally, I replace the sides top cord with a new styrene strips because puttying the old one wouldn't have yielded good results. Tichy hopper corner stiffeners were also added. Then the brake rigging, platform, grabirons and cut levers were added.


After some primer and paint, I was quite satisfied with the end result. The car won't be 100% prototypical, but it is quite close. It was also quite a fun project that took about a week. Fortunately, Black Cat Publishing has made correct decals for this cars, so I'll save myself a lot of work trying to piece together lettering from various sources. I've yet to decide the level of weathering this car will receive. This will depend if I make it a 1950s car or a late 1970s car. Probably the former I guess.
WOW, this is great bash. a much needed model.
ReplyDeleteThanks Mike! It's a shame there is not that much diversity in term of drop bottom gondola and air dump cars on the market. Tiring to see a Red Caboose here and a Walthers Difco there all the time! ;-)
DeleteWow is right! I hope that you will show us the completed model after you get the decal work completed.
ReplyDeleteJim @ JSSX
Certainly! I'll probably preweather the model before decal work then finish it.
DeleteLooks great.But... you really could have scratchbuilt this with A LOT less effort. I can't imagine doing that many cuts cleanly.
ReplyDeleteCheers.
My exact thoughts... But I was too far in the process when I realized a full scratchbuilt would be more efficient.
Delete