Tuesday, December 31, 2024

Kitbashing a NYC 40ft Stock Car

When I was modelling the Erie Harlem Station, I acquired an old Roco/AHM Great Northern stock car after reading a kitbashing article online mentioning it was based on a New York Central prototype. RMC ran an article in March 1997 about the modifications required to bring this model on par with its real life counterpart... However, I've always been too lazy to track down the article and to be honest, I didn't care about it being 100% prototypical. I just wanted it to look "right".

My weathered old Roco stock car in Great Northern scheme

That brings us to the big reason why this car doesn't look right out of the box. When Roco tooled the car, they decided to reuse their 40ft steel boxcar underframe. The only issue was that the stock being an old single sheathed boxcar from the 1920s, it was much narrower than more modern steel boxcars from the 1940s. This manufacturing compromise made the model look a little bit massive and weird.

Another mistake was the floor moving mechanism that can be see under the sills. It should only appear on one side, but Roco made both side identical, probably to reduce the tooling efforts. There were also some discrepancies on the chain locations. This mechanism was required because these cars had two levels. This is, I think, an interesting and distinctive feature of this car and to be honest, compared to other stock car toolings of the era, this Roco car was high quality, fine and prototypical. When you think about the ubiquitous Bachmann and Varney/Life-Like ones, you want to cringe. As for the Athearn one, if was only useful to a few roads.

Gluing a styrene blade guide

From what I understand, a full kitbash would require to narrow the car, remove the mechanism on one side and greatly improve it on the other side by using metal chains and rods. All fine if you model NYC, but I asked myself if it was necessary when the goal was just to have a decent car painted and lettered according to the real thing. Thus, I decided to keep both mechanism as is, reduce the width, replace the grabirons with metal ones and use a Tichy wooden roof walk. I felt the biggest offenders were indeed the clunky ladders and details.

Nice vertical and near perfect cuts!

To narrow the car body, I looked at prototype drawings online and determine I had to remove a full scale feet in the middle. To ensure a perfect cut, I glued a 3mm wide strip of styrene right in the center on the car ends and on the roof. It would serve as a convenient blade guide during the cutting process.


When done, the car was reglued together and I improved the detailing. The old lettering was sanded down with fine sand paper as I didn't thought it required a full paint striping. I also replace the brake wheel with a nice Kadee Ajax one.

Improved B end with puttied joint

Car was primed with grey Tamiya primer and a coat of faded Vallejo Terracotta paint applied. This color is my go-to all purpose Mineral Brown/Oxyde Red paint. Using the same paint but faded with more white, I dry brushed all the details to bring them to life. I also like to lightly drybrush the wooden plank along the grain to create some visual texture and mimic paint that starts to fail on wood. No need to exaggerate the effect since just a little bit is enough to add some depth to an old car.

The primed car brings everything together

Decals were from Westerfield and barely usable since they were made for another class of NYC stock car. I had to supplement the missing data with various Microscale alphabets and car data sheets, which was a little bit disappointing. Westerfield decals quality is also quite subpar for a company that used to boast about fine modelling. The printing is extremely fuzzy and the thickness is medium. It's not as bad as Tichy, but it certainly do not compare with Highball Graphics, Black Cat and even Microscale. I wish the printing quality was higher because most of the smaller text is ineligible. That said, there was light at the end of the tunnel and I managed to piece together something quite close to the prototype.

Not to bad and weathering should make it looks even better

While I could have gone crazy with this model, I think it looks great even with only a few modifications. Sure, I may be tempted some day to replace the thick rod at the bottom with phosphore-bronze wire, but that's not a priority!

Monday, December 30, 2024

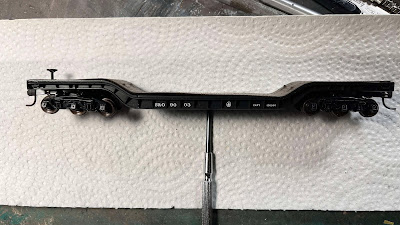
Today's project is improving/kitbashing an old Roco depressed center flat car. I acquired that car a few years ago but I no remember where. It wasn't a top priority in my project stash, but when I stumbled upon a set of Black Cat decals for CN depressed cars, I knew it was time to do it. Anyway, I was in that spree of flat cars and gondoals building, so why not continue the trend.

A kitbashed Roco depressed center flatcar


First of all, a bit of caution here. The Roco car, while looking quite similar to CN depressed center flat cars from the 1950s is too short. The 699900 series cars built by CCF in 1950 and 1953 where all 59'-9'' long while the Roco car is about 50ft long. That's quite a noticeable discrepancies and they also rode on different and longer 3-axle trucks very similar to what GSC did use back then. The Roco 3-axle trucks are much shorter, with wheels too small (Roco cars always had these weird 28" wheels instead of 33" ones) and follow a Bettendorf type.

Original car out of the box

Knowing that, I had to draw a line somewhere. I could do a heavy kitbash, which I wasn't that much motivated to endeavor since at that point, a full scratchbuild would have made more sense. Another option was to track down the Roco prototype and repaint it in a correct paint scheme (non-CN)... or simply be reasonable and find a middle ground. That's what I did and here's my reasoning.

While shorter, the Roco car really capture well the general appearance and type of construction found on CN CCF-built cars. The proportions look alright, thus, it's acceptable. Another thing is the truck. I could swap the trucks with GSC ones, but they would be too large for the car. And having smaller trucks makes the car looks longer, which is my goal. So I kept the truck. However, the car ends were very different, with CN ones having flat steel plates there with stake pockets and imposing jack pads. I thought if I had something to improve and that would make a huge visual difference, it was rebuilding the ends. So I did.

Slow chiseling work to thin the wooden deck

The first big step was to spend a lot of time making the fake wooden deck thinner and removing all kind of pesky plastic knobs and bumps inside the car to make room for lead. I haven't glued the weight yet, but I did some test and I can reach the NMRA prescribed weight, which is fantastic for a flat car.

This car won't derail!

The ends were built using styrene scraps and the jack pads were crafted using thick styrene. Yes, I sculpted them individually the old school way! A new brake wheel was added and Tichy stake pockets were glued on. Sure, there number is smaller than on the prototype to take into account the shorter car. However, it was a matter of balancing the number and how the decals would be placed.

Rebuild end

Painting was really straightforward and the wooden deck received my typical mix of light buff paint and AK Wood Wash over it. Decals were also easy to fit because I did take some measures when building the car. This is a rare case where I was thinking of lettering placement before even committing to modify the car.

Car ready for final paint and decals

All in all, it now looks like a decent CN depressed center flat car even if one could argue it's a total foobie. It will rejoin the Monk fleet where it will likely haul transformers for the paper mill in Edmunston or the hydro power plant at Armagh.

Sunday, December 29, 2024

Improving a Bachmann Quad Hopper

Back when I started this blog, I posted several articles about repurposing and repainted cheap train set cars to fill the fleet. That was before I embraced more prototypically oriented modelling. However, I always kept these older cars with me and even got donation from friends. After few year, I ended up with a considerable fleet of useless hoppers... or so I thought. Then, many years ago, when I modelled the Harlem Station in Bronx, it came to me to upgrade these old ARA quad hoppers with better details and correct decals.

B&M ARA hopper in 1929 (credit: movingthefreight.com)

Some shell were striped from paint, others got their clunky ladders removed and I even purchased several sets of decals for B&M, C&O, ERIE and other roads that did own that peculiar prototype so loved by manufacturers back in the days, but barely useful to most modellers.


Recent Bachmann tooling on top, older one at the bottom

Last week, I thought it was time to try to make a better model out of these shells. I started with a Lionel/Bachmann tooling which, like the old IHC one, have crisper details and better molding that later Bachmann cars which were made with a different tooling.


It takes a lot of patience, but well worth a try

I removed all the grabirons, ladders and small details and replaced them with Tichy wire ones. Unfortunately, the batch of Tichy drop grabirons I purchased are slightly crooked, which was annoying to rectify. A great detail was Tichy delrin stirrups. They are easy to work with and gorgeous.

I didn't bother improving the brake gear, but had to rebuild the sill ends to install Kadee coupler pockets at the right height. Some diagonal braces were added too. To be honest, this part was harder than I previously thought and I gave up adding the slope sheet bracing. That would be another detail I would add if I ever kitbash another one. I also discovered the Bachmann shell wasn't correct to place the left side grabirons. On the prototype, the configuration is similar to a small ladder. I should have known better.

In "photographic" grey primer

Then, once the sill was done, the doors were improved by adding a small angle iron connecting each pair and also, crafting door latches out of styrene strips. This detail would end up really improving the overall appearance of the cars.

Faded black and joining another B&M brother on the siding

The car received a coat of great primer and once I deemed it OK, a faded black paint was applied. I never use plain black, but rather a bluish/grayish base color for hoppers. I didn't go crazy with the weathering effects because I wanted a relatively pristine cars.

Completed model!

Decals are by K4 models which has an extensive line of nice decals generally not available from other sources. However, the decal film they use is much thicker than many other manufacturer and I had to fight with Microsol and a blade to make the decals snug around the thick rivets. Not to bad, but next time, I will do it with Solvaset, which is much stronger.

Almost ready to roll, if not for the missing coupler!

Overall, it was a fascinating kitbash that took almost a decade to finish. I'm glad to have soldiered on because this car look stunning! Will I ever try to model a few other ones in the future? Maybe, be cause I have plenty of shells and decals, but I have much more interesting projects on my plate and can hardly see with I would flood my fleet with a prototype that was indeed numerous, but not ubiquitous.


Friday, December 27, 2024

Modernizing a CN Accurail Wood Reefer

The Accurail wood reefer based on a FGE prototype from the mid-1920s according to Eric Hansmann is a versatile model generic enough to be a convincing stand in for many other reefers that graced the rails. With most details are molded on, they are crisp enough to be kept. These cars themselves are easy to upgrade, bash or superdetail to fit better what you are modelling. While not in the same category as a higher quality kits, they render excellent services to the thrifty or crafty modeller.


A few years ago, Accurail offered an early paint scheme Canadian Pacific reefer which I purchased and redetailled by adding wooden platforms around the ice hatches. Carefully weathered, it was the crown jewel of my old time fleet until I discovered the prototype picture and found out it was a foobie. The lettering was pitch perfect... but it should have been a 36ft reefer and not a 40ft one! So, now aware of the mistake, I stopped using the car, wondering what I would do with it.


Fast forward a year ago wen I was designing decal artwork for a modernized CN wood reefer in the wet noodle scheme of 1961. I always loved these clumsy applications of the new CN corporate image on cars that weren't made to wear them in the first place. When my craze of building reefers feathered out, I forgot about the project until I needed to fill a decal sheets two weeks ago and felt it would be useful to print the artwork.


The thing is I didn't have an available undecorated Accurail shell. Looking online in Canadian model shops all around the country, I couldn't locate a single car for sale. But that CP foobie was still in my collection and in need of an upgrade! It had already the wooden platforms added, so it was quite close to prototype and it would only be a matter of spraying the sides in oxyde red brown and start over again.

My old CP foobie weathered with love and care

I didn't want to remove the nice weathering on the roof, so I elected to sand down the Accurail pad printed lettering with fine sand paper. That way, there wouldn't be annoying ghost lettering showing under the new coat of paint. An aged and faded mineral red paint (modified Vallejo Terracotta) was airbrushed, weathered with pencils, details were drybrushed with a lighther shade to make them pop and oil paint washes were used to blend everything together. When dry, a coat of gloss varnish was applied, ready for decalling.


After a short while, I decalled the car, fought with air bubble because decals on wood sheathing is always a nightmare and dullcoted the model. Further weathering would be required later, but it will be for the future since I'm not currently in a weathering mood.

Repainted and with new custom decals

But the story doesn't finish here because while looking at a prototype picture, it became clear these reefers had been updated with Ajax brake apparatus. Fortunately, I always keep these parts around just in case. I lowered the brake platform, cut down the vertical staff and installed a Proto 2000 Ajax brake. The old Accurail brake wheel went on another old CN reefer which was missing his own wheel due to poor handling. That car was also finished with some custom decals.

Ready for final weathering

All in all, I'm really happy with this modernized car. An underslung charcoal heater will need to be added later on (I will probably 3D print such parts because I need a ton and I already designed it). Just a few details make it a distinctive model and when I was looking at Richard Manicom's 1963 pictures yesterday, I discovered the local trains had one of these modernized reefer in tow, just before the combine!

Look at what's hiding behind the combine! (credit: Richard Manicom / CN Lines)


Thursday, December 26, 2024

Improving Athearn Blue Box 40ft Gondolas

When you look at Monk subdivision pictures of the 1960s and 1970s, a lot of traffic was travelling on flat cars. Mainly piggyback ones similar to the ones produced by Rapido, but also more mundane ones from earlier eras. Over the years, I accumulated a few Athearn 40ft flat cars through people giving away old broken rolling stock to the club. Must of them add stake pockets broken due to mishandling and one had lost a few stirrup steps. While these cars are outdated and not prototypical on CN, they still are close to a few groups of cars the company owned. So, since I have them, they cost nothing and can be improved greatly with some adequate detailing and paint, it was just a normal thing to use them.

As with many projects, this one started maybe two years ago when I went through a kitbashing spree then let them gather dust – literal dust – on my shelves. While tidying up my collection last weekend, I got fed up seeing that pile of Athearn undecorated shells and trucks lying around and thought I would complete the job illico presto.

The first main job, after striping the paint, was to add wood texture on the deck. As always, my trusty razor saw blade and some very coarse sandpaper helped me to achieve that result. It’s a matter of only a few minutes and it greatly improves the appearance of an ubiquitous kit.

 As for the other steps, it’s basically a straightforward project: cut the funny brake wheel stand, repair the stake pockets with styrene channels and bits, drill holes, install new metal grabirons and A-line stirrups where needed. The new brake wheel – an Accurail one from their old time kits – is mounted on a piece of wire secured on two little bits of styrene. If you are more motivated than I am, having a more detailed brake apparatus is certainly welcomed and you also can add a cut lever.


The big surgery I made was to the underframe where I cut a notch into the main fishbelly beam to add more weight. Lead wheel weight without the adhesive strips to save space were glued on the kit metal plate, then I put in place the frame. In this way, the weights are both glued and mechanically secured. I added about 1.25 oz. but could add more if required to get the NMRA recommended weight. To be honest, with metal wheels, they are already quite heavy. I will have to think about doing something similar with the Red Caboose and Tichy flat cars which are criminally feather weight.


When detailing and assembly was done, I covered the models with Mr Hobby mahogany primer which is quite useful when painting cars in boxcar red since it’s dark brown. When dry, a coat of Vallejo Terracotta paint was sprayed and left to dry. I find the different tones of Vallejo Terracotta paint to be extremely useful for a good Mineral Red/Red Oxyde/Boxcar Red color. The Air version is slightly more brightful while the regular version is somewhat duller/darker. Both looks good and I often mix them together.


Finally, just like all my other flat cars, the wood deck was painted with off white acrylic paint and aged with AK Interactive Wood wash. I'm always impressed how this small but significant touch of color makes a big impact on Athearn flat cars.


As for decals, they are custom made using an Intermountain 42ft flatcar and prototype CN pictures as a general guide. They were printed by Bill Brillinger at Precision Design Co. (www.pdc.ca) with many other decals that will be used for other projects. I always found his decal sheets to be very high quality and that’s neat to get custom decals made directly in Canada.

Monday, December 23, 2024

Drummondville Station - A Scratchbuilt Clone

Imitation is the sincerest form of flattery the old saying says, so imagine my surprise this morning when Jeff Boudreau from the Drummondville Railway Modellers Association (AMFD) wrote to tell me they had almost completed their version of the Drummondville VIA station based on my sets of drawings and 3D printed parts.

Drummondville station almost done (credit: AMFD)

Many years ago, I scratchbuilt that very station for a friend as a personal challenge. Intricate brick work, custom details, very large size, etc. It was a beast to build and when finished, the AMFD members certainly wanted it... or should I say, a copy of it. Back then, I sent them my modelling notes from my blog and 3D printed parts. They have a few very talented builders in their club, but it seems the task was quickly seen as a pretty involved project and was put rightly so on the back burner. They had measured the building just in case, but the time wasn't right to move forward. At that point, I thought their project was DOA but never underestimate modellers who need their signature piece.

Marcel Haché working on his masterpiece (credit: AMFD)

Fast forward few years and Marcel Haché, as I did many years ago, took up the challenge and tackled the beast. Not only did he do a fantastic job, but he also managed to fool me believing for a few seconds it was my own station. The colors, the details, the way it was assembled and even the blinds in the windows! He outdid himself and I'm really glad that the club now has the centerpiece it always wanted. On a side note, I'm pretty sure Marcel modelled the interior because Jeff Boudreau once told me they had surveyed the partition walls in case their would replicate the station in HO.

The station on the layout (credit: AMFD)

That was probably the most fantastic early Christmas gift I could hope for!!

Monday, December 16, 2024

Building Long Overdue Kits

Like any modeller, I have accumulated a dreadful backlog of unbuilt kits over the years. We always think we will find time for these projects, then new shining things appear and they are forgotten until the end of time. Since I can't work on the layout for two weeks due to the drain repairs, I decided to tidy up the collection and work on kits that were in dire need of attention.

Among these kits were a few Proto 2000 8,000 gallons tank cars which were notorious for being a challenge to build. You can always find a few of them pre-owned and unassembled. A few years ago, I got my hand on 3 Champion Oils - Sterling Fuels kits which would fit perfectly a 1950s-1960s consist. Having nothing better to do, I worked on them over 2 evenings at a leisure pace. First, they are much easier to assemble than I remembered and they are so beautiful. Honestly, I suspect that my painful memories of these cars were caused by my poor modelling techniques back in the days. I didn't clean well the parts from the sprue and used CA glue for everything. Not a recipe for good results. That said, I will still have to do some decal work because out of three cars, one is a duplicate. Shouldn't be hard to fix.


The next group of kits were Red Caboose 40ft flat cars in CN paint schemes. They are not that prototypical for CN, but they are still acceptable. It was my first time working with older Red Caboose kits and I must confess I felt some aspects of them are a little bit crude while other are exceptionally good. They are easy to assemble and painting the wood deck makes a big difference. I use an off white base and brush over AK Interactive Wood Wash to create the wooden effect. Mind you, this is only a first step as I intend to weather the decks later as they should be. Be aware that every time I model a wooden deck, I add wood texture using a razor saw blade over the plank. I really go over board with that and it's fine. The job is finished by removing the fuzz with a coarse sandpaper run along the wood grain. As you can see, it looks good for new wood. I will also have to renumber of the flat cars due to duplication.

Wood deck not yet painted

After these cars, I turned my attention to a group of two Tichy 40ft flat cars that were assembled years ago but never painted. I completed some details and painted them. They also got the wood deck treatment and are now ready for decalling work.

Ready for decalling

Another group of cars were a pair of Proto 2000 CN 52'6'' mill gondolas. I always loved these cars since I acquired one back in high school and took the time to assemble them carefully. I upgraded the snap-on coupler pocket covers with screws, which is now my standard practice. Wood decks were painted and the cars finishes in a matter of maybe 2 hours maximum.


Having been more proficient while assembling the kits, I was able to set aside enough spare grabirons and stirrup steps to repair my original CN mill gondola from 25 years ago. Back in the day, I had repaired the broken steps with heavy brass wire. It looked terrible and I thought it was the perfect time to bring that car to life again. Coupler pockets were upgraded, the wooden deck disassembled and painted. Some time was also spent to tidy up the botched brake rigging underneat the car. Some paint touch ups on the new stirrups made everything blend together and it was rewarding to see this car under a much more flattering light after all these years of neglect.


With these cars assembled, I can say that I have cleared up a bunch of CN cars required for Monk. However, I still have a lot of cars to build or paint. I'm not sure if I will go forward right now with these projects, but just to give you an idea, I have about 10 reefers from the 1950s that need some work and also several tank cars to rebuild to complete my British-American Oil fleet. We shall see! But I have also a special project about upgrading Athearn 40ft flat cars to join the expanding Monk fleet.


Saturday, December 7, 2024

Monk Subdivision - Raising the Benchwork

Benchwork along the wall must be remove

Due to a major drain failure back in October, a new pipe will have to go down the hobby room. To prepare the space required to install the new drain pipe, parts of the benchwork have to be temporarily dismantled. At first, I was far to be excited by the news, but in hindsight, it's an excellent opportunity to improve things a little bit.

Cutting the painted MDF backdrop in advance

As I mentioned in previous post, the track height was something that bothered me for a long time. I'm generally a fan of layouts were I can feel immersed and watching trains from the trackside. The height was quite good in Armagh, which was at 49.5 inches high. This height corresponds to the unbuilt second level staging. Since this won't be built, I had to make a choice: set the height at 45.5 inches because the current staging is at this height, or raise everything to 49.5". my first choice was to keep things as they were, but when I started to mockup scenery using my photoshoot diorama, it wasn't cutting it for me.

The raised benchwork on brackets

So today, while dismantling parts of the benchwork, I decided to raise a section under the cabinets to see how it would fare. The backdrop height was reduced and the benchwork raised on metal shelf brackets. Sure, the backdrop is now only 11-12 inches high, but the track is at the right height and the floating effect of the layout over the base cabinets is much better than before.

Mocking up a scene

I was always struggling for shelf space to put tools or materials when building this layout and this 8 inches high gap between the layout and counter top is already very useful. Sure the downside is having only 12" of vertical space which isn't ideal for photography, but I'm thinking about painting the cabinets underside in blue to blend it with the back drop.

This is about 12" high for a framed scene.

Since it worked so well, I'll need to raise the other sections. This will also provide the opportunity to replace the cumbersome swing gate with something better. And to be honest, that extra 8 inches means that having a duck under in this area is much more acceptable. I'm currently exploring the idea of building a lightweight movable section and maybe even recycle an old lauan plywood module that was built many, many years ago for the Temiscouata Railway layout.

Good lighting will be required to make it pop!


Friday, December 6, 2024

Modelling Le Tortillard du Saint-Laurent

An iconic part of modern Murray Bay Subdivision are the numerous attempts at kickstarting touristic trains based to link the highly sough after Charlevoix area with Quebec City. Granted the majestic landscape only seen from the railway is a understandable incencitive to provide such a service.

Excursion trains weren't a rarity on the line back in the days and even the famous CN 6060 pulled a passenger train in the 1960s. However, it's only in 1984 that a regular service tourist train was put in service to take advantage of the 450 years anniversary of Jacques Cartier's first voyage to Canada. In Quebec City, an ill-fated event called "Les Grands Voiliers" (The Great Sail Ships) was expected to draw hundred of thousands of people to the old capital and it was thought that a touristic train would be the perfect opportunity to draw crowds to Charlevoix.

A man, Jacques Leblond, with a few associates, dreamed of a train but they had to "build" one from scratch on short notice. Through various contacts, they were able to rent a few GO Transit Bombardier bilevel coaches, refurbish an old baggage car into a generator car and secure CN participation in providing a GP9RM freshly out of the shops to pull the consist. That strange looking train was quite unusual, but struck the imagination of the crows and with an indeniable sense of creativity, provided an enjoyable experience to passengers.


That train was a popular success and was reconducted for an another year, but it hardly made money and was cancelled until the idea was revived in 1995 by another group of investors.

My personal link with this train was that it was my first time riding a train up until the mid-2005. I was two years old and my recollection are barely reliable. But it made an impact and since high school, I wanted to model it in HO. It was a hard thing to do, but when Proto 2000 released short hood GP9 in CN colors and Athearn made the bilevel coaches, it became a possibility. However, It's truly when Rapido made a newer and better version of the GO Transit coaches that it really became a serious possibility. I quickly ordered six coaches and bought a Supercontinental smooth side baggage car to repaint in Tortillard du Saint-Laurent scheme. Finally, last month, when I visited Vermont & Essex Club, I stopped en route to Modèle B.T. in Drummondville and acquired a Rapido GP9RM identical to the one pulling the Tortillard (OK, granted Rapido made locomotive #4028 instead of #4027, but I can live with that).

Tortillard as described in Branchline July-August 1985 issue (Bytown Railway Society)

Jérôme had the pleasure to inaugurate the train on our layout and honestly, it was a fascinating sight and something interesting to run. I can certainly see operation potential around that train.

The next step was to design custom decals for the generator car which was done quickly and now, it just a matter of ordering the decals and painting it up.

Monday, December 2, 2024

Monk Subdivision - Armagh Station Drawings

This title can be misleading if you believe I found architectural drawings of Armagh station. On the contrary, I have nothing on my hand except a few very blurry old pictures from the 1950s and a 3/4 view of the east gable when the station was in derelict state in the 1970s. From these pictures, we can surmise the station was very long, with an extended freight house section and most likely based on standard Grand Trunk Pacific designs, which was common on National Transcontinental Railway. That's where the detective work starts to find a few key information such as general dimensions, internal layout, roof geometry and many more. So here we go! 

This is probably the best picture of Armagh Station (source: Facebook)

One of the first thing that we know is that GTP had several standard designs classified by letters: Type A, type B, type C, etc. With that knowledge, I wanted to see how far I could go online, within a day, to find everything I needed to replicate a decent version of Armagh Station.

The first step was to Google simple terms such as "Grand Trunk Pacific" "Station Drawings" "Type E". Luckily enough, there was a short PDF file produced by the Province of Manitoba which collated informations taken from Charles Bohi’s book "Canadian National’s Western Depots". In the PDF, there was a set of station plans identified as GTP Type D and Type E, with Type E looking identical to Armagh if not for the shorter freight house. Upon further investigation, it appeared the authors had inverted the caption and it should have been Type D.


Drawings recovered from a PDF (credit: Province of Manitoba)

I tried to find it Library and Archives Canada had some drawings online, but I didn't find a lot to help me. So I imported that drawing into SketchUp, a 3D modelling sotfware, and scaled it to HO. I didn't take long to have an entire set of drawings, however, no a single one was fitting with the other one, particularly in the roof. I was puzzled until I manage to discover that these drawings had been pieced together and badly stretched, making them only reliable in the X axis. Unfortunately, the drawings were so blurry it was impossible to read what was written, including the dimensions. I could fiddle a bit, but I needed more help.

Scaling the drawings became quite tricky

That help came from Charles Bohi's book which I searched for a copy online with the intention of probably buying it. It wasn't hard to find and some only shop displayed a few pages to show the content. Once again, luck was on my side because of there very few pages, two were about station Type D, listing interior and exterior dimensions that I could use to scale the drawings from the PDF. Better, Bohi was giving an excellent description of the hipped roof shaped, in particular the presence of a flat spot on top of the station main building. That was the key to understand why I couldn't make sense of the roof. It was just a matter of time before I had a set of perfectly scaled drawings that could be used to built a station.

However, the extended freight house layout didn't seem to be a standard practice on GTP and since I only had very poor pictures of Armagh, I was hard to guess the overall dimensions and location of doors and windows. It then struck me that since Armagh was a sizable town on the line and the midpoint between two division points, it was probably why the station was so large. You only require such a warehouse if you have a lot of goods for larger customers. It was a common pattern on the old Monk Subdivision: many station had GTP layouts but with extended freight house. If such a thing was common on Monk, it would also be shared by stations on other NTR subdivision.  At that point, I asked myself which towns in the Abitibi area could have such a larger stations. I selected Amos because it wasn't a division point, but still a very large settlement.

Amos station in 1945 (source: BAnQ)

I tried finding information on Quebec National Archives (BAnQ) and found many pictures of the town in the 1910s up to the 1940s. Not only the station was almost identical to Armagh, but I even had aerial pictures of it. In general, Amos station photographs were of much higher quality, with helped to figure out key details and dimensions. The only noticeable difference was the location of the second freight house door.

Extract of Amos insurance plan by Underwriter's Laboratories (source: BAnQ)

But while these pictures were of a great help, I still needed to figure out exact dimensions of the extended freight house. At that moment, it crossed my mind that such a large town as Amos was bound to have been surveyed by insurance company mappers. A quick BAnQ search shown it was the case and that the station had been documented. This was the final piece of the puzzle and what I discovered was a very large station that really as a lot of presence.

Locating the freight house openings in Illustrator

The last big challenge was locating with some precision the openings that existed in the freight house. Most pictures of Amos and Armagh stations are shot in such angles that you can't see everything. However, we can assume there was, from left to right, two large sliding doors, two windows, a door and, most likely, another window right by the telegraphist bay.

Crude 3D rendering of the station

At that point, I was content with my work and the 3D model fitted almost perfectly the photographs of Armagh Station... until Chris Mears pointed out that CP Tracks website had PFD files of old GTP drawings! They had the 100-154 drawings available in much better quality, even though it was based on a photocopy and some deformations were clearly visible. The interesting part is these plans were different from the one shown in Bohi's book. They are quite similar, sharing the exact same dimensions and window placement, but I could see that interior partition walls in the office was different and there was much more details on chimneys. Also, there was a basement right under the office, something I wasn't aware.

Using that new data, I compared my first draft and started to correct it. The section drawing were of higher resolution, so I was able to figure out the way they built the curved roof eaves. That was the linch pin to finally get the dormers right.

Improved drawings

All in all, it was a fascinating and quick project while I can barely do nothing on the layout. I had some issue with the sanitary drain and a contractor will replace it by Christmas. It means a new trench must be dug in the concrete floor of my hobby room to install the new pipe. I will give me an opportunity to improve the benchwork and backdrop later on.

Meanwhile, I will check if it's worth 3D printing or scratchbuilding the station. Maybe it will be a mix of both mediums. I feel like 3D printing is cheating though!