British-American used to be a staple name in Canada for many decades.
After a merger with Gulf in the 60s, the company name quietly
disappeared from the landscape. But before that happened, they operated a
large fleet of tank cars across the country. Built at various dates,
spanning technologies from the 1910s to the 1950s, the fleet was far to
be unified and many oddballs could be spotted here and there.
Interestingly,
the fleet was transferred to CGTX and renumbered. While some cars
quickly disappeared from the rails, many of them survived well into the
80s while a few even saw regular service until the early 90s. Among them
were 3-dome cars, very old riveted tank cars and more recent ones,
including propane cars.
The most striking feature was the
attractive B-A logo informally called the “roundel”. A very few color
pictures of B-A cars are available online, but the bright logo was a
quite a sight on dark colored tanks. Most tanks were black, but
supposedly, evidences of color – mainly dark green – exist. I’m far to
be a believer, but that could make sense and photo quality doesn’t make
it easy to tell. If it was green, it was a very dark one. A later paint
scheme sported a light colored horizontal stripe on the middle of the
car. Black Cat Decals suppose it was yellow or light orange. Honestly,
it’s hard to tell from pictures I’ve seen. One thing is sure; it can’t
be white since a stark demarcation between the logo’s white contour and
the stripes is visible. My best guess would be this stripe was probably
light yellow, almost cream colored. Also, Black Cat claims there are
evidences the upper half of these cars was dark green. Honestly, I’m
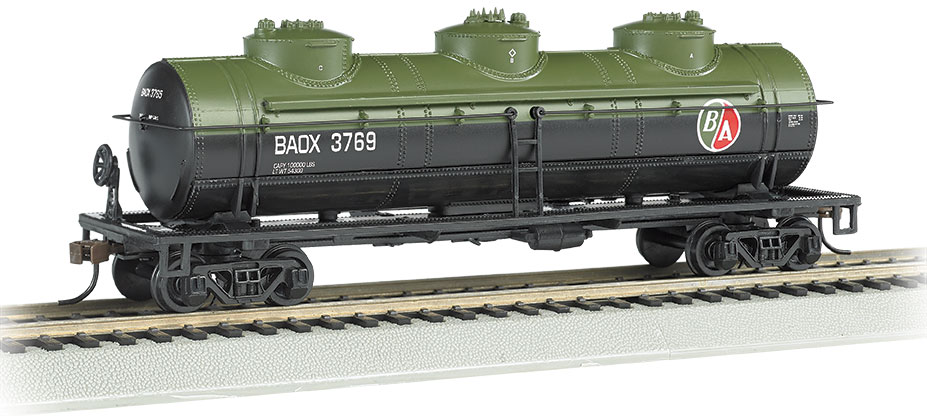
puzzled about that. When Bachmann recently released their 3-dome tank
car in B-A scheme, they followed that route. Attractive, but is it real? I'm more than skeptical.
To make sure, I processed official Bachmann picture in Photoshop to see how it would look in black and white. I followed a process used by pro (not simply doing grayscale) which give a little bit more realistic results. As you can see, if you don't you the car is green, you'll have a hard time telling if it is painted with two colors.
 |
| Bachmann Trains (shop.bachmanntrains.com) |
 |
| The same after some Photoshop editing |
I was curious and took the most likely picture of a BAOX tank car to be painted in the two-color scheme. Slightly adjusting contrast in Photoshop immediatly yielded some interesting results. As you can see (circled in yellow), the car's ends are clearly darker than the upper tank body. Such demarcation doesn't exist on the inferior part. Also, the "B" from the B/A logo is painted on a "green droplet". The droplet background color is quite similar to the tank car. The "A" background is red and there's definitely a sharp contrast with the tank. Also, you'll see the red color is almost similar to the black part, which is a common occurence with B&W photos. Other interesting facts are that I'm seriously thinking the platform was black with green railings and ladders. Final touch, the horizontal stripes are indeed darker than I thought. The yellow-orangish color is more than probable. As for the green shade, according to the B/A logo, it was slightly lighter than the green "droplet".
Seriously, I can't believe almost no color pictures of these attractive cars can be found anywhere! If anybody have knowledge about these cars, let me know.
 |
| Original photo: Ian Cranstone's private collection (nakina.net) |
Anyway, the best part is that CGTX didn’t bother to repaint all
BAOX cars. They only replaced the reporting marks on many of them. So,
it wouldn’t be a stretch to believe a car could have travelled Murray
Bay Subdivision and be spotted at Clermont where an oil dealer existed.
Sure, probably many cars got repainted in plain black later one.
Let’s
talk about the model. The easiest way to model a B-A car is to start
with a Tichy 10000-gallon tank car. Another viable option is to use
Proto 2000 and Intermountain cars. All of them can fit a prototype or
another. This is how Jim & Jeremy Spurway modelled their B-A fleet
with good results.
However, I don’t have any available
car to use on hands (and I don’t want to repaint my Proto 2000 Canadian
Petroleum fleet). It’s just I’d like to use a set of Black Cat decals I
have and don’t know what to do with them.
After looking
at several pictures and searching through Ian Cranstone’s excellent
website dedicated to Canadian freight cars, I came to the conclusion I
could model a
12,500 gallon welded tank car from the 1950s. Those were
still in revenue service in the 80s.
After some
consideration, I came to the conclusion a good old Athearn single-dome
tank car was the easiest way to achieve my goal. It would require
removing all rivet details, platforms and ladder, but generally
speaking, the model would be very close to a 12,500 gallons tank car. My kitbash will try to closely follow car series BAOX 8XX.
After
an hour and a half, all the wrong details were removed from the tank
and underframe. The tank was dipped in Super Clean all night long and in
the morning, all the paint was dissolved.
Using styrene strips, I added some steel beams at each underframe ends up to the bolster according to prototype pictures. A-Line stirrups and metal grabirons were added, including modified Tichy ladders.
Next,
I built up a new platform around the dome. I decided to use a Tichy
metal grid pattern roofwalk and assembled a new platform. Then, using a
0.25mm styrene sheet, I cut a correctly-sized hole that fitted the dome.
When done, I cemented the steel platform to it. I didn’t bother to cut
the styrene sheet to length and left it exceeds the platform. I prefer
to cut it later when all the sand and cutting is done.
Next
step was to remove the protruding steel grid over the hole. I started
with a Xacto then sanded it smooth with a half-round jeweller file.
Finally, the styrene sheet was cut to size. The result was more than
acceptable!
I also added grabirons at each tank’s end.
When I removed molded details, I took care to keep the nuts in place.
Later, I found out the distance would fit perfectly a 18 inches drop
grabiron. It made my life quite easier!
At this point, I reassembled the car after stuffing it with lead weight. Then, I completed fine detailing prior to priming.