Sunday, January 1, 2023

A Year In Review

2022 was probably, in hindsight, my most productive year ever as a modeller and I’m not saying it lightly. Listing everything here would be a fool’s errand, but just from the top of my head, it includes completing more than 16 linear feet of scenery on the club layout, including the entire paper mill, replicating a few real houses, experimenting with various carving and weathering technique, customizing over 3 dozens 40ft boxcars, designing a Grand Trunk caboose kit, overseeing the final steps that led to the release of two Canadian National woodchip cars, building the backbone of my future Monk Subdivision layout (including wiring), compiling modelling notes about British-American tank cars, writing a book chapter on weathering and finally, going all out about early Canadian railways modelling. On top of that, starting the adventure of launching a cottage industry of custom parts and kits, which I have no idea where it will lead. My only regrets is not having had enough time to write up a few articles I’ve been asked for by a major publication… something I’d like to do in 2023.
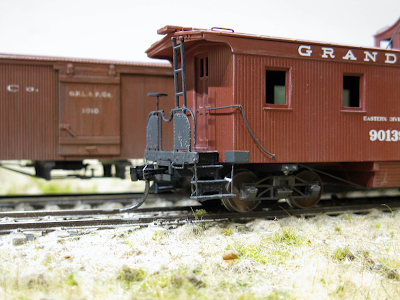

It is probably the first year ever I’ve felt I know what I’m doing, that I’m starting, humbly, to master my art, find my groove and my personal artistic approach to modelling. I see myself less and less relying on others’ work as a template and building more on my skills and experience. It doesn’t mean I’m working in isolation, but rather that I no longer look at other’s recipe, but prefer to understand the logic behind their choices and make what I can out of that. Armour modelling, mainly Martin Kovac’s excellent and entertaining videos, have pushed me to try things without fear. That’s mainly true about weathering which I no longer approach from a step by step process, but rather as an additive artistic process. In that regard, it was inspiring to see Hunther Hughson taking the lead in challenging the common wisdom of model railroad weathering. I think he has shattered many misconceptions and started to freed many people’s mind. That said, it is never easy to go against the grain and often, when I tried to challenge the crowd this year, I could read many comments that wanted to go back to the old ways. Not that I care which way is better, but it is a little bit sad to see that many are too afraid to try, only once, something different and see if it works for them. I’ve always been the kind of person who want things to stay accessible and pragmatic, and when I challenge people, it’s generally because I believe that just changing one or two steps in a well-known process can enable surprising results.


The year has also been full of 3D printing adventures. I was, to be honest, about to simply drop the towel and leave that technology to others, but has I mentioned to Trevor Marshall this week, I’ve finally reached the point where 3D printing is no longer that frustrating one-fits-all solution, but a convenient tool in the toolbox. It’s not the beginning and end of everything, but something that has its place for some stuff. I’ve also learned the hard way the limitation of the machine and resin, which made me confident in developing new products such as the CNR steam conversion mini-kits or, more recently, the old time Canadian freight cars that can be designed in less than 6-8 hours and printed in about 2-3 hours at max. I’ve even been able to print an entire station in one shot, which was a huge confidence boost.


Later in the year, when I knew I had to wait to continue working on Monk Subdivision, I thought about finally building an old design of mine based on a small Quebec railway terminal using a minimal footprint. This is, in some way, the spiritual successor of Connors. Over the last few years, I’ve developed a keen interest in pre-CNR railways in Canada. This theme is generally not covered by the hobby press or even social media which, to be honest, is somewhat surprising. When we think old time in North America, it’s the narrow gauge lines or other fanciful endeavor. The late Craig Bisgeier’s Housatonic Railroad used to do a good job a tackling the subject in a honest way. As for Bernard Kempinski, his work on the U.S. Military Railroad in O scale can be considered top notch museum quality with the caveat of being so well-researched and executed with such talent that it can be intimidating. Also, let’s not fool ourselves, the American Civil War is basically a non-event for Canadians and I’m not sure it is a good vehicle to promote 19th century railroading here in Canada. We know about it, but it doesn’t resonate with our identity and history. However, I tip my hat to Bernard for tackling such a terrible subject with such tact, taste, elegance and talent. Another one to add to this list would be John Ott’s imaginary Miskatonic Railroad, which replicate the heydays of 19th century railroading in the Northeast, but even his work with intricate paint schemes of the Victorian era can be intimidating to any mid-level modeller.


That said, in Canada, the subject is almost taboo as if anything before 1918 was irrelevant for the modeller. Nobody talks about it… except Rene Gourley who, for some reason, has decided to heroically soldier in Proto:87 to replicate the Canadian Atlantic Railway in HO scale. Rene’s endeavor is so frightening and imposing that even him regularly write about how this subject can be crushing! That’s plain madness, the kind of gorgeous madness that provides inspiration and doubt at the same time! Yes, it is!


Strangely enough, Canada was one of the earliest adopter of railways. One of the earliest project was devised in 1830 to provide Quebec City with a winter port on Maine’s coast when commercial railways were in their infancy. During all the 19th century, the talk in town was about trains. Countless colorful companies were created in the same fashion that happened in the United States. However, since most funds and many engineers came from the United Kindgom, our railways had a distinct British flavor that gave it a touch of originality. Americanized Birkenhead locomotives being probably the most eloquent example, or the practice of lining cabs and tenders during the Grand Trunk era. The country was crisscrossed by small rural branchlines, regional carriers and transcontinentals. All built under a fever dream that couldn’t be stopped. We may, nowadays, often forget that most of our key rail infrastructure was designed and built in the mid and late 19th century.


So, for the last few months of the year, I’ve been pondering why nobody was modelling that great era full of hundreds of layout ideas. And the answer I got from online discussions and private chats shook my beliefs. Pre-nationalization railways weren’t forgotten at all. People of all ages still research them… even when they are interested in the post-1918 world, they will often refer to that era in a way or another. In fact, many do model the era… Lettering a GTR locomotive here or building an old Juneco wooden kit there. It seems the hunt for old CDS Lettering dry transfers is also a popular habits among modellers. Yet, nothing of that surface in social media.


It would be easy to blame manufacturers, but they can’t start to provide models when the market simply seems to not be there. Just take a look at Rapido’s Icons of Steam series. The pre-orders dried out the moment it was time to produce mundane small steam locomotives that everybody complain the hobby is lacking. Certainly, many reasons didn’t help to boost sales such as questionable quality control or perceived prices, but it should have been an instant hit. In contrast, Accurail has been releasing Canadian cars in its 36ft boxcar series, including the Fowler car. If you look at their website, all Canadian cars are sold out and some, including Grand Trunk, are in their second release and already sold out. In a recent discussion with an American how commission custom orders of Accurail cars in pre-1918 paint scheme, he admitted that all is run sell almost instantly. For him, ordering a 48-cars custom run of old time Canadian car is a no-brainer. The biggest challenge is picking up the next paint scheme.


Some have argued the biggest problem of old Canadian model railroading is sourcing decals. Black Cat Publishing has done a good service to us by providing a few Grand Trunk sets, but it’s a far cry from CDS catalogue that offered everything under the sun. Someone will have to step in and fill the void… This is something I’m trying to do because I think there is a place for early Canadian railways modelling and currently redrawing and improving a lot of artwork using the historic photos once used by CDS.


Custom decals save the day... maybe there is a market.

As for my own personal journey, I’ve learned firsthand that working with small 32ft-36ft freight cars, 4-4-0s and wooden passenger cars can save a lot of space when designing a layout. Think about it, a 32ft boxcar in O scale is about the same size than a modern 60ft hi-cube boxcar in HO scale. You can complain about the lack of available models, but keep in mind old cars were simply wooden boxes. If you can put together a box with tongue-and-groove styrene, most of the battle is won. Kitbashing current models is also possible and several cars can be sourced from Accurail, Bowser and Roundhouse if you don’t want to venture into the costly and complicated resin world.


Stepping down from my soap box, I can also look forward with the new skills learned when working on the old time Standstead module. This new knowledge will be applied to the Charlevoix railway which, I hope, will continue to progress. At the time of writing this, the Clermont scene is about 90% completed. It’s only a matter of a few months before we can think about taking professional photos of the layout and seriously think about publishing something about it.


I wish you a fulfilling 2023 modelling year. Don’t fear and dare to build your model in unusual ways to develop your own approach. Don’t fear to go artistic and overdo things, because later, you will be able to calibrate your effort on the next project. Take care!

Sunday, December 18, 2022

Canadian Northern Refrigerator Car

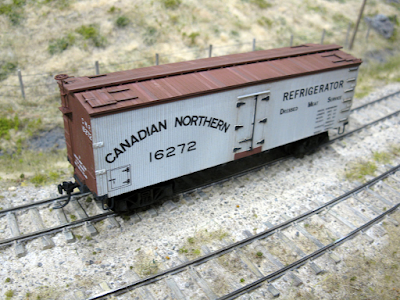
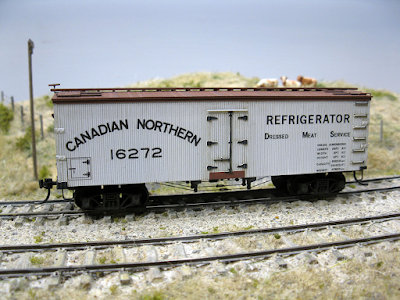
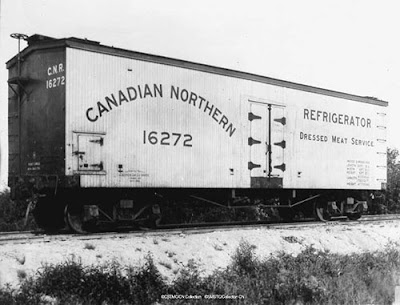
 A few weeks ago, I completely redrawn artwork from CDS in Adobe Illustrator to transform them in good quality decals. It took a lot of time, but was well worth the effort. One of the first car I decided to build was the Canadian Northern refrigerator car. It had a simple paint scheme and, according to pictures, was very, very close to a Roundhouse 36ft reefer.


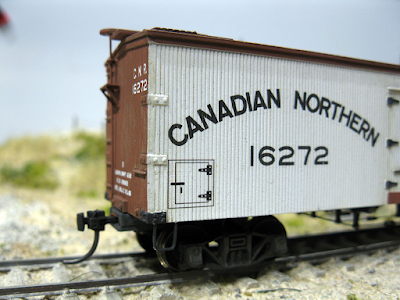
It was a fun build and I improved the model a little bit by addind new metal stirrups, roof grabirons, brackets and fishing line truss rods with Tichy turnbuckle. Brake details are Tichy too. In hindsight, I should have taken a hour to remove the molded grabirons, but I was too lazy for that. My mistake. The car is currently riding on old Roundhouse archbar trucks, but I'm planning to swap them later with Tahoe or Bowser ones when I'll purchase some.


Painting was straighforward, but I made sure to bleach the roof as much as possible in previsioon for weathering. On the roof, many boards were repainted individually in slightly different shades of brown. If you look at old pictures, wooden roofs are always a patchwork of colors because wooden planks were heavy maintenance and required replacement and paint touch up frequently.


When done with the coloration, I applying AK Interactive Streaking Grime wash over the model and removed the excess with odourless thinner. The goal was to make the plank texture pop up a little bit so the car would look more realistic. All that was done prior to decalling because I've learned from experience that your should always pre-shade your models. Also, sometimes washes on light colored cars pick up the decal edges, creating horrible weathering patterns.

In Canada, reefers were used also as insulated cars. The trap was for a charcoal heater.

When everything was completely, I sealed the model with a coat of gloss coat, then with a layer of dullcote to kill the shine. As Hunter Hughson likes to remind us, dullcote is basically a solution made of talc and a carrier. It can't act as a durable protective coat. That's why I've been gloss coating all my models since a few months to improve durability. The dullcote is just there for the look.

The prototype


At this point, I consider the model ready for the layout, but it hasn't been weathered yet. Road grimes will have to be added and some shadows added around the molded grabirons to make them look better. Overall, I'm quite glad with this model and my only real criticism is the decal. When applying them, it became evident the old CDS artwork was derived from a picture I found online. It's highly skewed. I used Photoshop to rectify the picture and superimposed it over the artwork. Found out the lettering is far too wide compared to the prototype and dimensional data is too tall. Given the limitations when this artwork was drawn in the 1970s and 1980s, it's excellent. But honestly, I'll need to redraw it using the rectify picture to correct the many discrepancies. That said, I guess most people won't notice!


Next time? More Canadian Northern rolling stock and many other surprises.

Thursday, December 15, 2022

Stanstead - Painting GTR Passenger Cars

This project is moving alone nicely even though I was naive enough to believe it would take 2 evenings to complete! It's nice to be optimistic.


Underframes and roofs have been painted dark grey instead of black. I even did some post-shading with the airbrush. I'm looking forward to weather the hell out of these roofs so they show their age. At this point in their life, they have been downgraded to branchline service and GTR is starting to be strapped for cash.


Trucks have also been painted dark grey and heavily weathered. I drybrushed highlights on them to add more relief to MDC trucks. Some washes and powders will complete the job.


As for car shells, they have been painted in a faded shade of Pullman Green. When looking at picture of wooden clerestory cars, they are heavily varnished, but after a while they fade and varnish starts to peel off. They aren't dilapidated, but simply not pristine. Sure, a 1910s car would have been kept in great condition, but under layout lighting, it looks fake. It lacks relief. For this reason, I drybrushed completely the details on the car with a lighter shade of Pullman Green. It brings the details forward by adding highlights, but also, it replicate some wear and tear of the varnish. That said, it's artistic license and I won't argue about that. But at least, it doesn't look like a toy.


Finally, I applied Black Cat GTR passenger car decals... It's a mixed bag. The instruction mentions decals that aren't included in the set (data, etc.), and the film was so brittle every Grand Trunk name on the letterboard cracked into multiple pieces. I don't know if it's a defect. It's the first time I have that problem with their decals. Weirdly enough, my sets have been acquired from different vendors, so I can't blame storage for the degradation. At least, they are salvagable.


With that said, I still have a lot of work to do on these cars. Final weathering, clear coat, windows, couplers, etc. But at least, they have reach a decent level of completion and I'm looking forward to put them in action soon.


I have a lot of rolling stock and motive power to complete on the benchwork, but I'll try to spend the last few days before Christmas on completing the layout itself as work will soon resume on Monk.

Wednesday, December 7, 2022

Stanstead - Kitbashing Grand Trunk Passenger Cars

I recently started to kitbash a few Roundhouse Overland 50ft passenger cars. My rationale was that they were quite close and it would take about 1 weekend to improve them... Fast forward two weeks later... I'm still deep into the proverbial rabbit hole!


At some point, I wanted GTR old time cars for the layout and thought about repainting and decaling a few Roundhouse 50ft Overland cars I had on hand that were leftovers from an abandoned QRL&PCo project.


In my mind, it would be easy: install better platform railings, redo the truss rods rigging and paint it. You know, the proverbial one weekend project. Unfortunately, it didn’t take long before the “fast and easy” task became an adventure on itself and down the rabbit hole I went.


The first thing that bothered me was that Roundhouse coaches are in fact patterned on Pullman sleepers. They are fairly accurate models if you want a coach, but all that fancy side panelling looks out of place on a mundane branchline train. I thus decided to cut the lower parts of each side and replace them with tongue and groove siding to get a more generic look.


It was quite fast and gave a more familiar look to the car. Two were converted in that way and I kept one sleeper intact just in case. Then, I moved my attention to the future baggage car I wanted to model. At first, I decided to use a stock Roundhouse Overland baggage but I had a hard time finding one. They were to pricey due to shipping cost and I didn’t want to use a brand new RTR version. Fortunately, Chris Mears came to my rescue and provide a second combine car which provided me with enough material to think about something much more ambitious and prototypical.


2 combines + 1 Overton baggage = 1 combine + 1 baggage

As you know, the passenger compartment on the Roundhouse Overland combine is laughly small. Only 4 windows. On GTR (and most other roads), the passenger compartment was generally twice that size. I started to wonder if I could splice two combine shells together to get a more accurate car. Unfortunately, doing so meant that I would have not enough material to build a 2 door GTR baggage car with the remnants of the combines.

That’s when an old Roundhouse 36ft Overton baggage car from a 3-n-1 MoW set came to my rescue (again!). I would splice two combine passenger sections together and use the 36ft baggage car for the baggage compartment. I would then have two nice baggage compartments that could be spliced together to create a relatively accurate GTR baggage car. Nothing lost in the process, it would be a 100% win-win.


These car ends are accurate for GTR cars

However, the car ends were completely wrong on the baggage car because it doesn’t have end platforms. The style of door and the two windows didn’t match my reference pictures (generally of poor quality). It was time to fire up SketchUp and model a correct car end including the brake apparatus. At this point, it was evident the coach and combine ends were also wrong, so I simply made new ends for these cars too. About 2 hours later, the 3D printer had provided me with correct parts. I also printed correct arched windows for the baggage car and new chimneys for all roofs. 


When came time to tackle the platform railings, I first thought about making mines out of brass. But after a while, I decided to simply 3D print them. It was both faster and more consistent. It could be argued I printed them a little bit on the thick side, but sturdiness does matters, and I don’t want these to break easily. Also, since they are painted in black, they should blend well with the rest of the model. To make printing and gluing easier, I create new platform beams and cut the plastic one from the Roundhouse underframe.


Also, I replaced the stock Roundhouse thread truss rods with 8 lbs monofilament fishing line and added Tichy turnbuckles. The underframe brake system is the stock Roundhouse stuff. I didn’t bother improving it that much. Underframes in the K-brake era of earlier 20th century weren’t that complicated when you look at technical drawings of that time.

Finally, I installed new Kadee coupler draft boxes to replace the truck mounted ones. At first, I installed them flush with the platform end beam but car spacing was too wide and looked silly. After looking at prototype pictures, it became evident couplers on old cars were located under the platform, with only the knuckle protruding from the beam. I thus glued the draft boxes about 1.5mm from the beam face. All in all, it reduced the car spacing by 4mm, which is more than a scale foot in real life.


At this point, the cars were ready for priming and painting. According to my less than stellar research, it seems GTR cars were painted in Pullman Green, or more accurately Vallejo 71.019. As you know, on scale models, colors tend to look darker than in real life, under the sun. For this reason, I mix a lighter shade of green with a ratio of 15:1 Pullman Green to White. Even that is a little bit dark to be honest. In my mind, the cars must blend with their surrounding, i.e., the layout. I want a color palette that is shared on all elements. So, I will probably exaggerate a little bit the color variations on cars to make them pop. The same can be said of structures, which right now are looking quite dark. If this layout had taught me a lesson, I would say it’s that I paint and weather everything too dark and I don’t fade my paint enough. We, railway modellers, tend to believe that if we use the prototype color, it will look prototypical. But in truth, when modelling rolling stock in service or buildings that have been under the sun for more than 2 years, it’s all but a pernicious fallacy.


Tuesday, December 6, 2022

Finally, A New Backdrop for Wieland

A long overdue task on the layout was completing the photo backdrop installation in Wieland. For years, it was a blank slate of light blue paint that couldn’t provide any sense of place. The photo was printed years ago, but we kind of forgot about installing it. The sky was cut off with a hobby knife to only keep the scenery part of the photo. It was fastened in place using double-faced tape.


I won’t say it’s amazing at this point because a lot of vegetation will have to be added to improve the blending between the 3D elements and the flat 3D picture. However, it certainly adds depth and context to what was basically a shelf with model trains.

In particular, the General Cable short siding now makes much more sense. You can imagine the siding curving into the woods to reach the aluminium electric cable plant.

The same can be said of the transloading area which now has greatly improved. The backdrop is full of vehicles and structures that would be hard to translate in model form without looking clumsy.


Finally, the Route 138 also doesn’t look half bad from certain angles. Sure, the pavement color is wrong, but this isn’t a scene that is visible under normal circumstances since it’s deep in the alcove. It could be improved though. In my mind the most interesting feature is the dark trees are the same height as the tunnel opening. Having these trees on each side will help to hide that black hole punching through the wall.

The backdrop isn’t fully glued to the wall yet due to running out of double-faced tape. Also, I’ll need to print a small section of backdrop to complete the scene behind the locomotive shop.