Friday, October 27, 2023

Refurbishing an IHC 2-6-0 - A 15 years Project


Refurbished IHC Southern Pacific 2-6-0

In 2007, I acquired an IHC 2-6-0 for a good price at Udisco in Montreal. It was painted for Southern Pacific lines, but I didn't care because it would be an excellent starting point to model QRL&PCo #22. My previous attempt with a MDC Prairie kit hadn't paid off and I felt the IHC Mogul would live up to my expectation. Having read the old mid-1990s Canadian Railway Modellers issue about converting one to a CNR prototype made me believe so.
Back at home, I started quickly to butcher the tender to conform to Omer Lavallée's drawings and pictures found in an old 1959 QRL&PCo historical brochure. It went well. It wasn't my first kitbash, but I was breaking new ground in terms of hacking a steam model.

Then, it was time to alter the locomotive proper. It's at this moment that big discrepancies started to appear. Wheels were to big and the wheelbase was much larger than the prototype. The boiler was too long and the cab somewhat wrong. It became quite evident that cutting down the boiler and fiddling with the drive could lead to a catastrophe. I thus accepted the discrepancies and decided they would be considered as modeller's license. Sure, I didn't like it because the silhouette was completely wrong. It was becoming clearer and clearer that QRL&PCo #22 was in fact an 0-6-0 with a pilot to make it track better on road duty.

That said, I soldiered on and started to modify the cab window to fit my prototype as best as I could. The results were OK and the model was soon covered with a coat of Krylon black primer. A picture was taken and the good old thing fell into the memory hole.

QRL&PCo #22 after it initial coat of primer.


A few years later, with more experience, I decided to revive the model. This time, it would be a CNR prototype. Or more exactly, a what if model, if #22 had been repainted in CNR colors as was supposed to happen back in 1952. I kept the tender as I had bashed it, then proceeded to correct the cab and finish the details. A neat coat of paint and decals concluded the saga and once again, a picture was shot. I then tried the loco on the club layout, found out the performance was poor due to not having be maintained nor breaked in and it went in its box a few minutes later. To be honest, I was never satisfied with this loco and its compromises...

CNR 429 was supposed to be QRL&PCo #22's new identity

Fast forward to 2023 and yet again, I'm digging that model out from the failed project purgatory. I kind of wanted to restore it as it should have been. Recalling it was based on a Southern Pacific prototype, I started to search for the locomotive it was supposed to replicate. SP Class M-4 seemed to be a good fit overall and I elected to restore the bashed model into it. After collecting a few historic and preservation pictures, I explored the possibility to add a  MDC shorty Vanderbilt tender. It was indeed very SP, but I felt improving the MDC tender I had would be a waste of time. I would keep the original tender and revert it back to SP appearance.

Restored tender with original oil and water hatches


For some reasons, I had keep several pieces I had cut from the tender more than 15 years ago and I was able to rebuild a decent oil bunker out of them. Styrene and Archer rivets completed the rest.

As for the locomotive, the biggest challenge was to rebuild the cab windows to specs. Styrene once again was used until a satisfactory appearance was restored. Unfortunately, during the original bashing project, I had cut and bashed the numberboards and they couldn't be reverted to their original appearance. They were replaced with correct SP brass ones.

Restored cab with correct size windows


My goal wasn't to make a superdetailed model, but rather to see how would the IHC Mogul look if it was painted and weathered with care. For this reason, I didn't add details that weren't on the original plastic shell. Sure, the bell and dynamo were brass parts I added during the earlier kitbashing project, but they were in the same place and had the same appearance. I also took care to rebuild the boiler handrails according to SP pratices.

Restored boiler with shiny brass replacement parts.


At some point, I was kind of surprised how the old IHC Mogul was finely tooled for its era. The original tooling was by PEMCO in the very early 1980s. The molded details were crisp, the backhead of the boiler was finely modelled, the part assembly was clever and generally speaking, it was certainly a good quality model back then. Sure, PEMCO powered their locomotives with motors hidden in the tender. That design decision would plague IHC steam models (which were inherited partially from PEMCO) until the company stopped existing. In the mogul case, PEMCO made the tender much longer than it was to install the motor and drive. This is why most modellers always consider this model quite silly. But after close examination of M-4 pictures, it's clear the tender is prototypical for SP, except its length. You don't need to rebuild it completely or use another tender. You just need to shorten it to prototypical length. Since IHC doesn't use tender drive, it's an easy modification.


I wouldn't say the IHC mogul is free of discrepancies compared to a real M-4, but it's certainly close enough to be a fun project to tackle. Painting and decalling the model was a breeze. I also experimented with preweathering the entire model prior to final assembly. It made application of fading, dirt and other weathering processes much easier. For example, I didn't have to care about covering the drive in paint while weathering  the firebox. This is an approach I have since used on a few other steamers and that makes my workflow faster and more enjoyable.
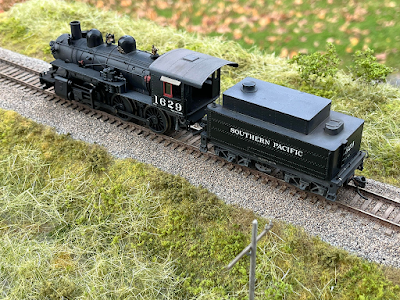

Once weathered, I had some fun taking pictures of my new SP M-4 outside on the diorama. It's certainly not a California setting, but sunlight brings forward the qualities of this budget model. I wouldn't recommend it to die hard SP fan, but has a funny quick modelling project, it certainly paid off! 


Tuesday, October 17, 2023

Return to Monk Subdivision

Last September, when the fall colors were still subtle and  subdued, I went to Bellechasse to hunt for backdrop pictures and visit a few spots I missed last time I followed the old National Transcontinental Railway roadbed.


It was one of these strange autumn days when nights are cool and days are warm, generating a deep fog that clings on hill and wood. This luminous and eerie ambiance was perfect for a road trip yet a little bit less for backdrop photographs since Appalachian mountains were virtually invisible to the naked eye even if they were only a few miles away. That said, they were plenty of good opportunities and I didn’t miss them when they shown up!


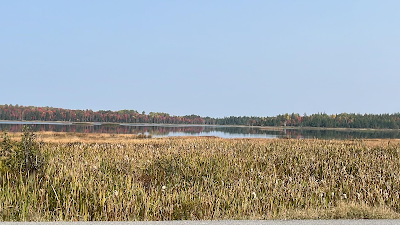
As expected, railfanning the old NTR is a fool’s errand in the sense that there is very little to see and most of the adventure is about driving long rural roads dotted with colonization era farmhouses, crumbling barns and lost fields. Forest is regaining its rights in these countries and soon, nothing will be left to be seen. That said, I was for a great start when the main street leading to Tourville (Monk station) gently curved around the calm and beautiful Lac Noir (Black Lake). Serene and scenic, the lake reminded me I entered a territory well known for being a sportsman paradise.

Lac Noir, in Tourville


Tourville was, as always, that sleepy town it has been since 1955 when the steam locomotive shops were closed down. That said, while it’s no longer the vibrant place it used to be, it’s still quite alive due to a renewed touristic vocation. Taking the gravel road westward, my goal was to finally get a glimpse of the causeway at Lac Therrien which was immortalized to vividly by the late Richard Manicom back in 1963.


Google Maps indicated a parking lot and a hiking trail leading to the Monk subdivision under the pompous Tourville Nature Park which convinced me it would be relatively easy to reach the roadbed… however, as is always the case, the parking lot was inexistant and the hiking trail was long lost to nature. My only choice was to park the car by the ditch and walk a muddy ATV trail. Since it was the beginning of hunting season, I wore my bright orange pullover, but it didn’t feel safe to walk there alone! But Monk always reserve surprises and after a while, the muddy path was consolidated by using wood planks… or should I say, old railway ties. Unmistakably, the roadbed was nearby and sure it was.


NTR ties are always found where you least expect them

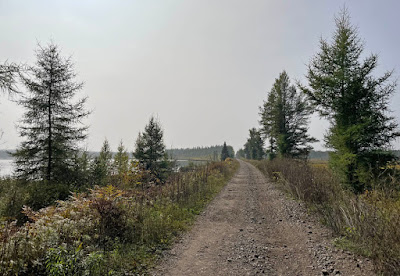
I climbed the gentle slope of the fill then found myself in the middle of a long straight corridor lined with conifers until it vanished into the horizon on both side. That was the hallmark of NTR exacting standards of construction applied in the most remote areas. On the right, toward Tourville, I could see a break in scenery that was the old bridge over the lake discharge. Under normal circumstances, I would have taken the Nature Park trail up there, but that would be for another time. I turned on my left and walked for about 500m until I reached the old causeway.

The causeway reveals itself after a short walk

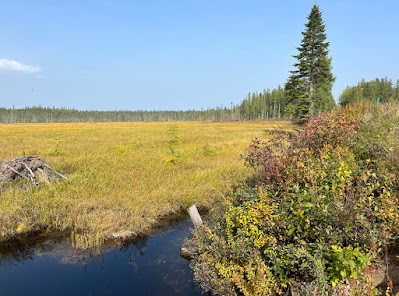
In any circumstance, there is nothing exceptional about Lac Therrien. It’s one of these thousands of similar lakes that can be found everywhere in Canada, yet that’s why it’s interesting because it’s such a classic sight. At that point, as was common with railway building practices of the time, the roadbed was built at the boundary between the lake and the marshes. In early Autumn, the marshes were covered in a beautiful array of colors ranging from various greens to yellows. Straw color, brown and reddish hues completed that mundane yet subtle landscape painting. In the middle of nature, nothing could be heard and a peaceful feeling filled the place.

A large marsh lies north of the causeway

After meeting a few peoples on ATV, I started to explore the causeways and soon, details started to pop up. I was looking for a small steel deck bridge over the creek, but was welcomed by a concrete culvert. At some points, big lumber were added to the original structure to widen it. But at the time of my visit, they were crumbling and sliding down the causeway. Nevertheless, I went down and stood on them to get a better glimpse of the culvert. It was quite obscured by the fallen lumbers, but a quick examination shown the concrete was in perfect condition after all these years. Better, a built date could be still read on the span: 1913, which was consistent with the first year of operation under Intercolonial Railway care in 1914.


This culvert was built in 1913

Nearby in the dark stagnant water of the marshes was a straight stump from a tree, but that also revealed itself to be the remnant of a telegraph pole. I would discover later that is was common practice to install the lines right in the water when crossing water courses on the NTR. I then proceeded to shoot several panoramic pictures with the goal of replicating that neat scenery on the home layout. When walking back to the car, I was tempted to walk another 1.5km to reach the other bridge, but decided to postpone that trek due to active hunters and a sun that was going down faster than I thought.


An old telegraph pole blending into the landscape

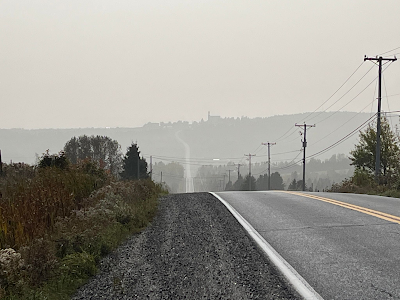
Driving on the country roads, I could see the fog starting to gather faster than I thought. I stopped in several places to shoot typical Appalachian landscapes, but I perfectly knew most of them would be unusable. When I reached Ste-Apolline-de-Patton, you could have bet a wildfire was in the area.


Atmospherical fog layering Ste. Apolline's landscape

From that point on, I decided to change my plans and drive to Armagh as fast as I could. In Ste. Euphémie, I tried to shoot the classic Ken Goslett scene, but trees had completely obscured the sight and it was no longer possible to replicate it. The concrete culvert was barely visible, yet the old houses and barns were still standing.


In Armagh, road construction blocked the main route and I had to take a rickety detour which yielded a couple of nice panoramas that could have some use on the layout. So, when I thought my trip was just a fun autumn ride, it finally provided some results. It was time to go back home before the sunset.


It was the third time I visited Monk Subdivision and it left the same weird feeling about the NTR. The malaise of seeing such beautiful track standards but serving almost no tangible goals, except political ones, is quite strange. A weird mix of being baffled by a nonsensical piece of work yet astounded by the skills and resources poured into it.  I’m not done with the NTR in Quebec and will need to revisit it again and again to make sense of that Transcontinental that could have been…

Monday, September 18, 2023

Brique Citadelle - Part 2

The next logical step to Brique Citadelle is painting and installing the road better known as Avenue du Sous-bois which used to be the main access to this industrial park until the late 1990s.


I'm certainly no reinventing the recipe. Not by fear of experimenting, but because I want the layout to have a common color palette and techniques to bring in an air of familiarity. As I mentioned in a recent post, just using some different color grass can have a huge impact and I certainly didn't want to gamble.

As always, it's a carboard road painted with Krylon grey primer and camouflage beige. Some light airbrushing blends everything together and add a touch of blue to better capture local tarmac. Powders and colored pencils finish up the road, which is then glued in place with latex caulk. 


Grass is the same blend I always used. The static grass applicator was helpful for some zones, but I must admit I preferred to complete the job with my own fingers. It seems to me each techniques has pros and cons, hence they need to be mixed together to yield the best results.


There are still a lot of things to do, but this area of the layout is taking shape nicely. I particularly love its understated appearance. Indeed, I'll need to add more grass and more ground cover, but I'm not planning to crowd the place with more than a few bushes and trees, utility poles and probably a weathered Volvo front loader reminding us that the site is currently being decontaminated for future redevelopment.

Tuesday, September 12, 2023

Quebec South Shore Railway - Mark IV: Resurrecting an Old Idea (again)


Several recent conversations with Chris Mears resparkled my interest in exploring shelf layouts as whimsical explorations of possibilities in model railroading. Since I’m cleaning the basement in hope of building new partitions for a storage room and a staging for Monk Subdivision, it gives me some time to dabble in that experiment yet again. Also, since it’s a big cleaning, I getting rid of several building supplies which I have no longer any use for and clutter my basement. These include scraps of foam, old cork rolls, various pieces of wood and plywood leftovers. Giving them a second life before the landfill or recycling makes sense and they cost virtually nothing. Track is recycled too from the original Monk staging which was recently dismantled.


As you know, I’ve designed and built several small layouts over the last decade. It’s a pet subject of mine which is rooted in nostalgia, desire for design challenge and probably a remnant of having been starved for space when I was a teenager living in a very small house. That said, I don’t see small layouts has a limitation because they drive you to understand how train movements work and how much real estate they require. These mathematical equations thus become ingrained in your mental muscle memory and can be put into action when designing larger layout.


My most recent explorations included Donnacona, which I still have in the back of my mind and St-Pie, a farming locality in Southern Quebec that used to be served by CP and later, by the infamous MMA. While extremely interesting project, both of them were bulky even if they footprint was 6 feet long by 15’’ wide. I used traditional carpentry to build them and thus, they were quite heavy, making them less than perfect for something that was supposed to be easy to move around. I may revisit these ideas, but what Chris is doing with his current shelf project (see his wonderful Prince Street blog for more info) kind of gave a second life to my desire to have a small plank for whimsical operation at my desk and photo opportunity.


Chris has been exploring ways of building fast, building cheap and building lightweight. He used ½ foam that he layers and glue down cork with double faced carpet tape. McDonald’s napkins are glued as a scenic base with latex interior paint and he starts pouring scenic materials right away. Let’s just say it outright, Chris and I share the same issues: we are both enthusiastic about everything train and impatient. Fortunately, there is a reliable backbone to this madness which is our love of mundane railroading. At a meeting earlier this year at Hunther Hughson’s house, he demonstrated a slice of that layout building technique and let’s just say we were all impressed with the results. In his proverbial humility, Chris downplayed a little bit the system, but it’s certainly a viable option for many people. And he handled these little pieces of layout very roughly over the years, including several trip in his backpack, to make sure it could last… and sure it did.


Another experiment that impressed me was my own photoshoot module I completed earlier this summer. It was built several years ago using a piece of 1’’ foam framed with some pieces of wood. It was cheap… dirt cheap and was left for years in Louis-Marie’s basement, exposed to humidity and temperature variation. I was pretty sure it would warp badly, but it did survive… Better, it’s feather light, making it perfect to move around depending on lighting conditions for pictures. Certainly, I could use something like that for a layout. At that point, I knew I had enough meaningful information to make a decision. And I certainly set myself a goal that it wasn’t a permanent layout, but only an experiment to push as far as I could.


The track plan was derived from the classic British tradition, which means a passing track (loop) and a siding. I know I have a strong hatred of overcomplicated staging devices, so I gave myself the challenge of making sure all the actions would fit within the layout boundaries, except a short shunting lead.


The footprint was based on dimensions that I felt would be easy to move around between my train room, my office and my workshop. 6 feet long is nice, but 5 feet fits perfectly my Ikea Kallax shelves and my desk. Also, it’s long enough to feel immersed within the scene. It may seems short, but it’s enough to handle a 4 cars long train and a locomotive, which is plenty enough for a single industry layout.


Depth is also another crucial parameter and I elected to keep it at 12’’. It’s a standard measure and makes for a layout that is easier to handle. At 16’’, it can be an issue under some conditions. Since the Kallax shelves are 15’’-16’’ wide, it leaves enough room at the back to keep decorations and objects displayed on the wall were they are.


Now, what’s the theme? Nothing more than the old Quebec South Shore Railway from years ago with the small feed mill. I reworked the track plan to be tighter, but everything else is the same, including the ubiquitous Highway 20 concrete overpass used as a scenic break. I always loved the simplicity of that design and felt it was worth revisiting once more. It’s also suitable for various eras, from the 1950s up to the 2020s. It can be a MMA/CMQ line were larger modern covered hoppers are shuffled around, or something older where 40ft reefers and boxcars are running along B/A tank cars, stock cars and coal hoppers.


At the moment of writing this article, which is about 3 days after construction started, I can confirm it’s taking shape. At first, I built a light pine frame covered with a melamine shelf. I quickly discovered it was far too heavy and replaced it with ¼” lightweight plywood. I haven’t reinforced yet that baseboard, but I may be tempted to add some braces underneath. It would then be easy to convert it into a torsion box if ever required. It must be stressed the great quality of Chris’ modus operandi is to refrain from using wet products on the baseboard, preferring glues and carpet tape to protect it from humidity.


This basic baseboard was covered with 1’’ thick foam secured with No More Nails adhesive. This protect the plywood from wet scenery process and provide enough depth to carve ditches and play with topography. Cork roadbed isn’t glued but kept in place by double face carpet tape. The same tape is also used to secure tracks to cork. This is not an ideal technique because you can’t move around the tracks were there are secured to the tape. It’s almost impossible to move it again if you pressed it firmly onto the tape. The bond is almost instantaneous like CA glue which can be seen as an advantage and a serious caveat. Nevertheless, I had so little track to install it was manageable.


More to come as I continue developing this small layout concept. I have also several other designs in mind, including another British-type micro layout based on a 32" x 9.5" floating shelf.

Saturday, September 2, 2023

Brique Citadelle - Part 1

Brique Citadelle used to be a major brick maker in Quebec until its spectacular demise at the end of the 1980s and early 1990s. Engulfed in several multi million dollars lawsuit regarding catastrophic quality control that led so several building enveloppe failures, the company which roots went back to the late 19th century, sank like a rock at the bottom of the proverbial pond.


While all that happened when I was was an elementary school kid, I can still clearly recall the intricate structures that made the plant. Each Saturday noon, we would take the industrial road behind  the plant to reach a well-known snack bar after visiting my grandparents living in Villeneuve or shopping in town. The brick and corrugated steel structures were covered in a reddish clay powder that gave an eerie Martian look to the compound. By the mid-1990s, it was in serious disrepair and everything was demolished, leaving piles of rubbles and concrete pads that would endure well into the mid 2000s. I recall the concrete floor was once used by a bike driving school as their formation center.


When the neighboring cement plant went down a few years after Brique Citadelle demise, projects started to emerge. Redeveloping are became a thing and the old industrial remnants were removed and soil decontaminated. At the time our layout is set, Brique Citadelle was nothing more that an abandonned fields with growing vegetation, dirt roads and piles of gravels and discarded demolition bricks. That's exactly what I wanted to replicate: a demolished and long gone industrial structure.


It all started with a coat of universal mud, aka Celluclay mixed with interior latex paint. A thin coat, about 1/16'' to 1/8'' was apply on which I poured sifted sand, various small rocks and scale bricks I once bought from Eastern Europe for that very purpose. They were available in all scales, including HO. They are generally used for military dioramas and are made from clay, which gives them a very realistic texture.


Most bricks were pushed into the mud with my fingers to show they had been mix with the ground and ran over by trucks for years. Others were simply left as piles on the surface. A light sprinkling of limestone powder was applied to merge the bricks with the surrounding. They look quite shiny and new and will require some weathering at a later date.

Before everything had dried, I started to apply some static grass by hand as I usually do, followed by crushed dead leaves and ground foam. I tried to overdo it it, leaving enough bare ground visible to suggested trucks and heavy equipment are frequent visitors.


When the background scene was done, I move my attention to the foreground where I started scenery last week. I didn't like it because I ran out of my regular static grass. Using different colors and jute rope to achieve the same blend was a foolish errand. Hence why we ordered the old stuff during the week.


There is still a lot of work to do with this scene, including trees, ground weathering and small details such as relay boxes and bushes. However, I'm quite happy of how it turned out. More grass will be applied on siding tracks to tie up this scene with the cement plant, but that's a footnote as far as I'm concerned.


A few unexpected results of this new scenery is it makes the mainline look longer and the lighter shade of ground makes it more luminous, two thing that works in our favour. I can't wait to finish the road and continue this work.