Saturday, October 17, 2020

Home Layout: Working Out the Approach

During the long Thanksgiving weekend, I started building my new home layout, namely the Quebec South Shore Railway Mark V. Interestingly enough, it became apparent the first ever version of that layout built several years ago was the right thing for me. But while the track plan is similar, the intentions aren't the same.

Designing a layout for someone else is often easier because we have the leisure to approach the subject from a distance that enables us to make hard choices without tampering with emotions. In my case, I've drawn several hundred layout concepts. One of my hard drive is saturated with them since 2006. 


Most of the time, my approach was to replicate a peculiar location and trying to make sure a maximum of things could happen and that my favorite freight cars and locomotives would have a role to play within it. This is the general approach most of us take and which is often underlined by the hobby press. Basically, choice a prototype, an era, a location and a room then try to make the best out of it. Some will fill it, others will restrain them. Over the years, something caught my eye in the work of many talented modellers and it was their ability to recreate a landscape in which the trains could "travel". While we thing travelling is coupled with the idea of a length of main line run, I believe it is rooted in the feeling the train come from somewhere and goes somewhere else. I've often wrote about how I felt an immersive scene didn't need to much larger than 7 to 8 feet. I think this concept is linked intuitively with the idea of travel.


Take a well-known exemple; Mike Confalone's Allagash Railway. It is basically your typical basement empire at first glance, but in fact, it is a series of extremely well connected scenes with a definite immersive power. Most of these scenes could live by themselves as diorama. More interesting, they are quite simple yet have a vibe that the trains do come from somewhere, cross a piece of land, then move far away to some unknown location. Certainly, the main line is long, but you don't actually have to follow the train because you can get the bigger picture from standing in one spot.


Back to my own layout, it came to my understanding that what I wanted at home was an immersive scene to display trains in action. I was less interested in modelling a particular location than modelling trains themselves in a scene that would put them on the stage. This had a huge impact in my decision because I know I'm not that much of a layout builder at home. I take solace in replicating freight cars and locomotives, sometimes buildings which are generally small rural structures. Recognizing that meant I didn't need a "proper" layout. At least, not for now. What mattered to me was modelling a CP freight consist from 1976 or a Central Vermont local freight in 1976 with shared DW&P power.  Modelling the MMA rust bucket era did appeal to me as was classic CNR steam locomotives. I didn't need a layout, but simply a proper stage to railfan my work from the trackside.


***** 


Since the layout is so simple, I wished to explain how it is intended to work because there is more than meets the eye. The operating scheme is based on British diorama practice, meaning the main scene is where the action happens while the outside world is basically a large staging area. This decision was bolstered by several factors including:


-The desire to model only one versatile scene

-The need for continuous run (both for fun but also for break-in motive power)

-Enough space for staging trains over my storage drawers

-To keep the modelled scene as a framed piece of art in the center of the room


As you know, I like rural settings and small local freight trains. The decision to go with the feed mill scene was an obvious choice. The track plan is based on several dozens of real locations I’ve seen over the time: a feed mill on the main line by a rural road with a few sidings. I’m not trying to follow a prototype but prototypical practices.


The runaround track serves several purposes. It Is possible to stage meets between local trains and higher priority passenger or freight consists. It also permits to operate the layout in a point-to-point fashion. It can also serve as a storage area for extra cars that can’t be handled by the sidings.


The feed mill siding is relatively long. It should hold about 2-3 grain cars and a few other cars for the builder supplies warehouse and the oil dealership. The team track is relatively short, about 3 cars maximum and is accessible by a gravel road. Virtually any load can be handled there.


Now, why the layout is so simple? Because, as I previously said, I have a lot of motive power and rolling stock that have never seen the daylight (I no longer care to count, but probably several hundreds). I’d like to use them, I’d like the layout to be a neat canvas to stage them in the “real” world. The Quebec South Shore is generic because it can be almost anything. It is designed to be a bridge line between Quebec and New England. Some days, it can be CP Richford Branch under CP Rail or MMA management, it can be the International of Maine under CMQ or Quebec Central in the 1950s. It can also be NTR Monk Subdivision or even the St. Lawrence & Atlantic or the Central Vermont in the late 70s when CV, GTW and DW&P motive power made for a striking motley crew. It can even be the CN or CFC Murray Bay Subdivision from the mid-50s up to nowadays. And if I really fancy it, it can be Temiscouata or Canadian Northern or classic pre-merger Grand Trunk Railway. It can also be Maine Central and, probably, Erie if I wish to put some mileage in my stuff from Harlem Station.

This simple layout would also provide a realistic avenue to stage passenger trains, local freights, railiners and through freight consists. Almost any train wil pass by a rural grade crossing with a feed mill.


You will say I’m pushing my luck a little bit far and trying to bite more than I can chew. Indeed, you can’t cram a century of railroading in the Northeast without having to make inacceptable compromises isn't it? Well, I think otherwise. Having learned and observed railways for decades, I’ve came to discover how some elements are absolutely fundamental and don’t change over time. By modelling a backwater railway, I also increase my chances to get more coherent results since infrastructure is limited and generally mundane… and that’s the key.


We generally tend to see a layout as definite in terms of scenery, trackwork and structures, but in fact, the reality is more complex and on a small layout, this can be used at our advantage.


Basically, you can separate elements on a layout as embedded (permanent) and simply laid over it (non-permanent). The first category is stuck on the layout, glued, nailed, painted and almost impossible to change once done. It relates to track work, ground cover, ramps/platforms, roads, vegetation, topography and whimsical stuff like the season of choice and the backdrop. Other elements that aren’t permanent are structures, vehicles, telegraph poles, railway and road signs, building signs, etc.


With care, we can decide to make our embedded elements as generic as possible to blend with any prototypes that shares a common set of characteristics. It’s the reason why a layout set in Southern Quebec with the lower Appalachian Mountain can fit many railways. A rural gravel road doesn’t have tell-tale details. They have existed for a very long time and are still part of the landscape. On the other hand, an asphalt road will set you in a specific era and depending on road markings, it can be even narrower than you think. A non-descript generic backdrop that is evocative will fit many locations too. If too dramatic, it won’t work. Don’t expect to make us believe your Midwest landscape can pass for Southern California! So the key here is “generic” in the sense that it is a common and prototypical occurrence on several railways that share a lot of things in common.


It leaves us with our non-permanent elements which can be permutated to create distinctive eras or locales. An old bilingual wooden crossbuck will set the layout in Quebec up until the late 1980s in some era. Modern ones with reflective red stripes will put us in Canada in the late 70s up to now. English crossbuck or the yellow round ones will send us on the other side on the boundary. Maybe in Maine, New Hampshire or Vermont. Telegraph poles with 2 or 3 crossarms set us on a busy line while smaller poles with 4 or 6 insulators will be a good indication this is a small branchline. Plant them crooked and you are in the modern era. Keep them well maintained and you are back in the steam era. As for road vehicles, they are self explanatory and a good way to pinpoint a specific era. Loads by the sidings can also tell a lot.


The last part of these non-permanent elements is the structures themselves. The idea is to use a common footprint for several buildings. A wooden-clad feed mill will set us in the first half of the 20th century while more modern doors, windows and claddings will set us later. Faded paint will also make a similar statement. You can then model a few structures that can be permutated from time to time to create new location. Signage on the building can also be installed with hidden magnets. Then, an old Robin Hood Flour billboard can be replaced with a 1980s Shur-Gain one or something more modern or American if required. There is also a catch behind that idea. If you are like me, you like to build something new from time to time. By sharing a common footprint, several structures, industries or prototypes can be modelled. You aren’t bound to a specific type of industries. It could be a potato warehouse, a creamery, a lumber supply, a saw mill, a food processor or anything that can realistically fit the bill. As long as your initial footprint is realistically sized, it will fit many possibilities.


The last thing is to keep thing simple. The simplicity enables you to go further with realistic modelling because you don’t have to cram the place with extraneous details that would make it impossible to switch from a prototype to another. In this regard, it’s why I would probably set the layout from the early 1960s to the early 1990s in Quebec because it would require almost no notable change.


This approach is also tailored to not feel pressured to replicate a perfect prototype and then, when it's done, feel there is nothing else to do. I want something that can evolve and be improved. Maybe partially replaced or refurbished without losing its core principles and purpose.


If I could boil down this concept, I would say it’s all about understanding the common language of railroading over the eras and identify the fundamental truths behind it. This kind of model railroading isn’t about replicating a CN or BNSF specific location that screams CN or BNSF, but rather to understand what makes railways universal. It is a different approach I took because I wanted both realism but also freedom when dealing with a continuous run home layout. Its purpose is pure enjoyment, small-time operation and providing a stage for my models. I will certainly continue to model specific locations, but I consider them to be another thing with its own sets of rules. Both are worth endeavours, but one has simply to recognize they have different design goals. The mistake would be to fail to see the differences and create something that answers none of both premises. Been there, done that… and it ended up in the dumpster!

Thursday, October 15, 2020

Hindsight 20/20 Version 4.0

Then next Hindsight 20/20 Virtual RPM Version 4.0 is now just around the corner. For these not familiar with the event, it is a virtual meet that was created a few months ago to replace traditional railway modelling events that were cancelled due to the current situation. Since then, the event seems to have evolved beyond a temporary measure and taken a life of itself. The lineup is always impressive and feature well-established modellers with a wealth of experience in the hobby.


The next event is scheduled on October 24th, 2020 and has always, you must register yourself at speedwitchmedia.com to attend. Registration is free but donations to keep the event running are welcomed. I'm also pleased to announce I'll be presenting a clinic on scratchbuilding structures out of paper and cardboard. This is an art I've been pursuing since my highs chool days, first out of necessity, later by rediscovering the incredible versatility of these  readily available materials. This clinic was triggered by Marty McGuirk's own presented on the second Hindsight 20/20. I'll pick up the ball where he left it and try to answer many questions then.


As a model railroader, this will be my first "official" clinic in a model railroading event. I'm generally not attending these due to their virtual absence in the province of Quebec, because I'm not the social type and due to the language barrier However, I've been giving lectures on various subjects over the last 2 decades, so I see it as a continuity of my regular activities.

Saturday, October 10, 2020

Satisfying Model Railroading: CV 8081

 A few years ago, when Rapido announced their new RS18 I started to raise some funds to acquire one for our club layout. Having kitbashed several of them from Atlas RS11 in the old fashioned way, I was eager to see a state of the art model of that iconic locomotive. However, I was prudent and didn't pre-order it yet, wanting to see the final product up and running before committing to buy. When the time came to place an order, I changed my mind. The chronic issue of missing parts on my set of 3 Rapido undecorated SW1200RS left a sour taste in my mouth and I felt I would not embark on another round of frustration dealing with costly models that doesn't live up to expectation. As they say, if you want it well done, do it yourself. And sure I did.

CV 8081 in St. Albans, VT (credit: cnrphotos.com)


Having about $300 in my pocket, I asked myself how this money could be invest to get a maximum amount of modelling opportunity, fun and sense of achievement. The answer wasn't very glamour! I ended up on a website searching for cheap but reliable locomotives to bash. Taking advantage of a sale, I got myself 3 Bachmann Alco S-4 for $40 each and a Bachmann GP9 for $60. I figured out the remaining money left from the cancelled order would be enough to cover for paint, decals and details. The goal was simple, since many of my switching layout ideas are around small towns on Quebec South Shore, family-owned feed mills and old paper mills, I thought it would be a good occasion to try replicate a few classic Central Vermont, Maine Central and other American connecting lines with Quebec. A quick search on Railroad Picture Archive proved they all had interesting variations that would be great to model.


Sure, the Bachmann models are spartan and lack details such as grabirons, but their newer diesel have reliable drive, crisp details and are DCC ready. Also, they are easy to take appart and reassemble while they shells are sturdy. Basically, they lend themselves to customization for an affordable price. At $40, I couldn't really complain about anything.


So far, I've not completed my 4 kitbashes, but they have brought me plenty of leisure time and provided many challenges I had to answer with creativity. The more I get involved in this hobby, the more I like to build things myself instead of relying on manufactured detail parts.


Another nice thing about starting with basic models is you have to better research your prototype. You end up learning a lot about real locomotives and how they evolve after each visit at the shops. A stock model such as an Alco S-4 starts to look noticeably different after 30 years in service. Your Maine Central switcher is now distinctly different from your Central Vermont one even if they were built by the same plant in the same era.

Some mesh from a faucet and voilĂ !

Speaking of Central Vermont, it is amazing how they customized their S-4 over the year, changing windows, removing louvers, messing around with the smokestack and adding rotating beacons and firecracker antenna. The most interesting change is probably the fascinating "Safety First" sign put on top of the hood.

Small scratchbuilt details are often a better fit


While making this model, I ended up making several detail parts by myself to save money, get away with shipping delay and get exactly what I want. The bell bracket was made of sheet styrene and using Atlas spare part generic bells I once purchased in bulk. The smokestack is a bunch of styrene profiles put together and filed down to shape. The new radiator grill was made out of an old sink faucet aerator mesh. The firecracker antenna is a styrene rod on a phosphore bronze pin. Finding these parts from shops would have been a nightmare and worst, it would have been a compromise since you won't find custom CV parts anywhere.

Decals shall be altered to fit your model...

Even when painting the locomotive I had to compromise. Microscale has a set of decals for CV RS11 and GP9, but it doesn't really fit a S-4. I had to cut several parts of decals and reassemble them to get the proportions right. This is certainly not the easiest way to do it, but there is no easy way out.


At the end of the day, these cheap models have brought me countless hours of relaxation and achievement. I've learned once again a lot in the process and had a lot of fun. I know for a certainty I wouldn't have got that kind of reward if I went with my original plan.

Friday, October 2, 2020

Racor 31B Switch Stands: A Detail That Makes a Difference

General Cable siding in Wieland

Since high school, I always thought switch stands were among the coolest part of the railway. It may sounds strange, but when you grew up along the CN Murray Bay were sidings were a rarity in the 1990s, it was the most "railroady" thing in the landscape after the bridges et the track itself. The familiar Racor 31B switch stand look was one thing I always wanted to replicate, but failed too. I recall, more than ten years ago, purchasing plastic switch stands which I believed were made by Detail West. They were finely cast in plastic and looked great, but they weren't that great looking.

But since then, many options are available. I first bought the Overland brass switch stand. Nicely done, but pricey and devoid of any target. It wasn't an economical way of doing it. Then their was Osbourne Models laser cut wood version. Not too bad, but wood is wood and I never felt it was a compelling option. After that, there was the Rapido Rail Crew switch machine with switch stand. As with all their models, it is an exquisite replica, but finicky to work with. Also, the price point is in my view over the top and I wasn't too fond of working with photo-etched brass targets that must be soldered to survive operation conditions.


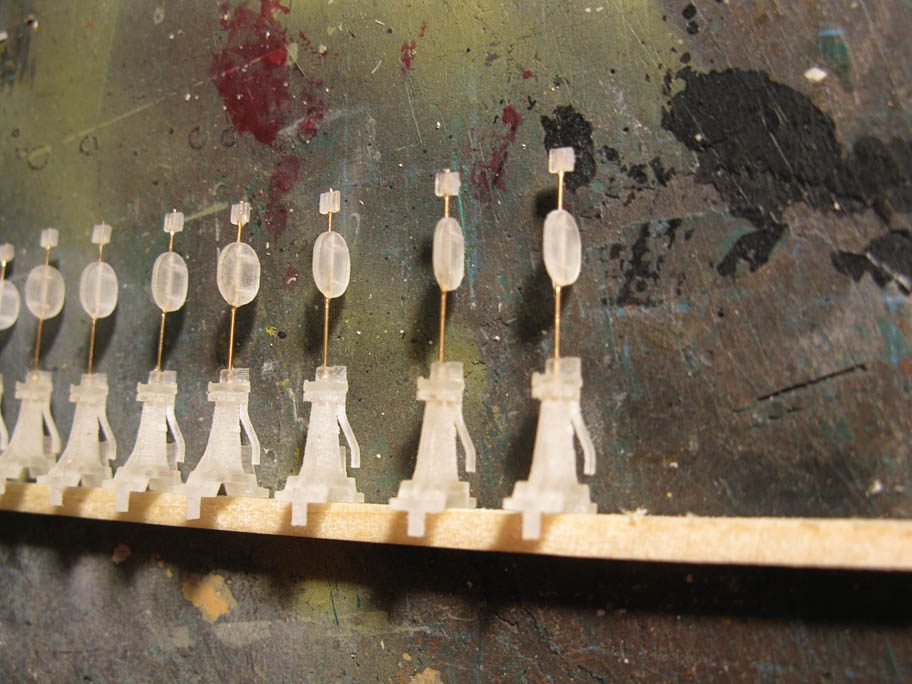
Finally, Steve Hunter via Eastern Model Railroad on Shapeways offered a set of six 3D printed Racor 31B switch stand. They are somewhat less detailed than the Rapido ones, but they shine due to their clever engineering. A single part stand with a brass rod on which you slide the target and/or lamp. Certainly, 3D print had limitation, but Steve's switch stands are quite sturdy, easy to assemble and realistic. He even included the rivets and brackets on the target, something even Rapido didn't bother.


Certainly, there is a trade off since all the components are thicker than they should, but given the price, the quality, look and ease of assembly, I consider this to be the best Racor 31B switch stand on the market if you need dozens of them. In our case, we need about two dozens of them and going the Rapido route would have been both extremely costly and finicky. I preferred to go the safe way given this is not a museum-quality layout, but an operating one.


That said, I wish Steve Hunter's product could benefit being molded by injection. If his switch stands were made in plastic, many features could be finer and much more realistic with being structurally sound. They would be on par with Rapido and Detail West products while having a much superior assembly. I know I'm dreaming, but that's fine with me! But not everything is lost and I believe someone could simply sand down the targets a little bit then install new rivets.

Anyway, I'm a happy camper and consider these switch stands to be well worth their value. Once painted and weathered, they look the part and give an unmistakable Canadian National look to any layout out there! Thanks Steve! I rarely vouch for products, but I'm well pleased with this one.


Sunday, September 27, 2020

Framing a Layout: A Footprint Doesn't Dictate the Level of Action

 As I move forward to finally build something in my hobby room - maybe a layout? - I try to get a better understanding of what I'm trying to do. Maybe thoughts have crossed my mind since I've been starting to seriously take a look at that challenge. Several concepts I've designed over the years have clashed together and are now starting to coalesce into a more coherent vision.


I recall, many years ago, submitting the idea of displaying several dioramas in this room, each one dedicated to my various interests in railroading. At first, I envisioned this by a series of independent layouts stacked one over the other around the room. While a nice idea, it was plagued to become a collection of dead ends; well-crafted layouts with little purpose.


Later, I came with the idea of trying a layout that would run around the room. As much as I'm not a fan of layouts based on simply having a train running in the middle of nowhere, I must  admit many of my locomotives and freight cars have completely a single loop in almost two decades. This is a shame. I have enough freight cars and locomotives to weathered, detail and improve for a lifetime. Much more than I need to be honest and I know too well I'm not about to sell them. It would be nice to appreciate them from time to time. But in a more pragmatic way, I have no place to break-in my locomotives and program them in a decent fashion. It may sounds ridiculous at first, but it means I have quite a handful of rolling stock with serious mechanical issues due to not having ran enough since I acquired them.


Another point to take in account is the fact I have appreciation for trains from various eras and I must acknowledge it. Trying to fit it all in a single layout theme is an impossible task. It would result in a badly executed product that would fail to deliver anything convincing in terms of realism. However, I'm not that much eager to constrain myself to a single theme. This is why over the last decade I've been trying to understand what is at the core of railroading in North America, particularly in the Northeast (Ontario, Quebec, NB & New England). Some regular patterns have emerged that can act as a common core that bonds many eras and locales. This is something I'd like to exploit.


Also,  I've also discovered our vision field constrains how we can interact and get immersed in a scene. I'm more than convinced that we generally can get comfortable in about 7 to 8 linear feet, maybe 10 feet if you take a chance. Anything over that gets blurry and you need a scenic break or a subdued transition zone before moving over to another interest area. Lance Mindheim called it the Scenery Only Zone, but I've come to compare it to song composition in an old blog post. I really think this has to do with ergonomic and the human body in the same way the size of doors, windows and rooms relate to us. I've seen it in action on Hedley-Junction where scenes in our Villeneuve sections are far too long while the most recent Charlevoix areas are better defined.


Finally, I have a serious problem keeping myself focused when modelling. I am absolutely unable to follow a schedule or a coherent plan even if I do this everyday in my line of work. Most people can't understand how much keeping this blog alive made it possible to have so much coherence in our Hedley-Junction project. But be assured, this is abnormal for me and takes a lot of efforts!


Put all these things together and here's what you will see. I've been able to create interesting parts of layout for the hobby rooms. Scenes that pleases me. But when I try to spread them all over the room, I'm far to be impressed. Also, each theme comes with a particular set of restrictions that goes against my will to put my collection in action. In this regard, my desire for realism hits a wall if I go the fully prototypical way. In that regard, Hedley-Junction and Harlem-Station are two layouts I've built which satiate my appetite for replicating real locations. I'm not sure I want to thread this path for the home layout which is less operation focused and more about railfanning.


For theses reasons, I've came to the conclusion I should set a shelve on each wall, lay a loop around the room and then work on one scene. The Quebec South Shore diorama I presented a few days ago fit the bill. It is generic but yet prototypical in the sense it is based on a real set of rules found on railways, structure I wish to build are indeed real-life prototype and it can support both light operation and railfanning .By following the prototype rules and taking root in real life imagery that means something to me, this generic diorama is a perfect background for CN, CP, MEC, CV and all these roads I like. Be it steam, early diesel or later eras, it keeps its relevance and stay pertinent. The choice of industry is basic but representative and can support the use of many car types. Better, the continuous run makes it possible to both operate small local freight, passenger trains and large freight consists with multiple unit.


Interestingly enough, this scene is self contained. In about 12 feet of linear space, a world in minature is created, both immersive and compelling. Better, this project leaves the 3 other walls as blank canvas for future diorama that can be operated in the same fashion. They can depict whatever I wish, be it a QRL&PCo river scene, an early 20th century rural station, a simple overpass or a bit of Baie-Saint-Paul. The idea is not to go in the "I want it all" fest, but rather to create modelling opportunities for the future. I know a layout has a limited shelf life once completed. Having the opportunity to consider each wall as a self-contain scene means I can redo parts when I'm ready to build something else or even refurbish what I have when better skills are acquired. All these individual scenes, each framed by a cabinet section, would share a common running loop and there would be no need to fear anachronism single the trains of a particular era would be operated by getting immersed in a single diorama at once.


Another thing I like about this idea is its incremental nature. The loop can be quickly put in place and running. Building the first diorama will be also a simple endeavor. Also, I must take into account my health issues and professional responsibilities. My hobby time is limited and I prefer to make the best of a small area than waste my time trying to fill up my room. The end goal is running trains, having fun, modelling prototypically grounded models and doing some light operation for the sake of enjoying some action and sharing the collection.


If I may conclude, I found out over the last few months I didn't need nor wanted a large layout but only a way to interact with trains and immerse myself in this creative world. I made the mistake to conclude running large trains meant a large layout. I made the mistake to think a diorama or a switching layout was incompatible with continuous run. I made the mistake of repeating a lot of ridiculous assumptions made by this hobby which always create the false dichotomy between the ideal layout and the compromise layout. As if the idea layout had to absolutely be large to fulfill large dreams which is probably the most ridiculous idea out there in this hobby. Isn't ridiculous to think a continuous run means a continuously scenicked layout? Isn't ridiculous a switching layout should be a terminus at all cost (nothing against them, they are cool)


The funny thing is that I only started to realize you could more with little by watching a lot of British modellers' YouTube videos. Not the finest ones, not the finescale ones, simply the average Joe ones. Those who aren't at the top of their game, but are clearly learning lessons from experimenting with their hobbies. Their approach struck me because they had a surprising validity beyond their low bro appearance. They shared a similar vision to the better examples from the UK: they were a slice of world where you could have a glimpse and enjoy the trains. Trains could run continuously, but it didn't meant the builder over extended his vision, but he simply made in such a way the outside world could still exist whatever the size of the layout. It meant to me that the size had nothing to do with the amount of action occurring. The most simple location - be it a flag stop - was still part of a network and didn't have to be the most complicated staging ever or a series of insufferable gimmicks. I all had to do with framing your subject.


That brings me to my initial point: I find it hard to frame a subject when it must fill a room. Give me a limited space and I'll have a vision. Give me a large room and it fills like the blank sheet syndrome. It is probably why I always come back to my old Quebec South Shore design experiment because it distillates what railroading in the Northeast means to me: rurality, feed mills, muddy team tracks, small roads and ondulating topography. As long as I can find these common features, I feel in my element and can dream of a local Central Vermont train, a large CP Rail consist or a CNR Mikado pulling a string of single sheated boxcars or hoppers.


As far as I'm concerned, I'm ready to get myself a pair of IKEA Ivar shelves, build a benchwork and lay some tracks. No real idea how it will turn out, but judging by my past efforts, I believe it will make sense and pass easily for Quebec Central Tring Subdivision, CP Newport Sub, NTR Monk Subdivision and many other tracks crossing the border.