Sunday, May 29, 2022

Scenery at Donohue - Part 2

In our efforts to reach a decent level of scenery in Charlevoix, i.e. all surfaces covered by at least one layer of ground cover, we undertook to ballast about 75% of the Donohue's section.

This is how things looked before ballasting the entire yard


I had already ballasted a few inches of track in the past, but it looked quite dark when the glue was dry so this time, I decided to add more beige coloured tile grout and sifted sand. It made the ballast dirtier in appearance and lighter in shade which is perfect to fit the very sandy river bank on which the paper mill is built.

Lots of hole patching and gap filling to waterproof the benchwork

About 8 feet by 1 feet of ground were covered in one session, which took us about 2 hours to complete. Applying ballast is not that long, but gluing this entire surface with an eye dropper can be maddening. In the past, I used a spray bottle with diluted glue, but since I don't want to ruin the printed backdrop or spray glue everywhere, I made the choice to go the long way. Fortunately, Louis-Marie helped me in this marathon against the clock.


Dry ballast before gluing...

A small access road lines the yard...
...and connects to the entrance.

I've yet to see the result after it dries, but I feel it should be a good foundation for grass, sandy patches, oil spills and debris. This will certainly require several layers of material to get the same feeling as the prototype. Once again though, we have to reinterpret reality since our mill is much smaller than the real one and not exactly a perfect match.


The next step will be to glue the foundations of mill structures all around the Donohue. When done, it will be possible to complete, once for all, the first layer of ground cover. Also, several structures will receive - finally - there last details, including an interior for the newsprint warehouse.

Monday, May 23, 2022

Scenery at Donohue - Part 1

With the parking lot done, our work is slowly moving East to the paper mill. The first new structure - a reception office - is now firmly glued and grounded on the baseboard. I was happy to discover the interior was worth my time because it's highly visible from the aisle and add such life into the scene.


A first layer of gravel has been applied to the different roadways and parking lot around the office. I experimented with a mix of limestone dust, sand-colored tile grout to keep it light colored and some Woodland Scenic fine ballast for texture. It made for an interesting mix, but once glued, it was evident the Woodland Scenic ballast is necessary. It works well for the shoulders, but not where vehicles run. Not a big problem since a second layer of limestone is scheduled to get the final surface.

Another project is the locomotive maintenance and fueling pad. I installed a concrete cutter around the locomotive track to fill it with gravel. This is to contain oil spills we the locomotive is parked. Then, I looked at a picture of the real thing in Clermont... and found out it was just a big concrete slab! So much for working without reference! I'll have to redo the job once again.


Finally, we also started to work on improving the warehouse. New loading concrete piers have been made inside. They will be painted and decorated with a forklift and rolls of paper. The siding colors will also be revised to better match the photo backdrop. The industrial beige color should be a little bit more greenish and the blue was too much turquoise. I shall fix that too. Many other detail like a staircase and a roof ladder will be added too.

Tuesday, May 17, 2022

Donohue's Reception Office - Part 2

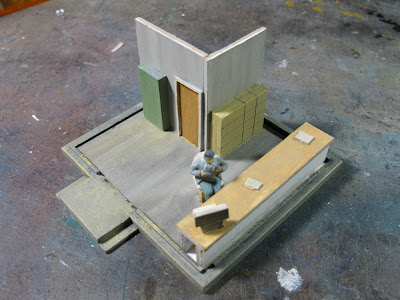
The reception office being a key feature and highly visible point of interest on the layout, I couldn't shy away from modelling an interior as I often do. The sheer number of windows made it so transparent it needed some furniture to really shine.

Interior is made to fit the foundation and is removable

The interior is removable and built using scraps of illustration board to make a floor and a few partitions for a water closet. The same material was used to build a large desk, a chair, a set of lockers, a desktop computer and file cabinets.

Interior is ready to be inserted in the structure

Some random sitting figure of a bulky man was painted in drab colors and glued on the chair to give some life in the building. We did the same when we built the Ciment St-Laurent scale building and it's really one of these moments were scale figures do add depth to a scene.

I also added some plastic glazing in the window and a few horizontal blinds in a few windows exposed to the West afternoon sun.


I can't wait to install this new building on the layout next Wednesday. Fascinating to think this all started with an Atlas signal tower upper half used as a prop for years! 

Sunday, May 15, 2022

Donohue's Reception Office - Part 1

Donohue's guard post has been on my mind for many years now. We had several discussions and explored many ideas, including a prototypical replica of Donohue's office by the parking lot (which was too big for the layout) or the tiny brick guard post. In the end, we settled down on the guard post but found out it was very similar in look to the Ciment St-Laurent scale building. Something different would be neat.

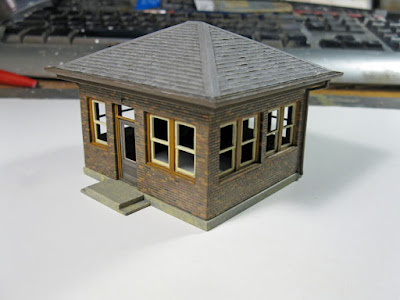
The Atlas tower was cool, why not replicate it in brick?

Meanwhile, we used the top level of an Atlas signal tower as an office since it looked like one of these typical guard post in the area. However, as the scenery work progresses, we have no choice to replace it with something more permanent.

White Birch Paper guard post in Quebec City

Fortunately enough, many local paper mill in the area have smaller brick guard post with pavillion roof. In Quebec City, the White Birch example is quite a classic sight and feel right at home in Clermont. In Beaupré, a similar structure did exist until the plant was demolished in the late 2000s. All these mills were built in the 1920s, in the same era as Donohue. Thus I felt a 1920s style guard post would look great and offer some counterbalance to clapboard and corrugated steel structures disseminated all around the layout.

The Atlas tower was cool, why not replicate it in brick?

Using the Atlas tower as a template and recycling its windows, I made it slightly large to accommodate an old 1950s Revell signal tower roof that was laying around in the hobby room. I felt it would look great.

Walthers excellent brick patterned styrene sheets were used for the wall and 3mm x 3mm chamfered Evergreen styrene strips provided for a sturdy foundation. In this case, I made the foundation separate from the building. This way, it will be embedded into scenery and mud, then later on the structure will be put in place. For perfect alignment, I provided for a small styrene tab that lock the brick walls on the concrete footing.

Always install recessed windows in brick walls.


Atlas windows were cut in halves to get that paired sashed window look so typical of 1920s architecture while Tichy provided a somewhat older type door with a transom. I also built a styrene recessed frame inside the wall openings so windows wouldn't sit flush with the brick wall. This is a typical construction detail that is too often overlooked. Windows in brick walls are very rarely is never flush. Also, having trims like a window on a wood siding wall is also very unlikely. Unfortunately, too many people use standard windows for wood buildings on brick structures, which kills the realism greatly.


Painting was inspired by my experiment on Drummondville structures built for a friend earlier last winter. I prime the model with a faded greyish black, add a layer of uneven base color then paint brick individually to add variation and colors. At first, it always looks garish, but after adding oil paint mortar wash (in this case a beige color), everything is toned down as it should be. The same method was also applied to the roof.


Painting the window was done using Raw Sienna acrylic paint. I wanted muted colors so nothing would look out of place. Sashes were painted beige instead of pure white to also blend them better with their surrounding. It was also common to paint sashes cream on historic buildings. In that regard, had I been a purist, I would have modernized the building with 1980s brown/bronze curtain wall windows and commercial aluminium door. However, I wanted to keep the retro look this time. Both approaches have their merit. In this case, it was all about translating the Atlas signal tower into a brick version.


Finally, I elected to weather the windows a little bit more than I had anticipated. Real wooden windows need constant care and I felt a paper mill with financial difficulties in the 2000s wouldn't care about spending money on them. Using armour modellers techniques but with a different medium, I used a light gray pencil to graze the sill and frame surfaces to create a chipping effect. After that, I repeated this step but with a dark gray pencil to replicate exposed and weathered wood starting to rot. Using these two colors yielded realistic results. The structure may be well preserved with original components, but it doesn't mean it's in great shape either.


In the next few days, I will add window glazing and I'm seriously thinking about adding a basic interior with a desk, a guard and wall for a toilet. I generally don't care about interiors, but in this case, the guard post is completely glazed and very close to the operator. An empty shell wouldn't cut the deal.


Saturday, May 14, 2022

Rivière Malbaie Scenery Progress

Foreground and backdrop are starting to merge together

Scenery work is steadily progressing at Rivière Malbaie while floral foam is glued and waiting to be carved in Clermont. As I said not so long ago, it's fascinating to see a scene that was envisioned back in 2014 taking shape. Even more impressive to see how close it is to the mental image I had.

The first layer is always drastic and contrasted...

I've also obeserved a lot real landscape around me during the last week, which is exactly the season depictdd on the layout. The most striking feature is the sheer amount of small green plants growing in the woods, how patch of dead grasses are common on the edge but also inside the forest. I had a very Confalone way to model forest ground cover, but modelling May instead of April is much more different than one would think. To be honest, it's better like that. It was never our intention to copy Mike, it would be utterly useless to create a copy of his own creative world. He inspired us to follow our own way and it should indeed be that way.

There is beauty in a toned down color palette...

The big difference in my approach now is that I build up colors, but also layer textures. I no longer rely solely on static grass and ground foam, but add dirt, gravel, long grasses, pieces of Super Trees, dead leaves and even sprinkle Woodland Scenic fine ballast. Several passes are required and it's a highly artistic form of expression. It's not about a specific recipe, but a harmony of various colors and textures altered on the spot.

The parking lot is done.. only the background to do.


When it's time to deal with backdrop transition, colors are of uttermost importance. In Rivière Malbaie case, it was interesting to find out a color of grass I rarely use because it's mint green was the best choice to blend 3D scenery to 2D picture. It's always about observing the reality in front of you and decomposing it into elements you can control.

Grass turns commercial track into an industrial spur...

At the end of the day, this process really makes a big difference and transforms a set of plastic models into a real miniature world. Crazy to think that Clermont as never been so close to completion as only the urban and industrial scenes are devoid of vegetation and ground cover... but not for too long! The village being probably the most nerve wrecking scene to complete!

The river bank is now covered up to the hill...


Wednesday, May 11, 2022

Scratchbuilding Electrical Cable Spools

One of the main rail customer in Clermont used to be General Cable (ex-Reynolds) aluminium wire plant. Founded in the 1970s under the impetus of René Lévesque, the goal was to provide high paid manufacturing jobs in this rural area and prosper from the boom of hydroelectric dam construction in Quebec. The company struggled from the start to carve a spot in the market and was almost on life support until its closure in the 2010s. It was, first and foremost, a political project to industrialize Charlevoix that was far too optimistic. For this reason, shipment of cable reels by railway were common, but still sporadic. I do recall seeing frequent gondolas in the 1980s and early 1990s but rarely beyond that point even if gondolas spotted in Clermont yard near the plant later on did hint at some activity.


To replicate that traffic, I purchased a few Herpa plastic spools years ago. While not bad at all, they had the disadvantage to show "Herpa" on each side. Also, weathering plastic to look like wood it doable, but far to be that great when trying to model something that is built from rough lumber. For this reason, I thought about cutting some balsa wood to size and build my own loads. Balsa wood has the advantage and also disadvantage to be soft and easy to cut, which will help me to add some details without losing my mind. It's also easy to stain with alcohol and India ink which I always do before assembly.


When the 2'' x 6'' scale strips were cut, I assembled them together by gluing together two perpendicular rows of planks just like the prototype. When dry, I draw the spool sides profile and cut them with a hobby blade. With a sanding stick, I was able to sand them down to an almost perfect circular shape.

Nut details and holes were punched out using various size of brass tubing which I files down until they had a cutting edge. That's were using balsa wood is handy before the brass tubing cut easily and neatly, leaving a perfectly clean edge.

A piece of dowel cut to length was used to serve as the center part of the spool. I drilled a hole so I could insert metal cables to secure the spool to the cradle later.

Sides were carefully glued to the dowel and imperfections filled with putty.

Using thick sewing thread to replicate the electrical wire, I covered the entire dowel with it, applying here and there a few drop of glue to secure the thread. You don't need a lot of glue and it's not necessary to use more than a layer of thread. As long as the dowel is completely covered and the wire looks tidy and regularly winded, you're fine.

Using aluminium paint, the thread was painted until it got a satisfying appearance. Paint will also act like a glue, making sure the thread will never move again and sealing it.

The cradle was built using pine strips and following various pictures found online. Older cradle from the 1950s didn't always show metal straps securing the load to the cradle, but more modern one did so I elected to add them since they look good.

The cradle was built around the spools to get the dimensions right. The spools fit snuggly and wouldn't require glue. In fact, they are kept in place only by the metal straps which are made of sewing thread again. It makes for relatively sturdy loads that can be handled during operation without fearing to destroy them.

The cradles are also wide enough to only leave about 0.5mm free on each side of the gondola. This way, the loads can shift that much during train movement.

Monday, May 9, 2022

Subtle Improvement to Trees

 I'm definitely not a very experienced tree modeller, but recently, when I have no idea what to do at the club layout, I take a few twigs masquerading as real trees on the peninsula and try to improve them.

Natural twigs as they look


Twigs can do a decent job at first glance, but they lack volume to photograph well. Also, since they lack complex branch systems, you can easily see through them, which makes the forest a little bit unconvincing since you can easily see the forest floor isn't well detailed.

Improved twigs after grafting a few branches to them


Replacing all twigs with SuperTrees (sea moss) would be both overkill and overpriced. This is why I decided to simply graft SuperTree branches on twigs. Not very complicated and add a lot of volume. It also has the advantage to model well trees growing in bunch because you can keep the small branches on top where they are due to the sun and the lower trunk bare. At the end of the day, it is a much better use of resources while giving nice results.

Saturday, May 7, 2022

Building the Monk Subdivision

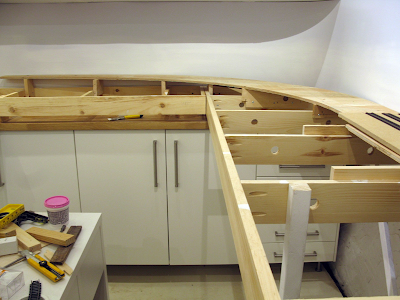
Analysis paralysis and perfectionism are serious diseases! I'm been afflicted with them since as long as I can remember when dealing with layouts. I can't even. While I've built several switching layouts to fill the void, I've not built something close to a functioning loop since two decades (except for the club layout). In the recent months, I've just decided move forward and cross the river when I'll reach it. The dream layout is a pipe dream... and at the end of the day, for me, it's not about a dream but simply running trains and rolling stock. The idea is to have a decently realistic canvas on which I will have the pleasure to recreate freight and passenger trains as I fancy.


In that regard, the project I shared here in the past few months (if not years!) is rather simple: a single town on a main line. It's been on the back of my head for many years now. A generic Quebec South Shore layout with a generic scenery that can easily accommodate trains from the 1950s to the 2000s without having to change anything more than the depot and the vehicle. Based on CNR Monk Subdivision, but that can accept classic Canadian Pacific, Quebec Central, MMA, CMQ and even some Northern New England roads such as BAR, MEC and CVR. By keeping it mundane, I make sure I no longer need to waste time deciding which prototype I want to model (I have the club layout for that) but focus on trains themselves. Bear in mind it's not about trying to cram every railway fantasy I have on a plank of plywood, but rather creating a plausible frame that can accept most of my favourite aspects in this hobby. Instead of cramming a 150km long railway subdivision on a layout, I decided to recreate a glimpse of a 120km x 120km geographical area where several of my favourite railways operates in the same Appalachian environment.

With that said, I'm glad to announce I've reached the stage where the layout is now starting to look like something. Today, the staging yard plywood was cut and installed, ready to receive the track and wiring in the very near future. I'm also eager to start working with splines for the first time of my life. To reach that point, I've changed my approach by applying the 80/20 rule. Generally, I would try to get everything perfect before moving to another step. While praise worthy in some circumstances, it leads to serious waste of time and even death of projects. At this point in my life, I know I have enough skills to make up for mistakes on the course of a project. Trying to be Leonardo Da Vinci to paint a vaguely impressionistic backdrop with latex paint is an exercise in futility. I did my best and identified a few spots that may need retouching later on when scenery will start to be applied.


Only 3 tracks remain in the yard, with possible extensions


I've also made bold choices with staging capacity. Instead of building a very complicated hidden staging yard, I decided to create a surround staging with only three tracks. These tracks are about 4" lower than the town scene which means I don't really have to bury them for invisibility sake. Takes a lot of stress out, make the project much easier to build and there is still a possibility for expansion if required.

Not perfect, but this light haze is at least a starting point

As for the layout itself, after building the staging level, I staged a typical passenger train and was surprised how small it looked on the layout. Far to be a negative, this is a welcomed discovery since it means the layout will look larger than it is and will capture that feeling of open space I'm looking for. I have no idea how it will really look once done, but I can tell it will be a very, very low track density layout at this point.