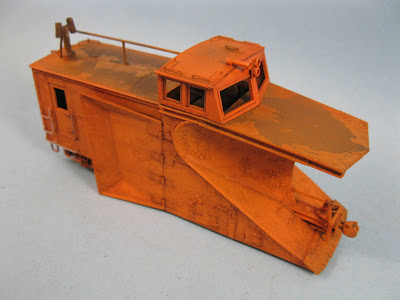
The third installment in this series is about applying the lessons learned by experiment on the model itself. It must be stressed using such unorthodox ways of painting a model isn't for the faint of heart and I felt, more than once, I was ruining the model.
First, I covered the entire model with a darck camouflage brown to create a contrasting underlayer. This provides depth for the later crackling effects.
After careful experimentation, I elected to use Citadel Egrellan Earth as my main texture paint to create chipping effects. Vallejo Crackle Medium would be only used sparingly on some spots were peeling wasn't that much present. Instead of covering the entire model and wishing for the best, I applied the crackle paint by small patches, generally 1 inch square, to control how the effect would develop. This gave me enough leeway to do touch up and learn how the paint was reacting to the model complex surface. By the end of the process, almost all the shell was covered with thick Citadel paint.
Since paint of the roof of the prototype is almost completely flaked off, I only applied the texture is a few spots using pictures to give some hints. The crackling paint was also applied to a few rods and railings, giving them a neat texture.
When everything was dry, I applied a custom faded CN orange mix consisting of Vallejo Clear Orange and Light Orange with a few drops of white. It would have been useless to waste prototypical paint on such a model because the real paint on the snow plow is almost 40 years old and has considerably shifted since the last repaint.
I made sure the airbrush was operating at a low pressure and I built up several light coats spraying them from a glancing angle. The goal was to not flood the crevices and hide the dark undercoat. It could have been to risky to paint with a thick coat and completely lose all the fine crackling effect.
 |
| Applying the pin wash around the details |
 |
| Removing excess wash and feathering the effect |
Then the paint was dry and hardened, a burnt umber oil wash was applied to flood the cracks and rejuvenate the effect a little bit. The same mix was also used to pin wash details, including access hatches, mechanical devices, hinges, rivets and other prominent features. I let it sit for a few minutes and came back with a clean soft brush wet with a tiny amount of odorless turpentine. Carefully, I cleaned up the mess where the wash was applied to create soft transitions and remove excess pigment from the mode.
I then let it dry overnight and coated the model with Dullcote. It will both protect the finish but also make sure the chipping effect won't start to flake off, which could be possible.
In the next installment, we will cover the weathering the model and adding decals.


That is fantastic. I need a tetanus shot just from looking at it!
ReplyDeleteThanks for your kind words! Hope you'll survive until the model is completed!
Delete