If windows are the eyes of a building, then it isn’t too far fetched to think of a roof as someone’s haircut. It defines its personality.
 |
| Shingles, ridge caps, vents and gutters give identity to this station |
When I built the roof substructure of the station, I used 1mm thick styrene from an old rolled sheet I purchased years ago in bulk. Unfortunately, this sheet was rolled for years at the store when I got it at discount with the caveat of being deformed almost permanently. Using a hairdryer, I did my best to straighten the styrene, but there is a limit to want can be achieve and when glued in place, some deformation generally settles after a few days. I already knew about it, so I planned to add another layer of material with shims to take care of everything later.

Pencil lines help to make sure there is no need to cut or fold shingles
The first
part of the roof to receive decking was the eaves. Using a 0.5mm, I
embossed a pattern of plank with a steel awl to give some realism to the roof.
I carefully measured the width of the eaves so I wouldn’t have to cut shingles
to fit the space. Since the roof has two different pitches, it was necessary
the change of angle happened right after a row of singles to get a clean result
later.
 |
| Scribing lines to get a plank effect under the eaves |
The cardboard
planking was then carefully glued to the rafters with CA. However, I didn’t
want to waste material trying to figure out the right angle at each roof corner.
To make my life easier, I used small 2 inches section and built the corners
first, then I filled the remaining space with additional cardboard sections.
With joints located right in the middle of a rafter, they are virtually
invisible.
Then, several
shims were used to level the styrene subroof and a new layer of 0.5mm carboard
added. Why cardboard? Because self-adhesive shingles stick much better on cardboard
than styrene and it is easier to glue. Laminating large sheets of styrene is
always a tricky endeavour and I didn’t want cement solvent creeping everywhere
and messing the stone paint job.
It was now
time to add styrene fascia glued to the rafters. Then, gutters made of U-shaped
styrene profiles were cemented on the fascia. To make them more realistic, I added
a chamfrain at the bottom to get a more prototypical gutter profile. It’s easy,
and they look far less bulky! I primed and painted the fascia and gutters
before going further. They will require later touch ups, but it was easier to it
now before too much fragile stuff was added to the roof.
From that
point, it was time to add shingles. I generally use Rusty Stumps self-adhesive
shingles, but many other brands are available. Their only big problem is their
color is solid and lack texture and color variation found on real asphalt
shingles… and their ridge caps are unrealistic at best! More on that later.

Eaves design using shingle dimensions make life easier
Before
gluing shingles, it is generally advisable to draw reference lines on the roof
to make sure everything will align correctly. Nothing ruins more a scale model
than unrealistic wavy materials. To save myself some pain, I draw the lines
before gluing the subroof. Much easier to do and gives better results. It is
also why I was able to get a perfectly balanced number of shingle rows on the
roof with no need for a weird half-cut row on top of the ridge. Planning before
hand always pays up later on.

Pencil lines to align shingles
Applying
shingles is a very long task, particularly when dealing with a 18-inches long
structure. I believe it took about 8 hours. Fortunately, if you use reference
lines, it becomes quickly a relaxing occupation. However, my friend whom I’m
building this station for ordered not enough shingles to cover the roof. The
fault is mine, I erroneously estimated the surface to cover basing my calculations
on what I consider faulty information provided by the manufacturer on their
website. Maybe I’m too dumb to understand what the instruction means, but
everything I redid my estimate, it never matched the real coverage a sheet of
shingle could do. Go figure out.

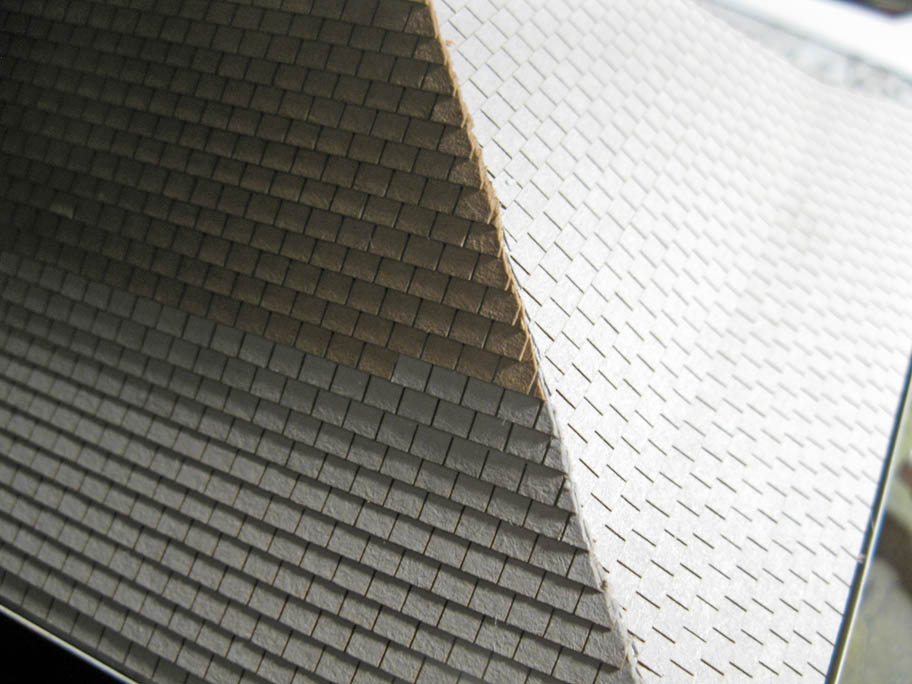
A full side completed.
So, I was
left with a big dilemma… Order more pearl grey shingles, waste time and money,
at the expense of losing complete interest in the project while it sits on my shelf…
or simply be creative and take another route. I opted for the second option. I
still had brown and dark gray shingle sheets from other projects. Since I
already wanted to weather the roof, it was a no brainer to simply use all the shingles
I had, whatever their color, and repaint everything. I know railway modellers
aren’t that much fan of painting some material they deem realistic. But after
seeing Martin Kovac painting ground and static grass, I’ve been convinced there
is always another way out when it is time to deal with colors.
Once shingles are cut to size, it's time for ridge caps
I already
said I find commercial ridge caps to be… a joke. They are. In real life, ridge
caps are made of several individual shingles overlapping each other. Due to
limitation in manufacturing process, most companies simply go for a solid ridge
cap made of a single piece of cardboard. Yes, very efficient, but bulky and
unrealistic. After putting so much effort on that station, I thought I would make
mines.

Copy paper is scribed to create ridge caps
I had two
choices: cut individual paper shingles and apply them individually, or simply use
a sheet of paper embossed with a shingle pattern. The former option would be
more realistic, but in HO, it would be time consuming, and I was afraid it
would be hard to get a perfectly aligned row of shingles on relatively uneven
roof ridges. The later seemed more practical while yielding decent results.
With some paint, shadows and highlights, it would be possible to create an
optical effect of individually applied shingles. So, I opted for that method
and it was fast!

Ridge cap cut to length and folded, ready to glue.
Finally,
when the roofing was done, I added vents on the roof. Most are old DPM kits
leftovers. At first, I thought drilling the roof would secure them better, but
I quicky found out shingles, cardboard and styrene drilled at an angle was a
recipe for a disaster. I simply glued them directly on the roofing with CA. I
secure the shingles under the vents with CA too to get a strong bond. It
certainly will need a careful handling, but if something happens, it’s an easy
fix.

Ridge for eaves are angled before being glued
Honestly, I’m
pleased with the completed roof. It really gives a railway vibe to the building
and it’s now instantly recognizable as Drummondville station and not some generic
Walthers kit. The roof vents, though simple, also add some interest to a vast
boring gray surface. I could go further with detailing, but I’m not sure I’ll
venture that far right now.

A few vents to add some life to the roof
In the next
installment, we will explore windows, doors and venetian blinds!
This is outstanding modeling.
ReplyDeleteJim at JSSX.
Thanks Jim!
Delete